

The Ergon TP1 Pedal Cleat Tool is a foolproof way to guarantee your cleats are perfectly aligned, every time. It does need some attention to the instructions, and there’s a knack to it, but overall it’s far better than the Eye-O-Meter of yesteryear.
If you do a four-hour ride, you’ll mash each pedal about 20,000 times. That’s 20,000 flexions of your knee, ankle, and hip joints. If you ride once a week, that’s a million pedal strokes a year. It doesn’t take a genius to realise that if your foot isn’t in the right place, at the right angle, you’re risking picking up an injury to a joint, ligament or muscle – and that’s then an injury that will at best never go away, as each pedal stroke compounds the problem.
> Find your nearest dealer here
A bike fitter will pay close attention to your foot and knee tracking – literally, to the millimetre – to ensure your foot is moving up and down in the right plane relative to your hip. Recorded, repeatable shoe-cleat alignment is therefore really important to avoid picking up an injury over time.
The problem here is that cleats are disposable items – if you’re riding often, it’s likely you’ll need one or two new sets each year. So how do you guarantee that the five-minute job of replacing cleats doesn’t introduce errors in cleat placement that, over time, could see a significant drift of foot position away from the optimum?
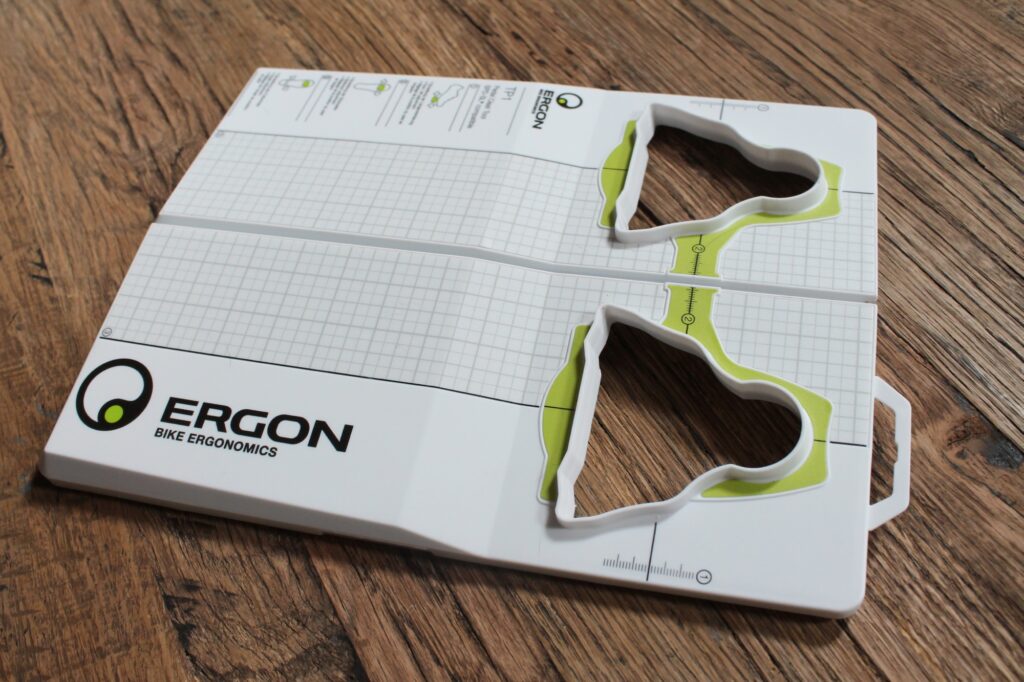
Enter the Ergon TP1 Pedal Cleat Tool…
It’s a pretty simple idea: the cleat’s bolted loosely to your shoe and goes in the hole. Then you move the shoe around in three axes – back/forth, sliding left/right, and finally twisting the heel left/right. The markers on your shoe point to the scale/grids on the tool. Once it’s in the right place, you lock the bolts down without removing the shoe from the tool.
The first step is to identify your first metatarsal joint – that’s the big bulge where your big toe attaches to your foot, often called the ‘ball of your foot’. With your foot in the shoe, you affix one of the provided green sticky arrows to the outside, directly in the centre of the ball. This then forms the reference point, under which the pedal axle needs to go for optimal power transfer. Another sticker goes on the rear of the heel of your shoe, in line with your achilles tendon. So two stickers per shoe.
Bike fit opinion seems divided on where the axle should go relative to the metatarsal joint – some say further back, midway between the big toe and the little toe (fifth metatarsal) joint. The Ergon tool doesn’t replace the advice of a professional bike fitter and, as ever, if it feels weird, adjust and/or seek advice.
> 9 ways to make your bike more comfortable
It’s these stickers that are critical to the repeated alignment process. Every time you replace the cleats, you need to mark your shoe, to ensure you are putting it back in the same place after replacing the cleat. If you are swapping the fit to a new pair of shoes, you need to ensure you’ve done the ‘Find My Ball/Heel’ step the same as the very first fit.
In the pack you get six stickers, on an easy-peeling sheet. Once you’ve used them they peel off your shoes easily, and go back on the sheet for next time. I removed and replaced them a dozen times and the glue still worked fine – so I can’t see them wearing out before you do. Of course any sticker or even soft pencil or marker pen will do the trick.
> The importance of a bike fit and riding position
There’s a knack to tightening down the cleats without skewing the shoe relative to the tool markings – I found sneaking up on the torque by going between the bolts a few times gave an accurate fixing, instead of just cranking down on one then the next. As the tool is open underneath, you just slide it forwards off the edge of the table or bench to expose the cleat bolts without disturbing the shoe/tool alignment.
When not in use, the instructions and stickers hide inside the folded tool, which then can hang on a wall for next time you need new cleats. I won’t say the instructions are perfect – Ergon could use some help to more clearly tell the story here. Ergon has some good videos which are far better to watch than the instructions are to read.

If you’re doing a new installation you shouldn’t expect a perfect fit on the first go – Ergon states in the video that most people will need to do a test ride and then adjust. The tool certainly makes this process much quicker and more accurate.
I’d recommend using a sheet of paper to record your cleat fit notes and keeping that with the tool – otherwise it’ll be lost when you come round to replacing them next year.
Ergon does four other tools in the range – for Shimano SPD (mountain bike), Crank Brothers, Look Keo and Speedplay. So you’re pretty much covered no matter what pedals you ride.
Value
Now £19.99 may seem a bit much for a bit of plastic – it’s the RRP of Shimano SL cleats, and about the price of the other cleats they cover – but if you’re spending 20 quid on cleats every six months because you’re riding a lot, an additional 20 quid once in your lifetime to buy the correct tool to align them correctly when swapping them isn’t really a big investment.
Previously I’ve used the Eye-O-Meter for cleat replacement, or a marker pen to trace around the old cleat to get the new cleat in place. The marker pen trick is pretty accurate – assuming you had the positioning correct in the first place, and equal across both shoes. If you’re going to a new pair of shoes, especially a different model, then all bets are off as in that case there’s no reference.
> idmatch Cleat Fit: the high tech way to position your cleats!
There are very few other options to get your cleats perfectly aligned, and they are all considerably more expensive. Shimano’s own TL-SH11 Cleat Setting Tool does both SPD and SPD-SL, but it’s around £130. The boutique Velobene CleatMaster tool only does one kind of cleat, and is a toe-curling $380 plus shipping per cleat type from the US.
Conclusion
Overall, for the price of a few coffees and cakes, for guaranteed correct cleat placement, replicable replacement and injury prevention, the Ergon TP1 Cleat Tool should be on every serious cyclist’s tool list. Given how often it’s used and the fact that it’ll never wear out, maybe buy one with your riding buddies and pass it round as needed. Or rent yours out for the price of a mid-ride espresso. However you get hold of one, just do it. Be nice to your joints – they’re likely going to do a few million revs for you this year.
Verdict
Replicable cleat placement that allows for experimentation with millimetre accuracy
All the deals displayed on our review pages are pulled from a constantly updating database feed of the best affiliate deals available. The criteria for deciding on what are the best deals is who is offering the lowest, delivered price. In most cases we will be showing the very best deal available online, but sometimes you may be able to find an item cheaper. If you can please feel free to post a link in the comments box below. To find out more about affiliate links on road.cc click here.
road.cc test report
Make and model: Ergon TP1 Pedal Cleat Tool
Size tested: Shimano SPD-SL
Tell us what the product is for and who it’s aimed at. What do the manufacturers say about it? How does that compare to your own feelings about it?
Ergon says: “Correctly installed cleats are noticeable from the first ride with the rider experiencing more power, more comfort, and more efficiency. The Ergon TP1 allows for the accurate adjustment of the three axis which are important when installing cleats: fore/aft position, the stance (Q-Factor), and foot angle. While pedaling, leg power is transformed over your feet into propulsion. Therefore the right position of the feet is of the utmost importance, as it determines performance and comfort. The TP1 is the first tool for the precise and easy adjustment of cycling cleats. It is used by many professional teams and bike-fitting specialists around the world.”
Tell us some more about the technical aspects of the product?
From Ergon:
TP1 Shimano SPD – SL®
Use: Road Racing
Size: One Size
Shoe Size: One-Size-Fits-All
Material: Tech. Polypropylene
Really solid construction.
Assuming you follow the instructions, it does exactly what it says on the tin.
Tougher than boots – this will probably live longer than you will.
There are very few other options to get your cleats perfectly aligned, and they are all considerably more expensive. Shimano’s TL-SH11 Cleat Setting Tool does both SPD and SPD-SL, but it’s around £130. The boutique Velobene CleatMaster tool only does one kind of cleat, and is a toe-curling $380 plus shipping per cleat type from the US.
Here, for the price of one set of cleats, you can guarantee every future pair gets fitted correctly.
Tell us how the product performed overall when used for its designed purpose
Once I understood what to do, the process is easy and accurate.
Tell us what you particularly liked about the product
Accuracy. It’s all about accuracy.
Tell us what you particularly disliked about the product
The insteructions need work.
How does the price compare to that of similar products in the market, including ones recently tested on road.cc?
Way, way cheaper for similar functionality. The shoe-brand ones start at over five times the price.
Did you enjoy using the product? Yes
Would you consider buying the product? Yes
Would you recommend the product to a friend? Yes
Use this box to explain your overall score
If the instructions were clearer I’d give it 10/10. The alternative cleat tools from shoe manufacturers cost ten times as much, and look to do much the same.
About the tester
Age: 46 Height: 183cm Weight: 72kg
I usually ride: Merida Ride 5000 Disc My best bike is: Velocite Selene
I’ve been riding for: Over 20 years I ride: A few times a week I would class myself as: Expert
I regularly do the following types of riding: cyclo cross, club rides, general fitness riding, mtb, Dutch bike pootling.


1 thought on “Ergon TP1 Pedal Cleat Tool”
Good idea, well executed.
Good idea, well executed. This is something you really need to do at home rather than with a bike fitter I think, because there’s a lot of trial and error to get the initial setup, takes hours. And knowing that you can reproduce that fine-tuned setup means it’s worthwhile spending all that time to get it just right.
Comments are closed.