- News
- Reviews
- Bikes
- Accessories
- Accessories - misc
- Computer mounts
- Bags
- Bar ends
- Bike bags & cases
- Bottle cages
- Bottles
- Cameras
- Car racks
- Child seats
- Computers
- Glasses
- GPS units
- Helmets
- Lights - front
- Lights - rear
- Lights - sets
- Locks
- Mirrors
- Mudguards
- Racks
- Pumps & CO2 inflators
- Puncture kits
- Reflectives
- Smart watches
- Stands and racks
- Trailers
- Clothing
- Components
- Bar tape & grips
- Bottom brackets
- Brake & gear cables
- Brake & STI levers
- Brake pads & spares
- Brakes
- Cassettes & freewheels
- Chains
- Chainsets & chainrings
- Derailleurs - front
- Derailleurs - rear
- Forks
- Gear levers & shifters
- Groupsets
- Handlebars & extensions
- Headsets
- Hubs
- Inner tubes
- Pedals
- Quick releases & skewers
- Saddles
- Seatposts
- Stems
- Wheels
- Tyres
- Health, fitness and nutrition
- Tools and workshop
- Miscellaneous
- Tubeless valves
- Buyers Guides
- Features
- Forum
- Recommends
- Podcast
review
£62.99
VERDICT:
For around £60 – or less – the Park Tool DAG-2/2.2 will meet the needs of all but the pickiest of home mechanics
Weight:
900g
Contact:
At road.cc every product is thoroughly tested for as long as it takes to get a proper insight into how well it works. Our reviewers are experienced cyclists that we trust to be objective. While we strive to ensure that opinions expressed are backed up by facts, reviews are by their nature an informed opinion, not a definitive verdict. We don't intentionally try to break anything (except locks) but we do try to look for weak points in any design. The overall score is not just an average of the other scores: it reflects both a product's function and value – with value determined by how a product compares with items of similar spec, quality, and price.
What the road.cc scores meanGood scores are more common than bad, because fortunately good products are more common than bad.
- Exceptional
- Excellent
- Very Good
- Good
- Quite good
- Average
- Not so good
- Poor
- Bad
- Appalling
The Park Tool DAG-2 (or the newer 2.2) is a shop-quality derailleur hanger straightening tool that will help keep your gears changing perfectly. Rent it to mates for beer money.
Find your nearest dealer here
Buy this online here
If your bike has a rear derailleur, at some point it's going to get hit. This is a given of storing, transporting and riding a bike. The derailleur is perfectly positioned to catch door frames, gates, roots, rocks, kerbs and a multitude of other immovable objects, be banged against other bikes, be dropped or crashed, and it's attached to a part of your bike that's nowadays usually designed to bend so your frame doesn't - the derailleur hanger. You'd much rather replace a £20 hanger than a £500 frame, right? Hence it's usually made of a softer metal than your frame.
So far, so sacrificial. But you also want accuracy in shifting, along with quiet. Noise = lost watts, accelerated wear and justified derision from clubmates. An 11-speed cassette has just 2.18mm between sprockets, with overlapping chain plates totalling 1.8mm needing to fit between, without excessively rubbing against the sprocket it's on or either neighbour. That's less than 0.4mm of room for error. And the derailleur has to be indexed. And the top jockey wheel needs to feed that chain onto your smallest sprocket at nearly 100 joining pins per second if you're maxed out in top gear on a modern compact drivetrain. All this while transmitting anywhere between 100 and 1000 watts of power and being jolted up, down and sideways by the UK's quality road 'surfaces'.
As Caroline Stewart (top mechanic and handy with a sword) puts it - 'Here Be Dragons'. If your drivetrain is making unfathomable noises or won't index no matter how much you swear at it, tweak the limit screws or twiddle the barrel adjuster, chances are your hanger is bent. The design tolerance of a hanger if extended all the way out to the rim is 4mm, but the problem is they are only 3cm long – so you're trying to spot 0.4mm of vertical hanger misalignment.
If your hanger is radically bent it might be possible to assess alignment by getting behind the bike and eyeballing it compared to the rim, but the problem is your hanger must be aligned both vertically and horizontally – and as the hanger is much narrower back-to-front than up-and-down, this is simply impossible to do by eye. Yes, you can swing it back and forth with a large wrench or a 5mm Allen key stuck into the derailleur bolt, fitting and re-fitting the derailleur to see if you've got it right this time, but this is guesswork, and somewhere a Bike Workshop Fairy just died. Sooner or later you're going to damage the hanger, hanger thread or bolt through repeated screwing and bending.
So you need a hanger alignment tool, or access to one via a friend, clubmate or bike shop. This is not an optional extra, a bike toolset nice-to-have – it's essential to achieving optimal shifting and minimising noise/wear. Checking and aligning your hanger is the very first thing to do when launching into drivetrain work; without a straight hanger, everything else – derailleur adjustment, cable replacement, gear indexing – they are all going to be built on an inherently inaccurate, misaligned base and will never work in an optimal fashion. If your shifting seems out and a basic check of the indexing doesn't resolve it, you need to confirm the hanger is straight.
With an rrp of £62.99 for the new 2.2 version (and prices online of around £40 for the DAG-2), the DAG sits in the middle ground of alignment tools. Most bike shops will own at least one, and for home mechanics it represents a spousal-budget-approval-friendly addition to your pegboard.
How it works
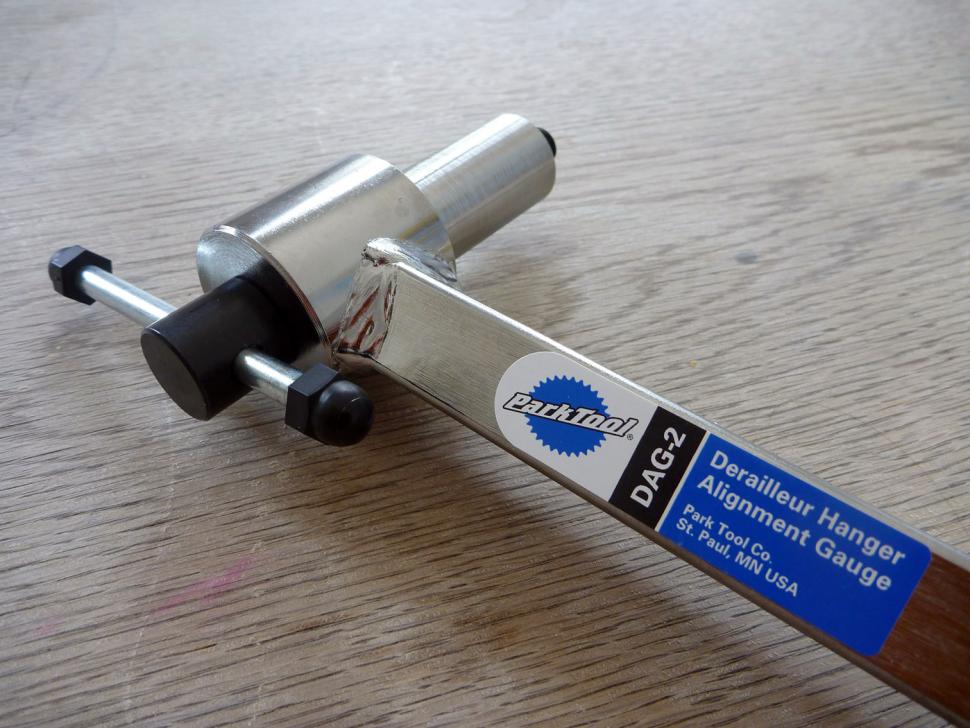
The DAG-2 is effectively two tools in one. Firstly, it's a gauge to measure how far out of true your hanger is. Secondly, it's a strong lever to bend the hanger into true. At the threaded head there's a large-diameter bushing with rebuildable parts – as with most Park (Tool) tools, parts are available to extend the life of the tool. This is a good idea as the thread that screws into the hanger should always be in good nick – you don't want to risk damaging the soft thread through use of a worn tool, which will also be less accurate in use.
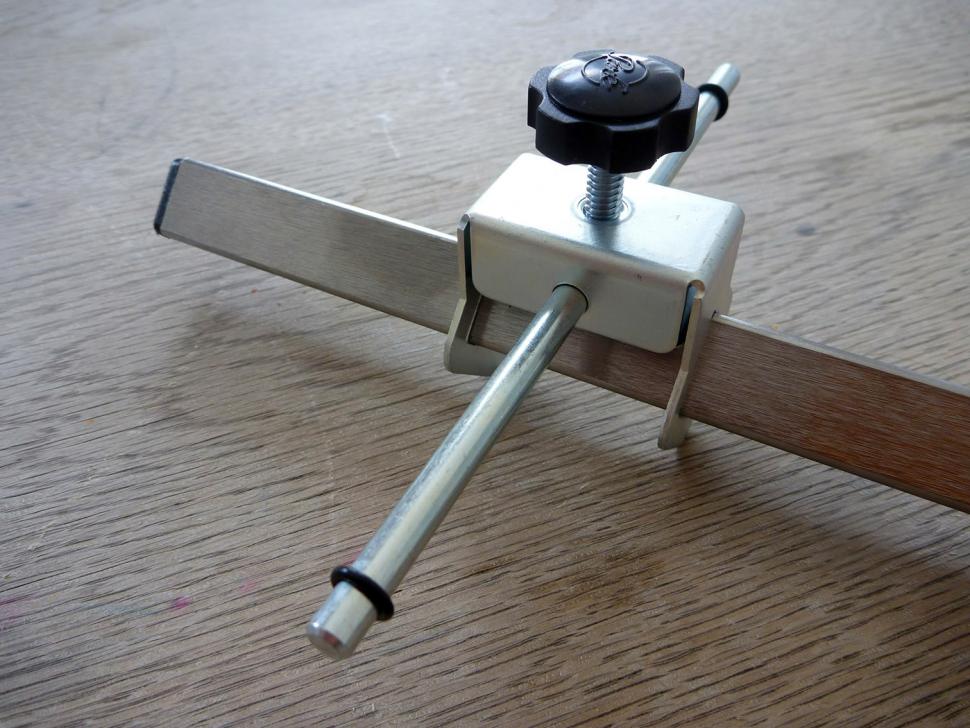
At the other end of the tool is a sliding gauge, with an arm that slides in and out to perform the measuring. This has two rubber rings on it to assist with repeated measurements.
The process of aligning your hanger starts with removing the derailleur after shifting into the smallest sprocket/ring to minimise chain tension. The DAG-2 is carefully screwed on, and the gauge is shifted to the nine o'clock position, the arm horizontal and rearmost. You spin your wheel to align the tube valve at the same spot, and keep this valve-gauge reference throughout the process. This means the trueness of your rim does not affect the end result – your rim could be out by a considerable amount around its circumference and, particularly with disc brakes, you might not notice.
Move the sliding rod back and forth, in and out until you get the tip just touching the centre of the rim sidewall. Push the rubber ring on the rod up to the body of the slide, where it acts as a marker for the next measurement. Then slide the rod back out, slide the gauge inward, and rotate the whole lot 180 degrees to the front of the wheel, just below the chainstay and repeat the process. Spin the wheel to shift the valve at the same time. If the tip of the rod is now more than 4mm too far in or out from the rim, you need to straighten the hanger. The distance you need to adjust is half that shown by the rod, as you will be adjusting the reference point at the previous location at the same time.
The process of bending the hanger is one you pick up quickly, and the secret is to start small – the malleability of hangers will be different across different materials and thicknesses. Bend, check, bend again, check again. Once you think it's right, reset the gauge at this new point and go back to the start to verify. The process is then repeated for the vertical plane, by starting at the bottom and progressing to the top, spinning the valve to follow each time.
The sliding rod means you can clear any mudguard or rack stays. With practice you can have a hanger aligned and the derailleur back on in a minute or two, satisfied that any subsequent work will be on an accurate base.
Real-world results
Prior to getting the DAG-2 for review I prided myself on my 9-speed gear setup. Always using slick, stainless cables and new outers every 1000km or so, perfectly lubricated derailleur pivots, indexed as per Shimano's instructions. What I didn't know was how inherently out my hanger alignment was, and what that meant for shifting. I was used to a certain level of shifting accuracy, speed and chain noise, thinking things couldn't get any better without jumping up a groupset or two.
Using the DAG-2 was a revelation. Immediately the shifting was noticeably faster in both directions, and the chain ran quieter. It was one of those 'I can't believe I waited so long' moments. Working on a friend's 10- and 11-speed bikes gave similar results. When paired with a fresh set of cables, what I had thought to be good shifting became great, and great shifting became almost telepathic.
A bike shop will charge you maybe £10 for a hanger alignment - and should carry one out by default as part of a new build-up, replacement mech or gear indexing (if they don't, consider finding a new bike shop). If you have a number of bikes, ride one or several often, mountain biking or road, and like a bit of DIY, then you should consider investing in a tool like the DAG-2. It will pay for itself in terms of bike shop savings, from beers earned lending to friends or checking their bikes for them, and from general smugness knowing that your drivetrain is working as best it can. And the alignment process is so quick you can do it pre-ride in a minute or so, should someone be concerned their shifting isn't quite right.
For 2016 Park has updated the DAG-2 to the DAG-2.2. The distance gauge and arm remain the same, the key difference is a redesigned head that affords better clearance for screwing into hangers where there's a lot of protruding metal nearby. Park has also increased the diameter of the shaft that screws into the hanger from 14.4mm to 16mm, and claims an improvement in accuracy. It has stuck with the same 4mm tolerance at the rim, though, and I couldn't discern any difference in use, so that benefit is moot. No one knows what happened to the DAG-2.1. Best not to ask really.
The rise in disc-braked bikes and associated thru-axle hangers makes clearance an issue that's not going away any time soon, so the DAG-2.2 is a timely update for this venerable workshop workhorse.
If you use traditional QRs and have a traditional-looking dropout area then the DAG-2 will do you right, while it's still available.
For performance at a palatable price, the DAG-2 (or 2.2) is hard to beat. Two notable hanger alignment tools in the 'Lust' category of tool geekdom are the Abbey Tools HAG and the Efficient Velo Tools Tru-Arc – but they cost £165 and £366 respectively and sport tolerances approaching 1/4 of 1/1000 of an inch (that's 0.00635mm in new money, or 'gnat's testicle' for the hoi polloi). For £63 the Park Tool DAG-2/2.2 will meet the needs of all but the pickiest of home mechanics.
Verdict
For around £60 – or less – the Park Tool DAG-2/2.2 will meet the needs of all but the pickiest of home mechanics
road.cc test report
Make and model: Park Tool DAG-2/2.2
Size tested: n/a
Tell us what the product is for, and who it's aimed at. What do the manufacturers say about it? How does that compare to your own feelings about it?
It's for anyone who rides, regularly, and wants the best-possible shifting experience but not at a bank-breaking price.
Park says:
"The DAG-2.2 is an indispensable shop tool that can be used to both measure and straighten misaligned derailleur hangers solving a high percentage of shifting problems."
Tell us some more about the technical aspects of the product?
Gauge bar made of heavy gauge, chrome plated steel
Adjusts to fit 20" to 29"+ wheels
Replaceable threaded tip
Upgraded large inner shaft for added strength*
Tighter tolerances for improved accuracy*
Improved clearance and reach to fit more frame/hanger combos including low clearance thru-axle derailleur hangers*
Rate the product for quality of construction:
9/10
It's built like the brick proverbial. Should zombies attack the workshop, this would be my go-to defensive weapon.
Rate the product for performance:
8/10
Performance in this regard equals accuracy. The DAG-2.2 does the job - not as accurately as the pricier options, but well enough for 99.999% of fettlers.
Rate the product for durability:
9/10
The only loss on durability is the black rubber rings – they are easily lost.
Rate the product for value:
10/10
For the money, the DAG-2.2 is excellent value.
Tell us how the product performed overall when used for its designed purpose
Very well. Only very infrequently would I want for more accuracy or tighter tolerances to aid more precise bending.
Tell us what you particularly liked about the product
The overall vibe/value proposition. I like that for £60 it sorts even horrific shifting issues in a few minutes.
Tell us what you particularly disliked about the product
The slide on the gauge is pretty agricultural – sheet steel spring on metal. You quickly get used to it, but the more expensive options featuring machined sliders are much nicer.
Did you enjoy using the product? Yes
Would you consider buying the product? Yes
Would you recommend the product to a friend? Yes
Use this box to explain your score
'Perfect' in the world of hanger gauges is reserved for the likes of the Abbey Tools HAG or Velo Tools workshop candy. The DAG tools from Park are built very well, but still to an affordable price point – with compromises in the distance gauge assembly friction slide and rubber marker rings in particular. Therefore, four out of five. But don't be fooled – it will do the job, no problem.
About the tester
Age: 42 Height: 183cm Weight: 72kg
I usually ride: Charge Juicer My best bike is:
I've been riding for: Over 20 years I ride: A few times a week I would class myself as: Expert
I regularly do the following types of riding: club rides, general fitness riding, fixed/singlespeed, mountain biking, and Dutch bike pootling
Living in the Highlands, Mike is constantly finding innovative and usually cold/wet ways to accelerate the degradation of cycling kit. At his happiest in a warm workshop holding an anodised tool of high repute, Mike's been taking bikes apart and (mostly) putting them back together for forty years. With a day job in global IT (he's not completely sure what that means either) and having run a boutique cycle service business on the side for a decade, bikes are his escape into the practical and life-changing for his customers.
Latest Comments
- momove 3 hours 9 min ago
Agreed. I've got four of the Elite Jet Biodegradable bottles - not the exact bottle reviewed here - though same shape, size and mouthpiece....
- Dnnnnnn 3 hours 43 min ago
I do wish the reporters would challenge some of the claims made, e.g....
- ktache 5 hours 14 min ago
More https://www.theguardian.com/sport/2025/jan/27/germanys-world-track-cycli...
- matthewn5 5 hours 17 min ago
I've got dynamos running B&M StVZO compliant lights. They are bright, but they have a hard upper cut-off so they don't dazzle. They light up...
- ktache 5 hours 49 min ago
Two of the key features are 18 and Not included...
- chrisonabike 6 hours 9 min ago
A very different situation I think we can all agree - less violence and generally less of the extreme violence on all sides. Certainly a vastly...
- dubwise 6 hours 34 min ago
Do we really need a rehash of a previous article that is only a few days old? Slow day?
- Johnny Rags 6 hours 35 min ago
Yeah. I was reading some comments made on a radio phone in regarding cyclists wearing hi viz and someone had genuinely phoned in to say something...
- matthewn5 6 hours 47 min ago
I've got a dynamo front wheel built locally by DCR with a Light Bicycle AR36 disc rim. I've got another wheelset built by DCR using Light Bicycle...


Add new comment
16 comments
If in a hurry, without the right tool, and you have a spare wheel with a threaded axle, you can screw that into the hanger and use in similar way to the park / lifeline tools. Not as graceful or accurate, obvs.
Funny thing is that the guy in the youtube video suggesting this is wearing a £20 Park apron. Priorities indeed!
Oh. My. God.
I genuinely cannot work out if that is a work of genius or something doomed to trash your threads - how many QR wheels have nice burr-free axle threads on them?. Knowing how much force was required to bend a few hangers I've straightened, I doubt very much a wheel would stay in true for more than one go using it as a lever. To the point where I had to be careful not to brace myself against the handy wheel, and to always use the frame.
You tighten the grub screw so that play is minimised and it still rotates freely. You don't tighten it up so hard you can't turn the arm. Obviously.
I doubt i will need to use the tool the many hundreds or thousands of times that it will require to wear a groove enough for me to have to tighten the grub screw again with a 20th of a turn. If I spent all day, every day, straigtening mech hangers then I dare say I would buy a more expensive tool. Although in that case I would swerve the Park one and buy the Abbey Tools one. None of the cheaper hanger alignment tools are really precision tools while they rely upon moving an o ring up and down the indicator gauge shaft.
Incidentally, i have just been reading a review on Chain Reaction of the Park tool complaining about too much play in the main piviot!
The reviews of the Lifeline one were obviously written by people who didn't understand that there is a grub screw that you adjust to eliminate play. To be fair, there are no instructions with it, so it is an easy mistake to make.
But the Lifeline works perfectly well. I have straightened hangers about a dozen times with it and leant it out to friends. If anyone fancies getting the Park one then good luck to them, it looks a nice tool. I have lots of Park Tools and they are mostly quite good.
As I said above, I actually have the Lifeline one and I have used it many times. My comments aren't based on internet reviews of products that I haven't used!
Chris, the grub screw isn't there to remove play - it's to hold the barrel inside the arm. You undo the grubscrew to remove the barrel for cleaning, lubrication and - in the case of Park - to replace it when worn. If you do the grubscrew up it simply means it doesn't pivot as freely - on a tool whos reason for existing is to do just that.
A side-effect of tightening the grub screw into the channel running around the barrel might be to remove play until it wears down and needs tightening again - but it's just scratching itself to bits.
That'd be all very well except that there are no paired sacrificial bushes/bearing surfaces to replace - it's simply the shaft inside the pivot. So yeah, you can replace the central section that holds the hanger screw, but you can't do anything about wear of the main arm section anyway. Plus the amount of wear that it's gonna get would be pretty insignificant I expect, especially if it's a chromed surface as it appear to be.
The cyclus equivalent has a similar grub screw which appears to take out slop - yup, might eventually wear a channel, but so long as the slop is repeatibly removed around the arc the arm it travels, it should make no difference- and for the number of occasions you'll ever use one it'd take a couple of lifetimes for any wear to appear.
People on this forum don't really seem to understand false economy though, Kiwimike, and will be unable to see past the £££ signs!
Or perhaps sometimes have a valid opinion based on experience which they share in order to assist?
Last I checked Castelli don't make their shirts from hair. Well, okay, merino possibly...
I recently bought the Lifeline one for about £20. I used it to successfully straighten a bent hanger and returned to perfect indexed shifting where previously it wouldn't index no matter how much I swore at it, tweaked the limit screws or twiddled the barrel adjuster.
I can't see that this offers anything over to £20 Lifeline one.
I was going to say the same. I am sure the Park version is very nice but the Lifeline one works fine too and is only around £20. Our family of four all race cyclocross so i am very familar with hanger realignment and replacement!
There's also a Lifeline version for about £20 available which, while not a precision instrument, does the job for occasional use. That said I know the Park Tools version will just be nicer to use but you pays your money etc.
The Lifeline tool is a blatant copy of the Park Tool DAG-2. As such, it doesn't have the clearance that the 2.2 version does for through-axle hangers.
From the relevant Lifeline Review section of a well-known online cycle retailer:
"As other reviewers have said, there's a lot of play in the tool, and this can make it very inaccurate"
"While the product works and sits on my shadow board ready for the next stack; in hindsight I would pay more to not have the play in the main bearing."
"It's not a precision tool as there's about 1/4" (6mm) play when screwed into the hanger. But for the price and its effectiveness, it's good enough"
...and these reviews of the X-Tools version (exactly the same as the Lifeline, just rebranded):
"This does the job but the central bearing is too loose resulting in about 8mm of play at the rim. It's still possible to get the hanger alignment more or less right but you're probably better off trying the Park tool"
"Mostly well designed and made, and it works well. EXCEPT the hanger insertion bolt thread is TOO soft. The thread of the bolt was very easily burred. This can happen when storing the tool in a toolbox where it can knock against other tools and be damaged. The material of the insertion bolt needs to be further hardened. A particularly important improvement as the bolt thread does not come with a removable protective cap"
"What you pay is what you get ! The tool is simply not very accurate and makes me think that I should have purchased a Park tool"
...so the amount of play in the tool is more than the recommended tolerance for the adjustment you're trying to make. Personally, I'd rather spend the extra ~£30 once in my life, have a tool that didn't require making allowance for inherent inaccuracy, didn't require aftermarket faffing with plumber's tape etc to remove play, with a thread that wasn't going to chew up soft hanger material if/when damaged, and also have a tool that's rebuildable - I can't see anywhere you can get spares for the Lifeline tool.
The Lifeline/X-Tools copies seem to be a classic example of false economy - either real-world (possibly damaging hangers through a soft thread, possilby destroying a fixed-hanger frame, possibly through being irreparable should the thread be damaged) or perceived - every time you used it, forever afterward, you'd wish you spent the extra?
...'you pays your money' indeed
I actually have the lifeline one. Having read many of the reviews you reprised I bought it from a well known website with an excellent returns policy so if it was unusable I could chop it in for the Park tools version. It's not a quality bit of kit, but it does work. 30 seconds with an Allen key reduced the play considerably, which is around a centre anyway, and I was able to adjust the hanger successfully. I then put it back in its box and put it away until the next rare occasion on which it will be needed.
Don't get me wrong I like a good tool as much as the next person and own some Park tools however I don't regret buying the Lifeline one, given my 'use case' as they say. Clearly you think differently which is great, diversity of opinion is a valuable thing.
Oh totally. I have boxes of tools* I no longer use, having realised I should have spent more in the first place. Your post just happened to be the first available passing bus to launch a multi-threaded rant against design plagarism and sub-optimal execution.
Tool Snob - moi?
* no, don't ask. The Boy uses them in the garden, distracts him from the proper fruit on the Do Not Touch Pegboard Of Certain Child Death.
The DAG-2 is a great tool and we have three in our workshop
Something all riders and home mechanics should be aware of is that the majority of bicycle brands supply their frames (and bikes) with relatively soft "cast" aluminium alloy hangers. Its not uncommon for these to be slightly bent from new, on many occasions I've taken genuine "brand" replacement hangers from a packet only to find them bent and requiring adjustment with a tool such as the DAG-2
My advice as a professional bike mechanic (and workshop manager) is to always use a higher quality aftermarket hanger when replacing a bent stock hanger.
Wheels Manufacturing is an American brand that CNC machine their hangers in the states from a higher quality aluminium alloy billet. You will £20 for their hanger as opposed to the typical £12-15 for a stock brand hanger, but its money well spent. Any shop in the UK that deals with Madison (i.e. Shimano) can get Wheels Manufacturing hangers no problem.
The result is a near-perfect hanger "out of the packet" and also better shifting, especially on less-tolerant 11 speed transmissions, due to the hanger being considerably stiffer than the softer cast stock hangers. Don't worry, it will still break when required in a crash!
I heard through the UK cycling industry underground that a few UK importers of high-end overseas frames remove the OEM hangers as a matter of course and replace with the WM hangers.