

[Images and video by Steve Thomas]
There’s no doubt that you’ve seen those epic POV videos and reels from the likes of Matt Jones, the Athertons, and so many more. If you’re at all into making ride videos, then there’s a fair chance that you, too, have snared a 360 camera, or are at least considering one. 360 cameras are a little more complex than regular action cams, however, so here’s how I’ve set up mine.
- Insta360 Ace Pro 2 action camera review
- DJI Osmo 360 action camera review
- DJI Neo 2 camera drone review
This article is about the basics of getting decent footage out of your 360 camera, not about producing the next off-road blockbuster… that’s a whole other level! With this in mind, I’ll keep to the essentials, which could well help you along the way.
What are 360 cameras?
True enough, 360 cameras are ingenious and very powerful little things – though they are not magic, as the marketing hype may suggest. They are effectively two wide-angle fisheye cameras positioned on opposite sides of the device. These film independently, and the footage from each camera is stitched together in-camera, and that creates a full 360-degree image/video while also masking out the selfie stick or mount at the stitch line.
You can indeed post full 360 videos on YouTube and Facebook, but few do that as the file sizes and viewing bandwidth requirements are incredibly high. Without a VR headset, they’re not easy to watch. By having this full circle footage, you can pretty much reframe as regular video or create the fisheye/tiny planet footage in an app when editing. Once the basics are grasped, it’s a breeze and great fun.
The great thing is that you are able to reframe, switch camera angles with a twist of your device, then zoom in or out. You never have to worry about stabilisation or missing a shot, or concern yourself with a wonky or imperfect camera angle. This, in my opinion, makes these cameras a genuine game-changer for action footage, and one which enables you to film yourself and your riding easily on the fly.
Many are confused about the whole resolution thing. The latest 360 cameras are largely 8k, which is huge, and double that of top-end action cams from a few years back. However, you are only using a small-reframed portion of that whole 360 8k image, which is why resolution and processing power are so important with a 360 camera. Depending on how much you crop in and how you output the footage, you’ll likely end up with something around 1080p/HD final video, or higher (slightly upscaled) if the output is set up right.
What cameras are out there?
Insta360, GoPro, and now DJI all make 360 cameras, and although I haven’t personally used GoPro or DJI’s offerings, I’d say that Insta360 pretty well leads the arms race here, especially given its intuitive mobile and desktop apps. These are far ahead of the competition and are essential for editing 360 footage.
.jpg)
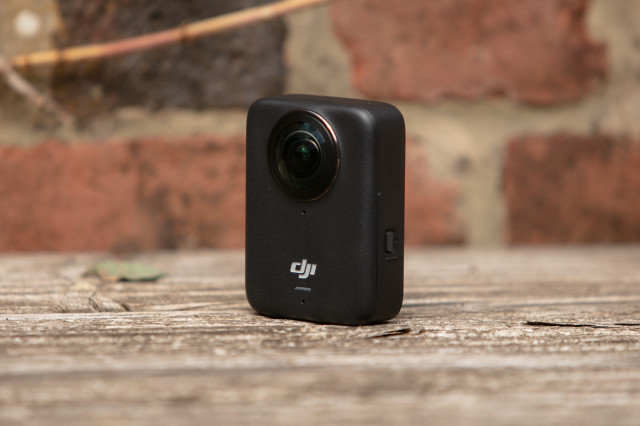
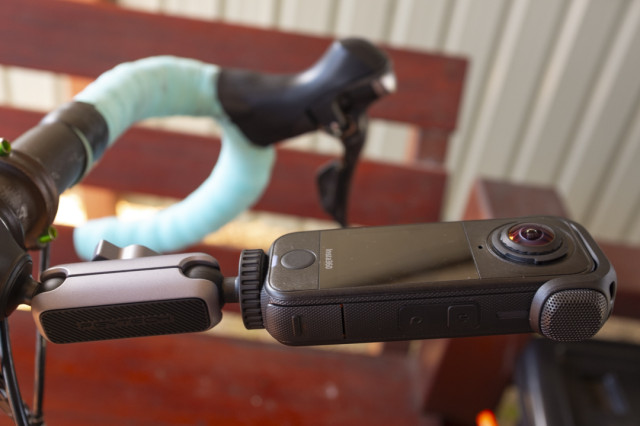
Having done the retro rounds with Insta360 cams and having been on the Insta360 X2 for years, I finally upgraded to the new X4 Air. This is basically a lightened-up, slightly less functional, and more novice-friendly little brother to the X5; although alternatives like the DJI Osmo 360 and the GoPro MAX are worth considering.
Basic settings for your 360 camera
For social media use, I’d set the resolution (detail the camera can capture) to 5.7/6k, which is plenty for most screens, and requires a whole lot less storage space, processing power, and battery life. For YouTube, etc, I’d go to 8k if it’s available on your camera, but this is a balancing act. If you need more storage space, you’ll need to sacrifice resolution, but if you’ve got a large memory card and plenty of processing power, you can go for the full 8k.
Frame rates are always a bone of filmmaking contention, and yet there’s far more to it than that. On a 360 camera, I prefer to go 25fps for regular footage, though 30fps is perhaps more popular – and in truth, few can really tell the difference. The most important thing is to stick to the same (intended playback) frame rate for a whole project, and to export at that rate.
Many 360 cameras offer a range of frame rates. A slower frame rate can be more flattering, making your riding look faster as there are literally fewer frames being captured per second. But if it’s all-out smoothness you’re after, a higher frame rate will achieve that. Also, if you’re looking to shoot slow-motion footage, you’ll need a high frame rate of around 120fps to do so.
Whether you shoot in auto or manual modes, I would advise setting the white balance manually to avoid colour temperature shifts when filming; you can judge this from the camera screen, but 5600K is normal for bright daylight shooting. I also always set exposure to around -3 to -7 EV, to protect the highlights, i.e. less of those blown out (very white) skies. With a 360 camera, this is more important than on a one-directional camera.
In manual, I set the shutter speed and ISO at the lowest possible for the clip, though mostly it sticks at just one speed for a regular single ride shoot. Although auto does a pretty good job, I’d much prefer 15 seconds of well-exposed and unflickering footage over a minute that may, or may not, have 10 seconds worth of good stuff – but, on the fly, I do sometimes let the camera decide these (but still lock WB and -3 to -7 exposure).
Shutter speed is an interesting one that’s worth playing with. A slower shutter speed will result in motion blur, which can look cool when chosen properly, and boost an illusion of speed. However, if the camera shakes a lot, the whole frame can look blurry. If you’re riding faster, you may want to consider choosing a faster shutter speed for clearer footage.
As for ISO, that dictates how sensitive your camera’s sensor is to light, and it affects the overall image quality. A lower number means that the sensor will be less sensitive to light, so it’s great in very bright conditions, as there’s enough light for a good exposure, but it’ll retain good image quality.
Higher ISOs will result in more usable footage in low-light conditions, however, that is at the expense of image quality, as the footage will get noisier with higher ISOs.
If you’re riding in very variable conditions, using the camera’s auto mode may help get more evenly exposed footage.
Of course, this is all up for experimentation, so what works for me may not be the perfect setup for what you’re trying to achieve. Have a play with the settings and get to know your camera to film top-notch footage that suits your style.
Camera positioning essentials
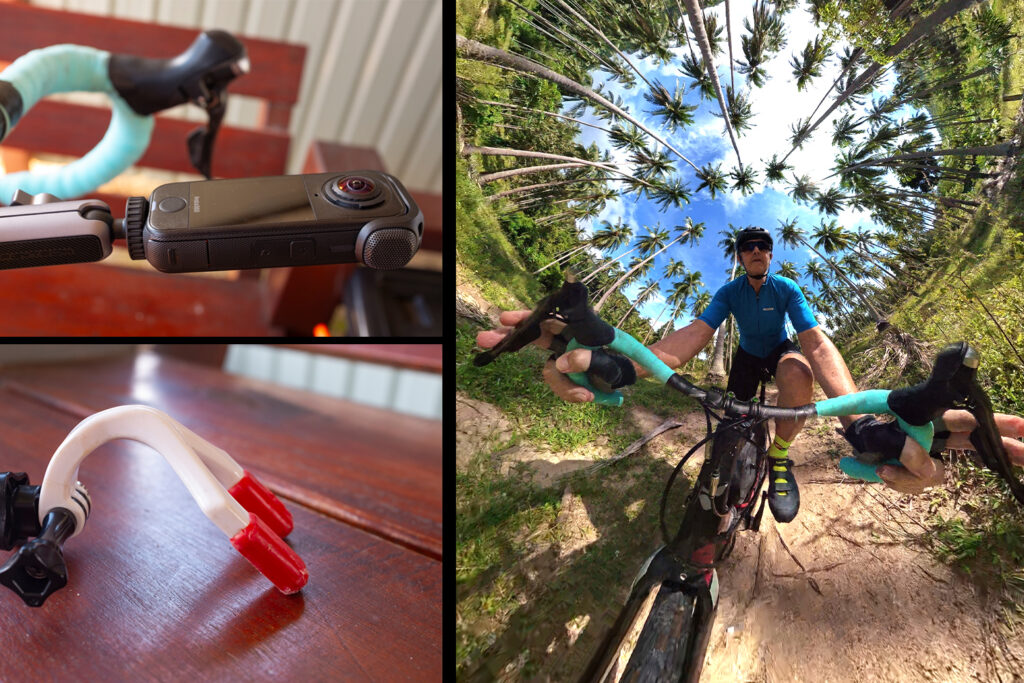
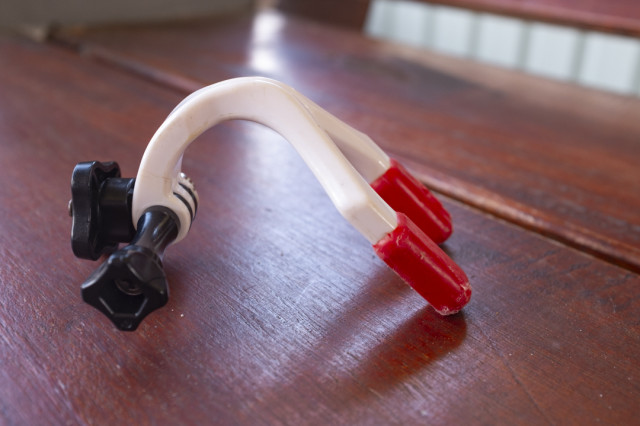
Probably the biggest mistakes I see in 360 footage comes from the camera positioning, with most positioning the camera way too close to themselves and sticking to the standard mount options. For POV footage, I use a cheap mouth mount (not with the actual camera in my mouth), and with the camera front-facing slightly up. The camera does a good job of evening out the lighting, especially in manual mode. This allows for some great reframing flexibility in both regular and vertical video later. You may feel like an idiot doing this, but it works well – and I prefer it to lugging around a chest mount.
For back-facing selfies, it’s a little trickier, and this is probably why you see all those fisheye selfies – with people just using a standard mount on the bars. The camera really needs to be two to three feet out front to be able to reframe into regular video. I’ve used the dedicated mounts, but find too much flex in some selfie sticks, especially when riding off-road.
Mostly, I strap a padded handle selfie stick to my stem/bar and pull it out when filming, which is a little more stable if the going isn’t too rough. When moving this with POVs I also sometimes hand-hold the stick against my left brake lever. Naturally, I can’t advise anybody to do this, and I definitely wouldn’t try it on rough terrain or on an open road/trail, so probably best stick to the regular barstem strap.
Light matters
You should always try to film in good light if possible, though most of us film on our regular rides and in whatever light we’re dealt. Keep in mind that action and 360 cameras can struggle a little with extreme and changing light, such as sun-dappled tree-covered trails, so be sparing with this footage.
The main consideration with a 360 camera is where the sun is, because you are capturing light in every direction. Try and keep the sun out of where you plan to reframe, which may well mean riding a section in the opposite direction. You can also often position the camera so as to block out the sun with your body, although it can be hit and miss if the trail shifts direction. If the sun is directly overhead, raise/drop the camera angle to reduce the impact, and always preview the scene on the camera (or via the connected app if in doubt) and set the exposure accordingly.
Apps and editing
In general, 360 footage needs to go through the camera’s dedicated app to be reframed, stabilised, and stitched – which is where I’d say Insta360 wins out. There are brand-dedicated mobile and desktop apps for this, and while many swear by the desktop Insta360 app, I much prefer the ease and the many extra options of the mobile app. Although you can attain higher resolution on a desktop, if you export correctly, you can get great footage from the mobile app, too.

Hook up the app to the phone via WIFI, from there you can edit directly on the camera/card via the app, though I prefer to download footage and then edit. Once in the app, you’ll see the files. From there in the editor, I always go to pro mode, set the aspect ratio (which you can go back to and reframe in another format afterwards), trim the clip, and then sit back in a swivel chair to reframe. By pressing the red reframe button and holding I’m able to reframe the video as it runs, and to keep it all very smooth. You can also use direction lock that’s available at least on Insta360’s app and DJI Mimo, but I much prefer this method.
Stabilisation, etc, are generally auto-set in the app. I stick with standard colour, check the export frame rate, up the bitrate to just below maximum and export at 1440p. The job is done in minutes.
Keeping it clean
Always carry a lens cloth and wipe the lenses before filming. Being bulbous, they are prone to scratching and attract dust and rain/mud spots, so keep the camera away from these if you can, as a simple spot of sweat or rain can ruin a video. With that in mind, for POV vids, make sure you don’t drip sweat or dribble onto the lens too, which is easy to do. When not filming, cover the camera with either the lens protector or the neoprene case.
When buying a camera, it’s well worth opting for something like the X4 Air or X5, as they have easily replicable lenses. A simple drop or trail scuff could well scupper your lens, and so I’d advise buying a spare pair if you do go this route.


