


Punctures are a fact of cycling life. For the users of inner tubes they’ll require a repair. This is an easy job and one all cyclists need to know how to achieve with the minimum of fuss.
Our guide below shows you what we believe is the best method fix a puncture. We’ve included a list of the tools and materials that you will need to complete the job and in some cases where you can buy them. If there are others that you prefer then feel free to let everybody know in the comments.
Tools & Materials
1. Remove the cause
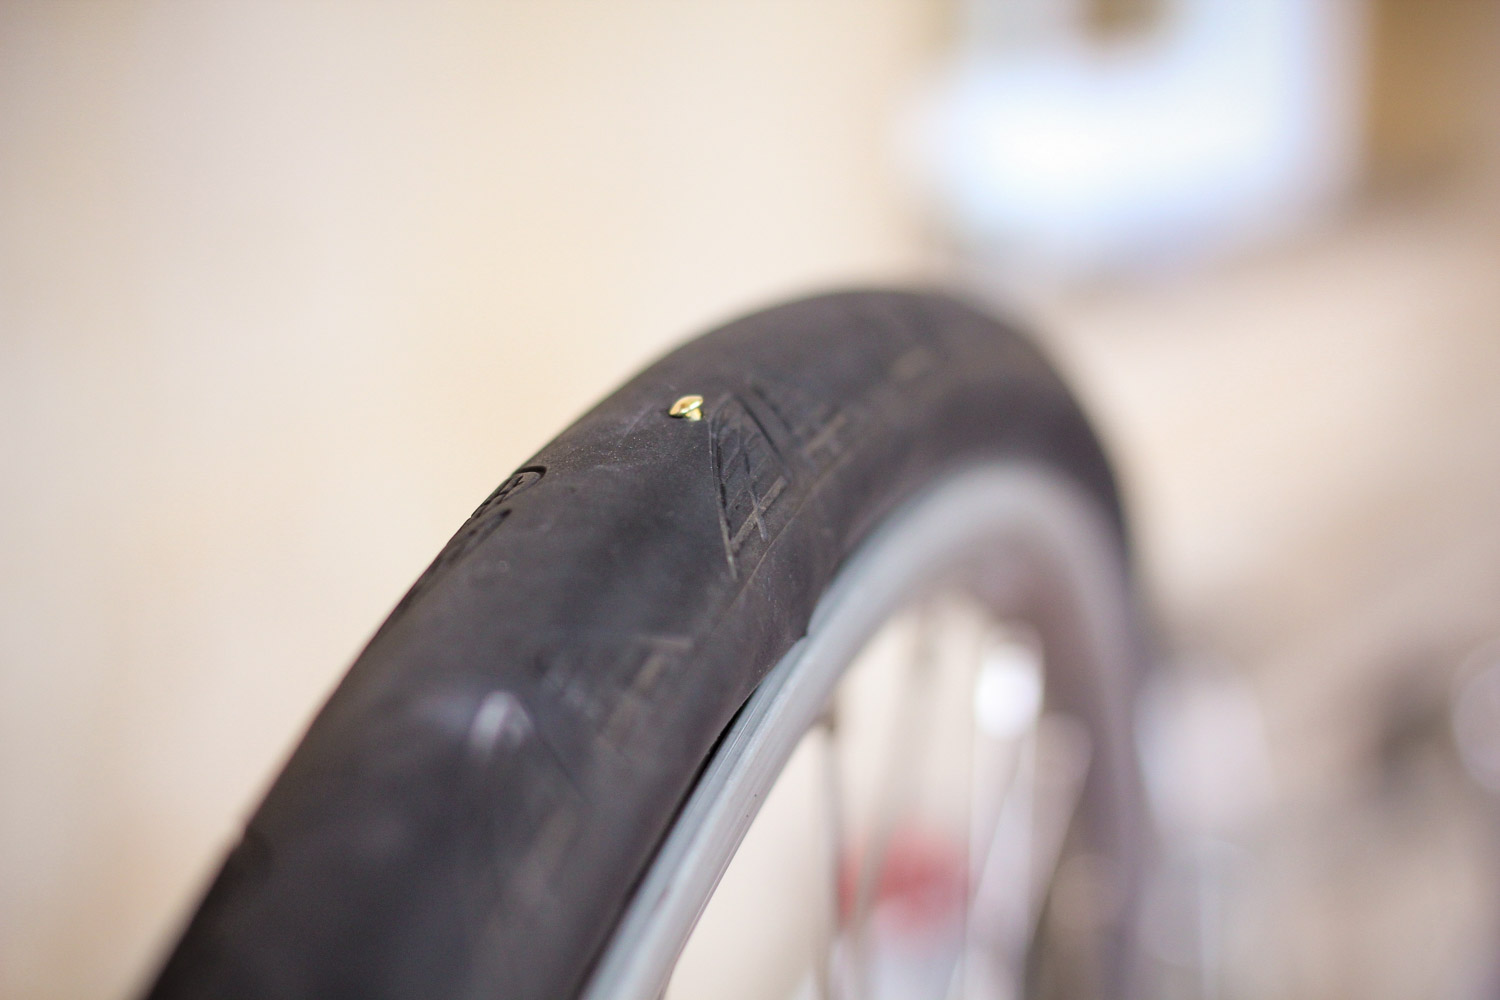
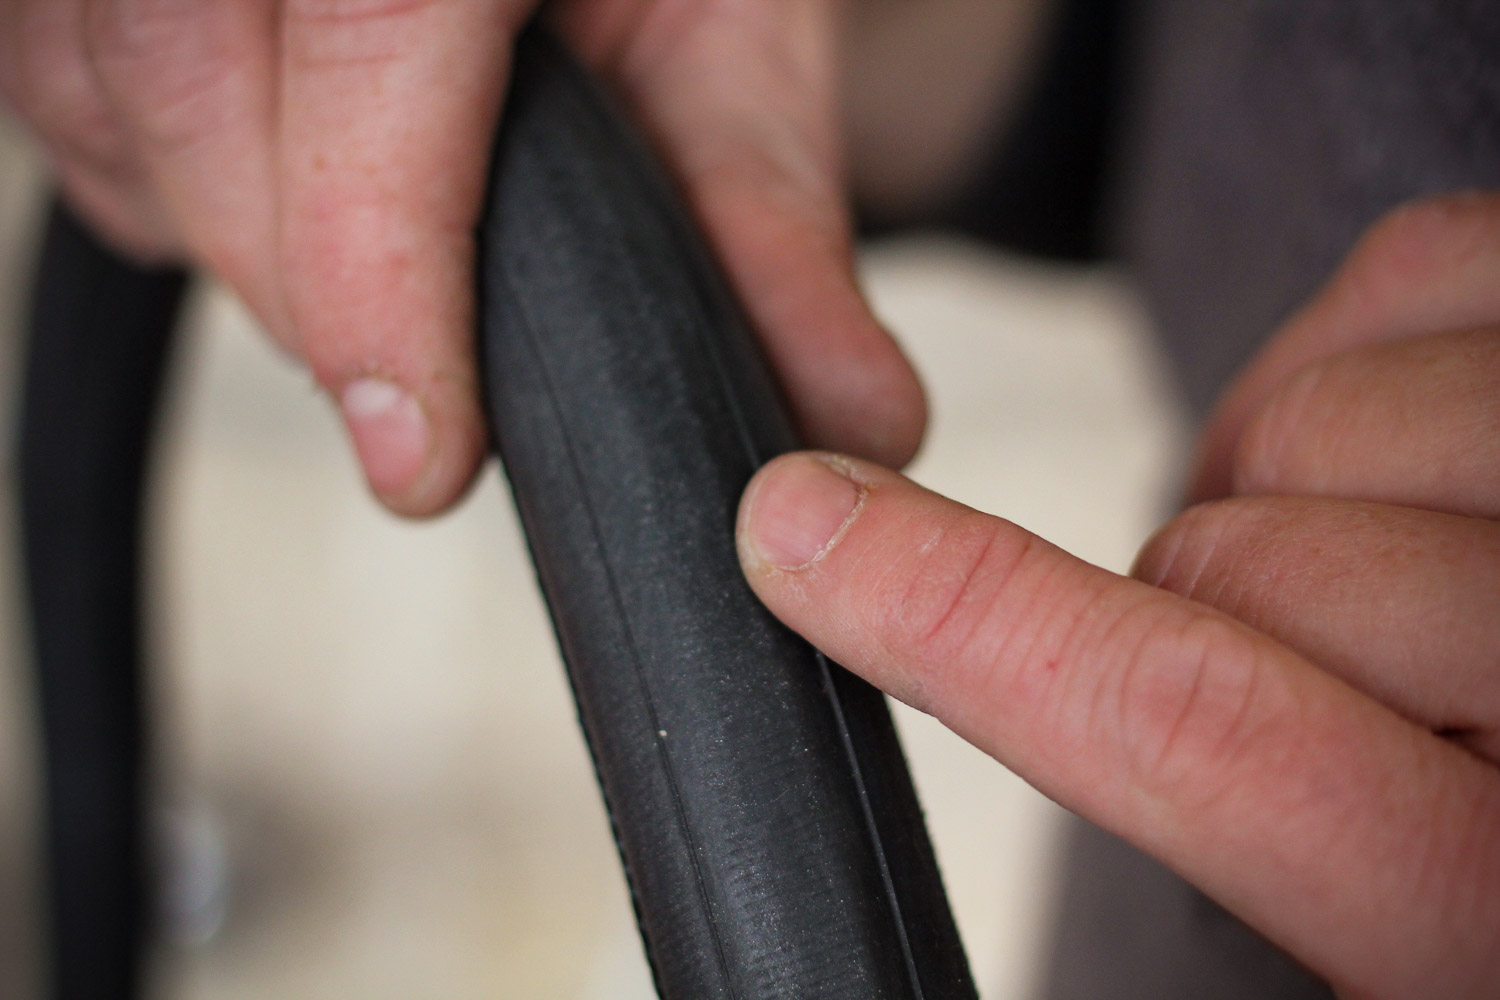
When the tyre goes down, before you remove it from the rim, check the outside closely for the likely source of the puncture. Sometimes it’s blindingly obvious, like a whacking great nail, other times small pieces of glass or thorns can be harder to spot. Naturally, spotting them with the tube still in place will give you a guide as to where to look on the tube. If you grab the tube straight out of the tyre without checking, you’ve no idea where it might be.
2. Check inside
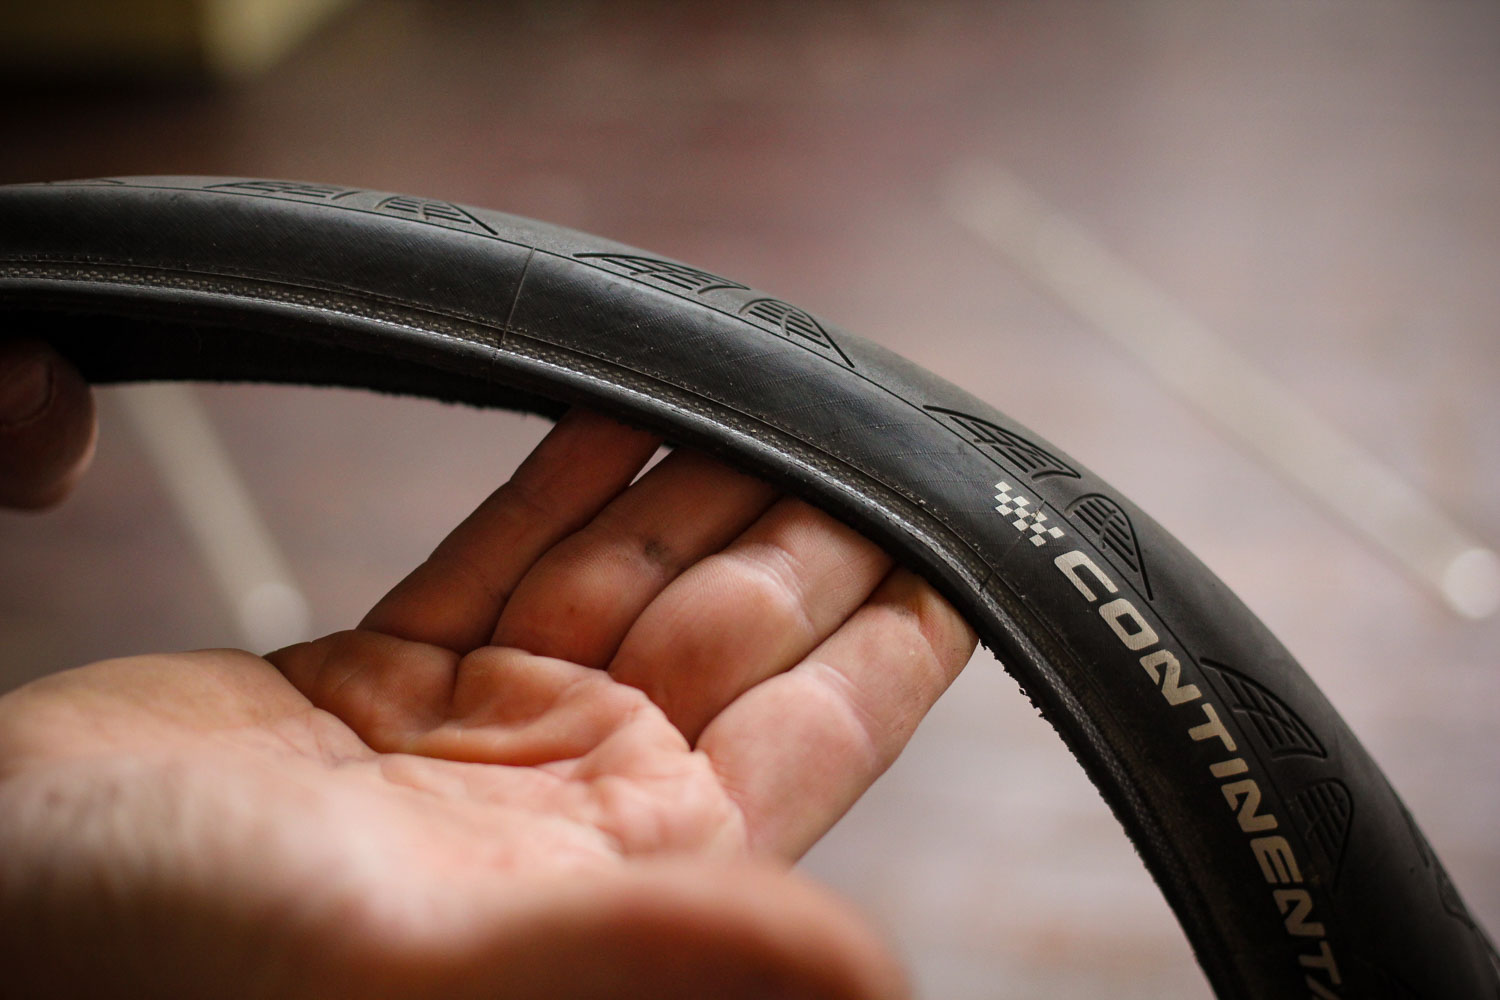
If you can’t see or feel the object from the outside of the tyre, remove it from the rim and gently feel around the inside of the tyre carcass with your fingertips. Go lightly and slowly, as the protruding item might be sharp enough to cut you.
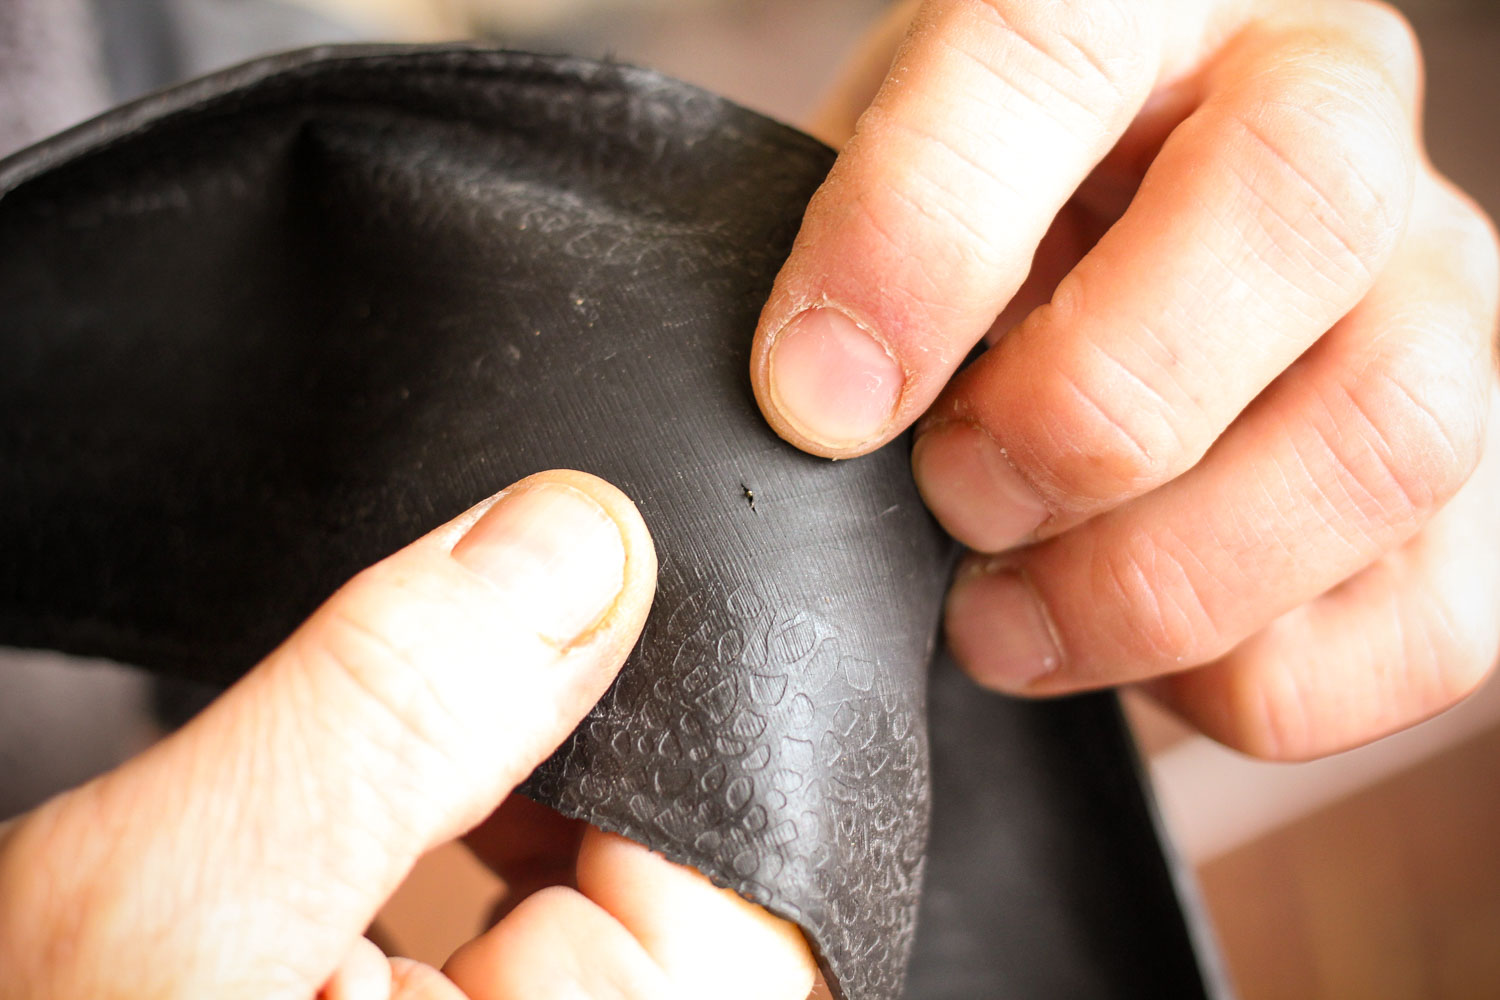
3. Double check
The culprit may be small, but you have to be sure that you have them all out. We’ve fixed thorn flat before, removed the one that did the damage, but missed another that was partially through, ready to do its deflating work a mile down the road.
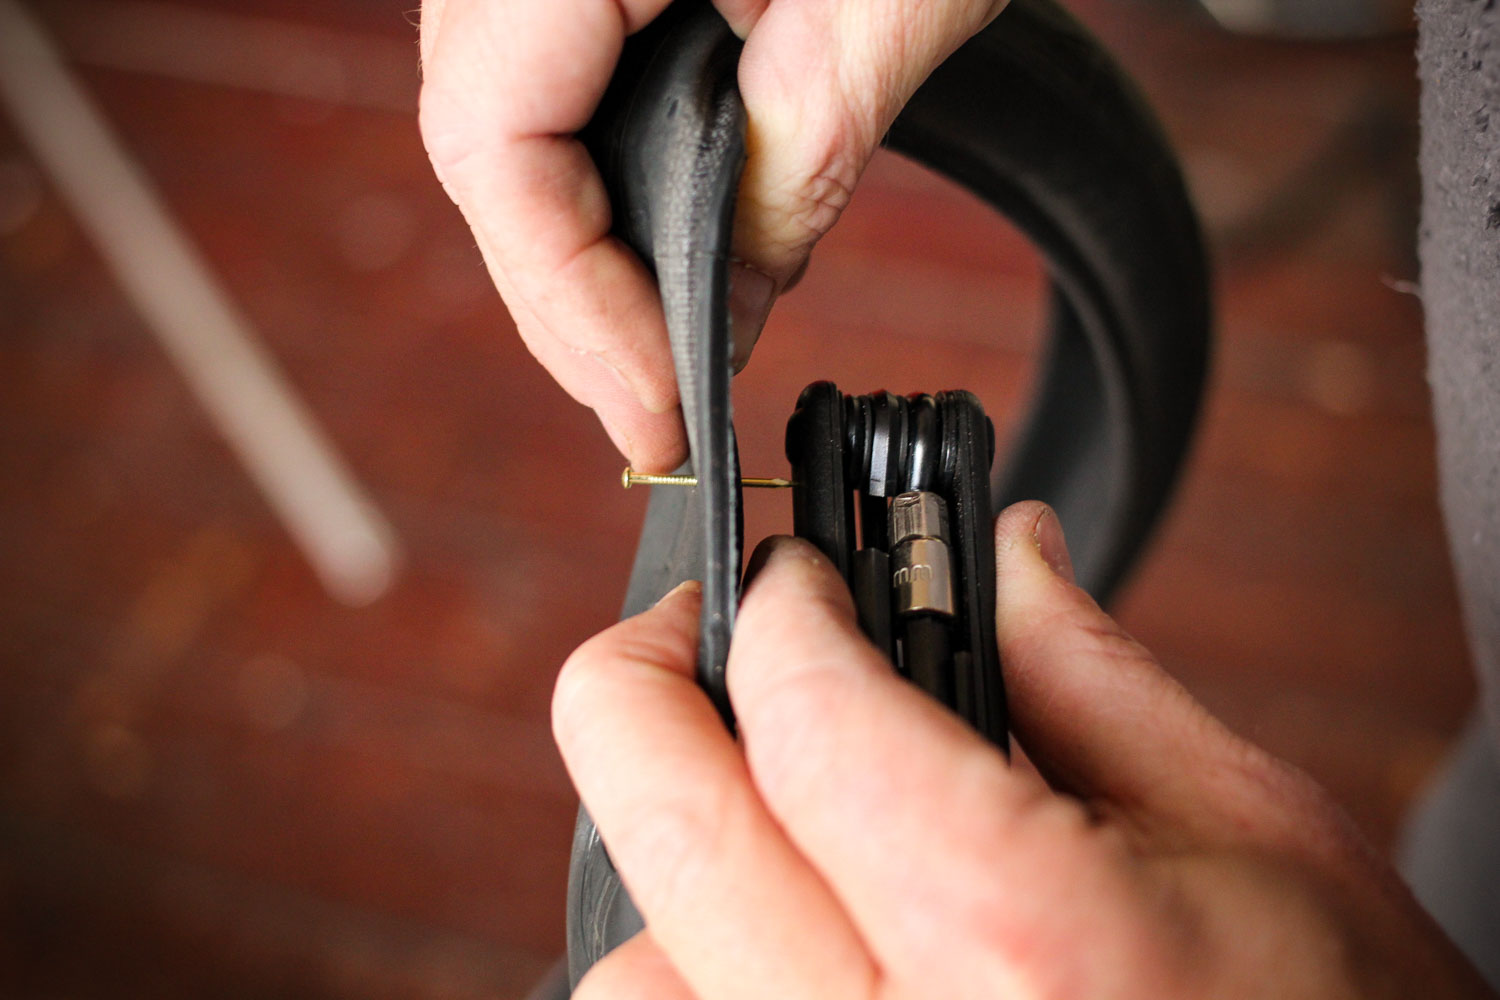
4. Push it out
When you find the object causing the puncture, push it back out of the tyre carcass. Do this from the inside out, never pull objects fully through the carcass, you’re only making a bigger hole in the tyre. Small sharp or pointy items can be pushed back with the end of a multi-tool or whatever ‘harder than a finger’ bits you have with you.

5. Find the hole in the tube
Add some air to the tube. Small punctures will allow the tube to hold some air long enough for you to pass the tube through your hands and under a moistened lip. You should feel/hear/sense the air escaping.
6. Don’t lose the hole
The holes can be hard to see with low air volume, and nearly invisible when the tube is flat. When you’ve located it, put your finger on it as a marker and keep it there until you can mark the hole properly.
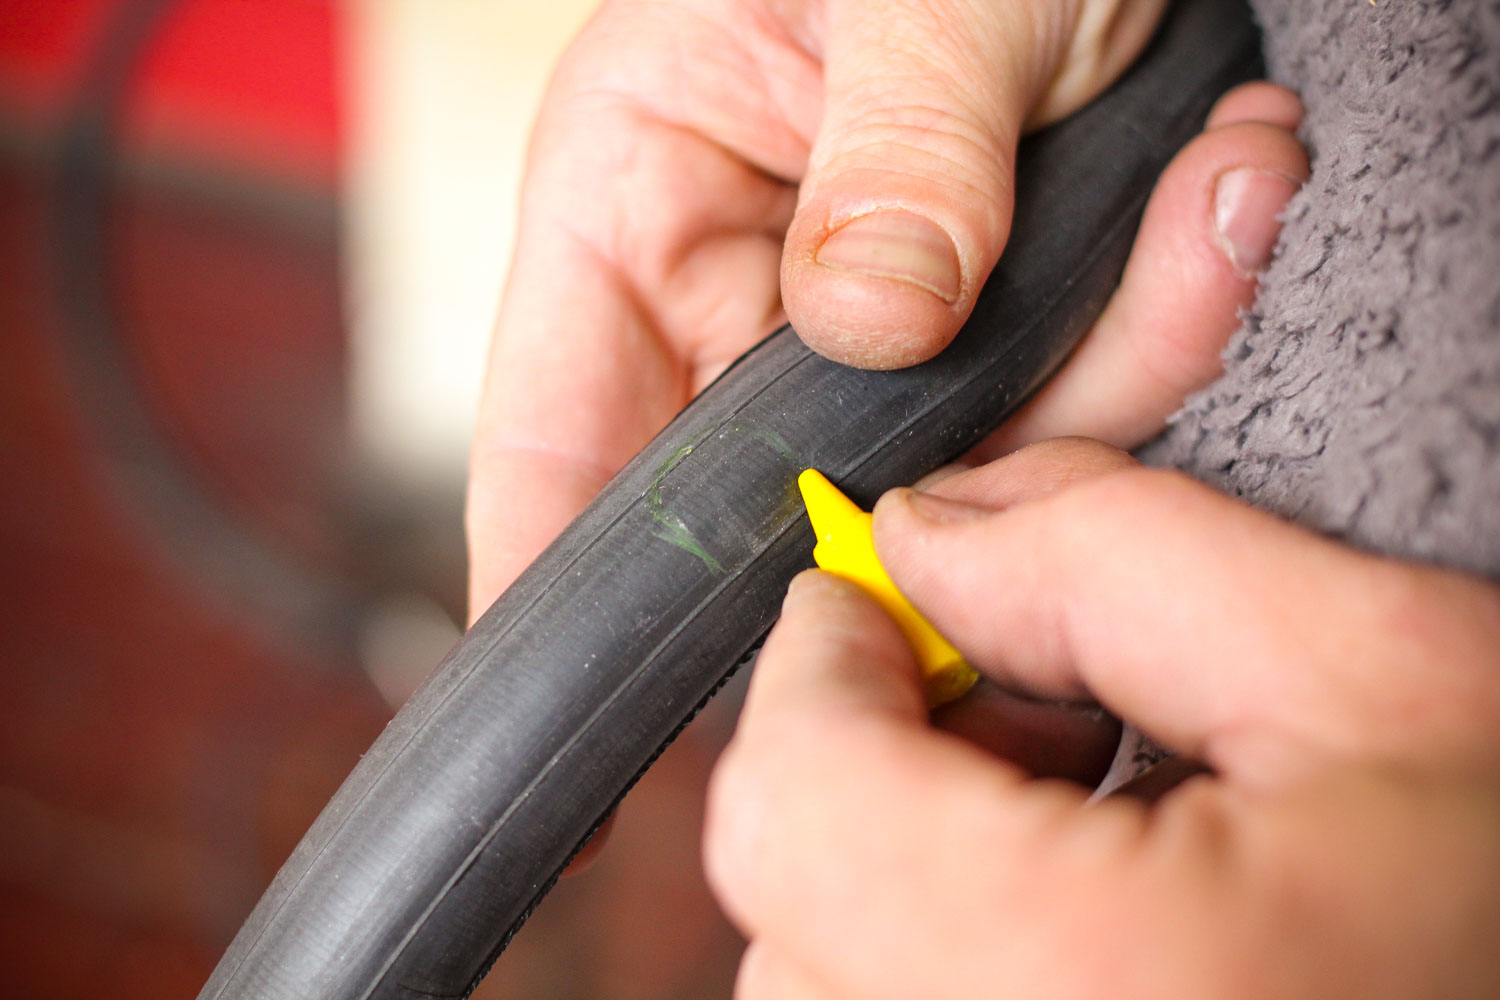
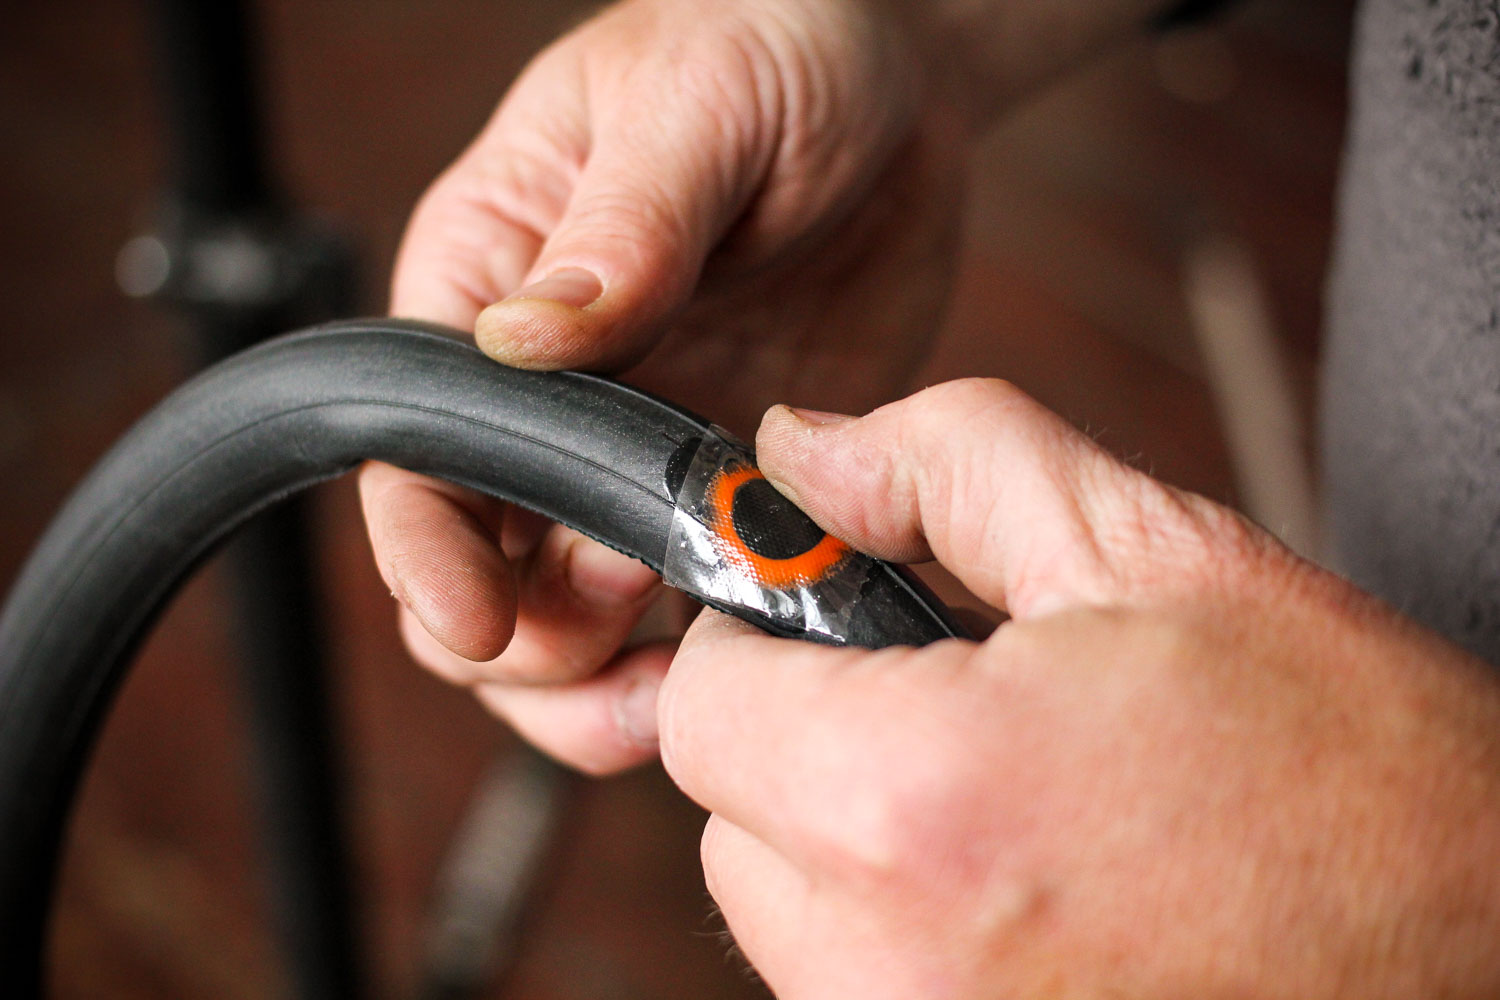
7. Mark the hole
You use the yellow crayon to mark the hole. Most patch kits come with a stub of the waxy stuff. It’s not ideal as its reluctance to show in the butyl can make accurate location of the hole tricky.
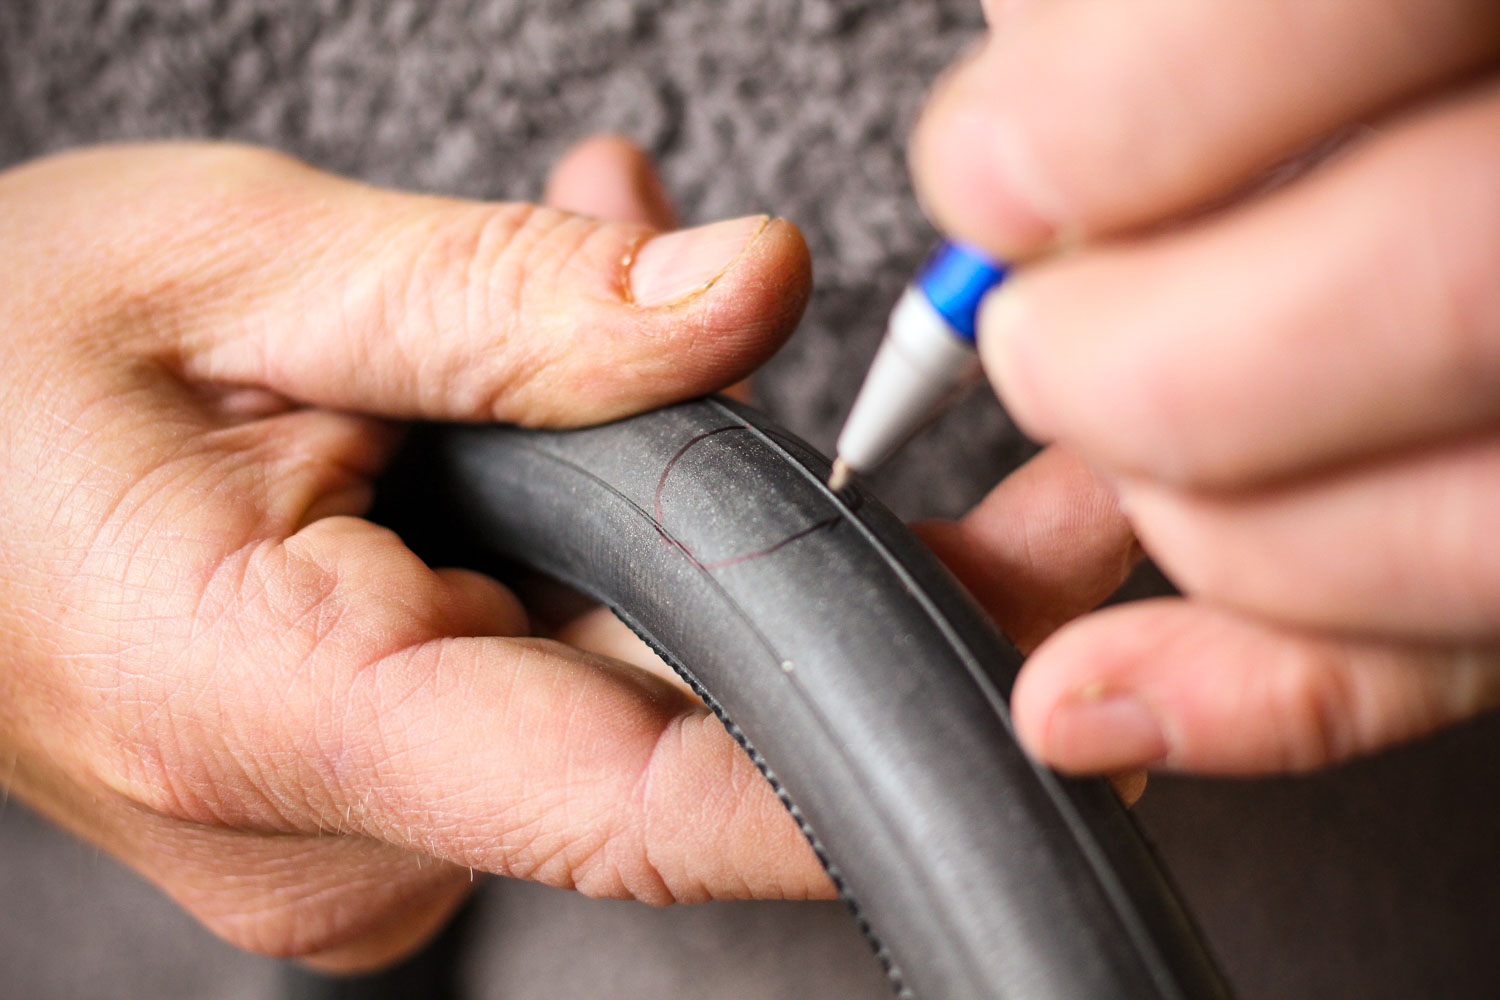
8. Even better, use a biro
If possible, we prefer to mark the position of the hole with a biro. Any colour will do, the ink sticks to, and shows up well, even on black butyl.
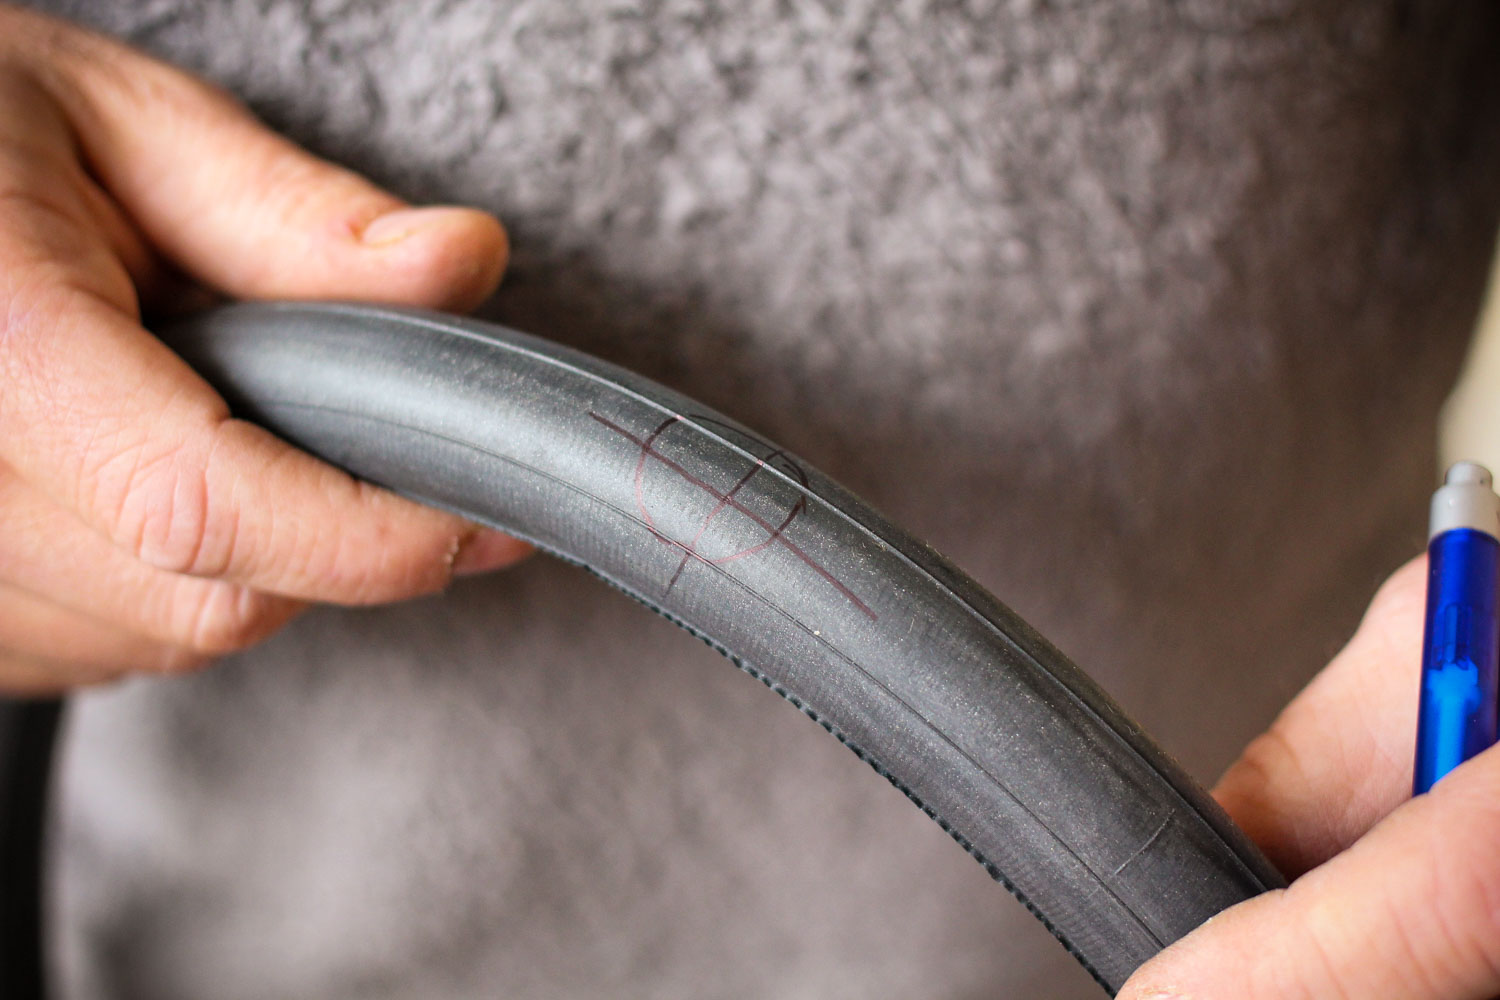
9. Get the hole in your sights
We draw a circle around the hole, just a bit bigger than the size of the patch to be used. With the hole in the very centre. We then draw a pair of crosshairs centred on the hole with the ends extending outside the circle. This allows you to rough the site of the hole, apply vulcanising solution and let it cure, without losing the exact centre location of the hole.
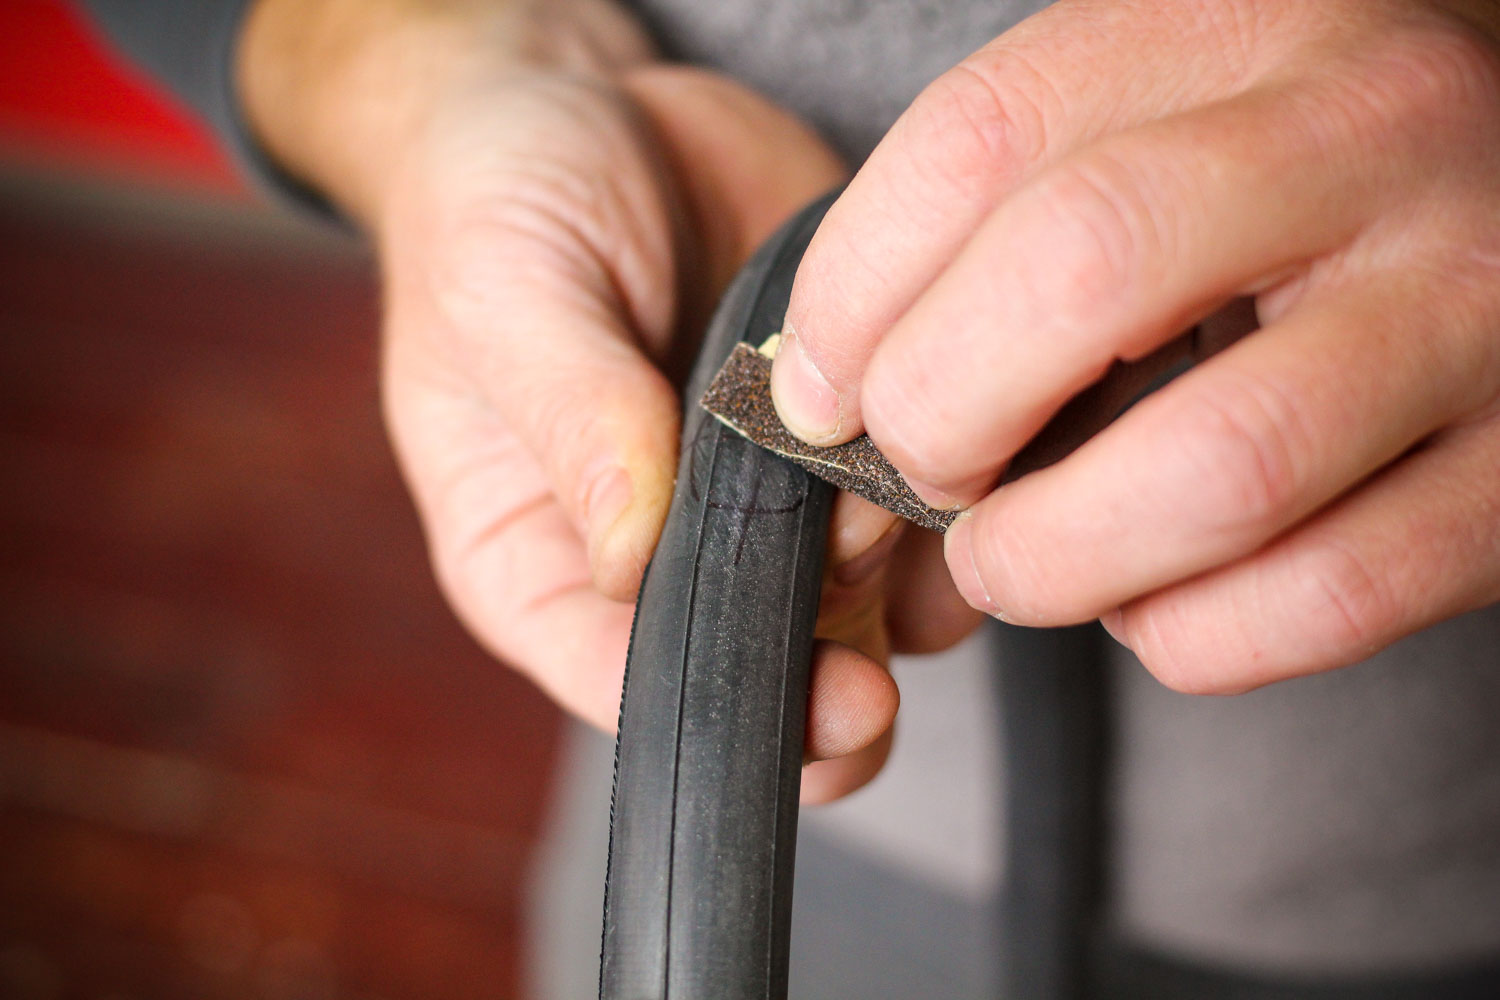
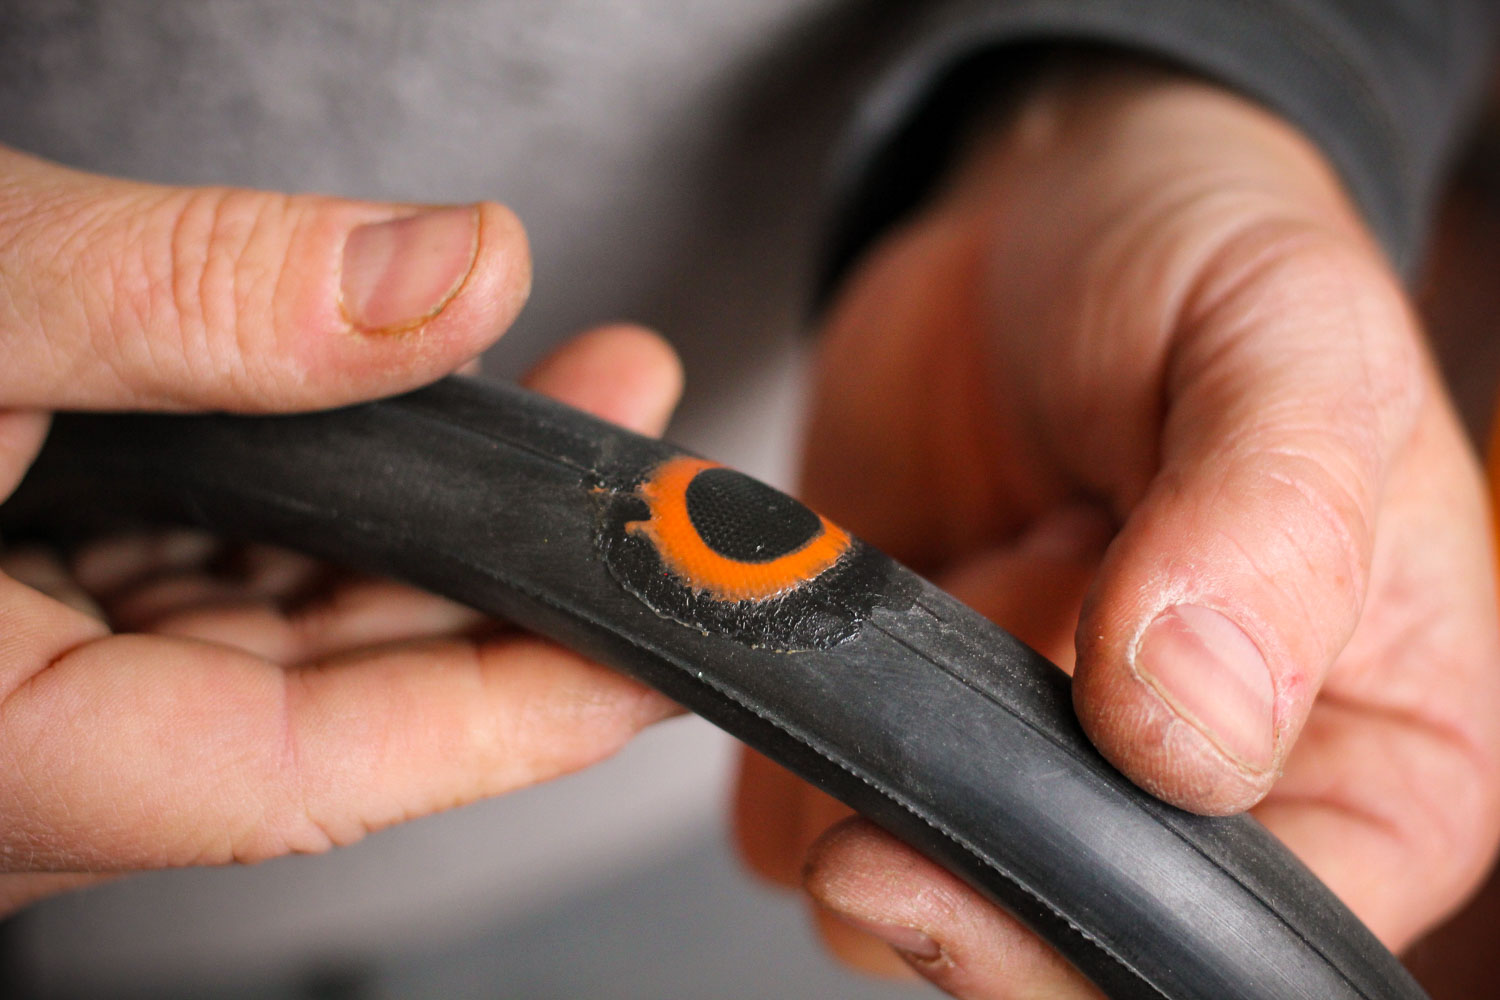
10. Rough up the tube
Roughen the butyl around the hole with the small piece of sandpaper included in the patch kit. We have, in extremis, roughened it using a handy kerbstone. You’re only looking to give the surface a ‘key’, so don’t make it a ragged affair.
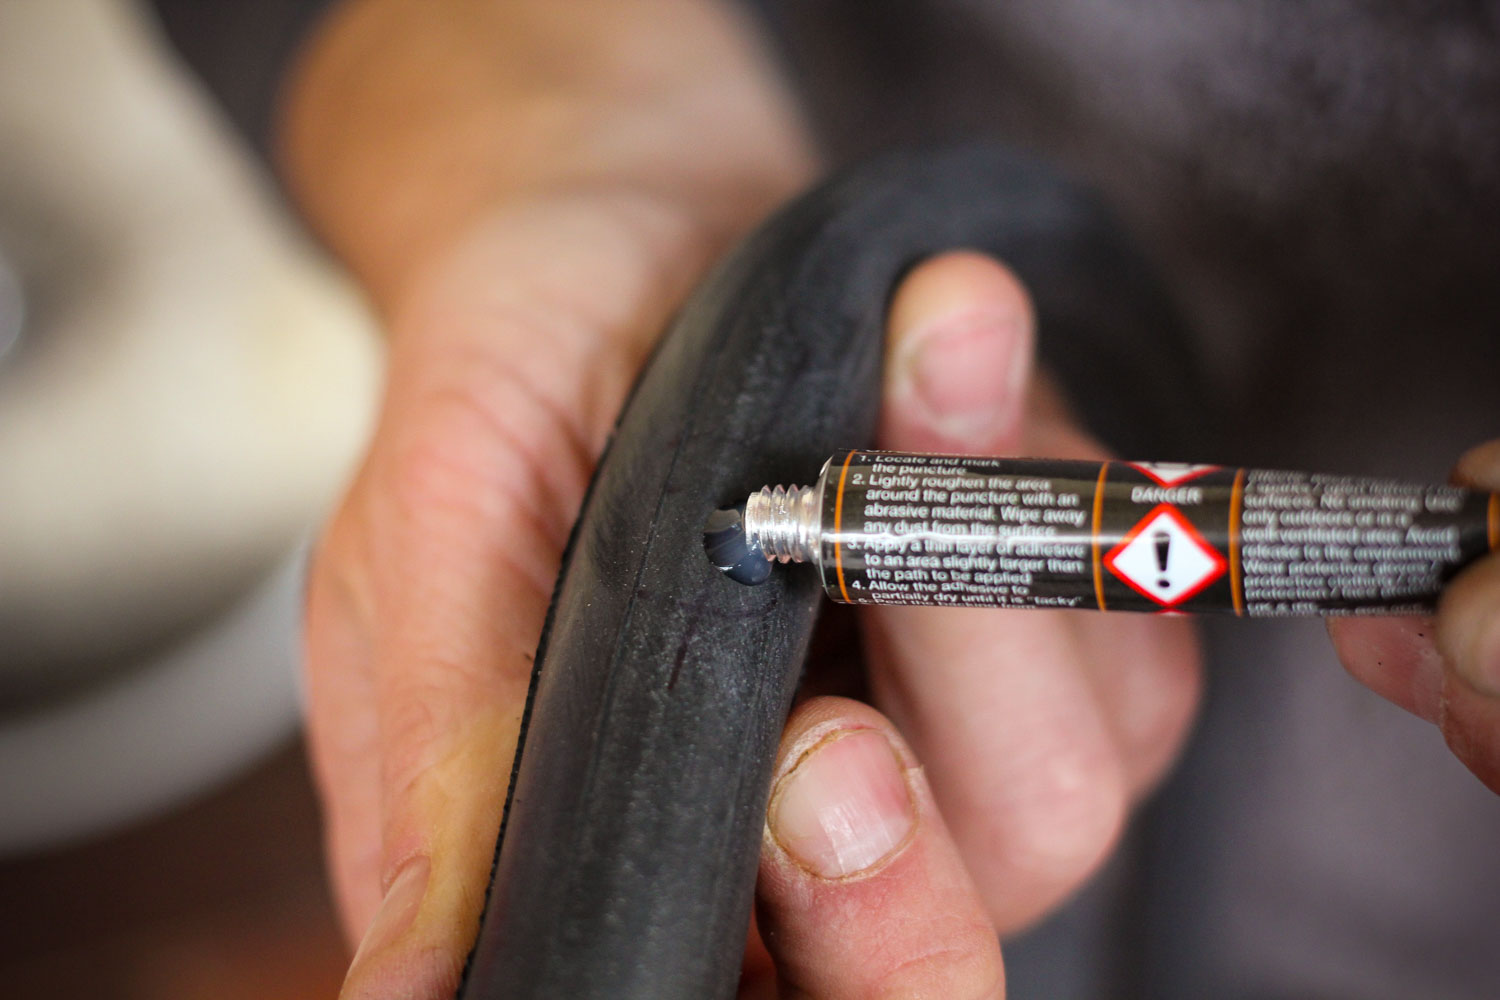
11. Vulcanise
Apply the vulcanising solution. For the sake of avoiding unstuck patch edges, make the glue zone slightly larger than the patch.
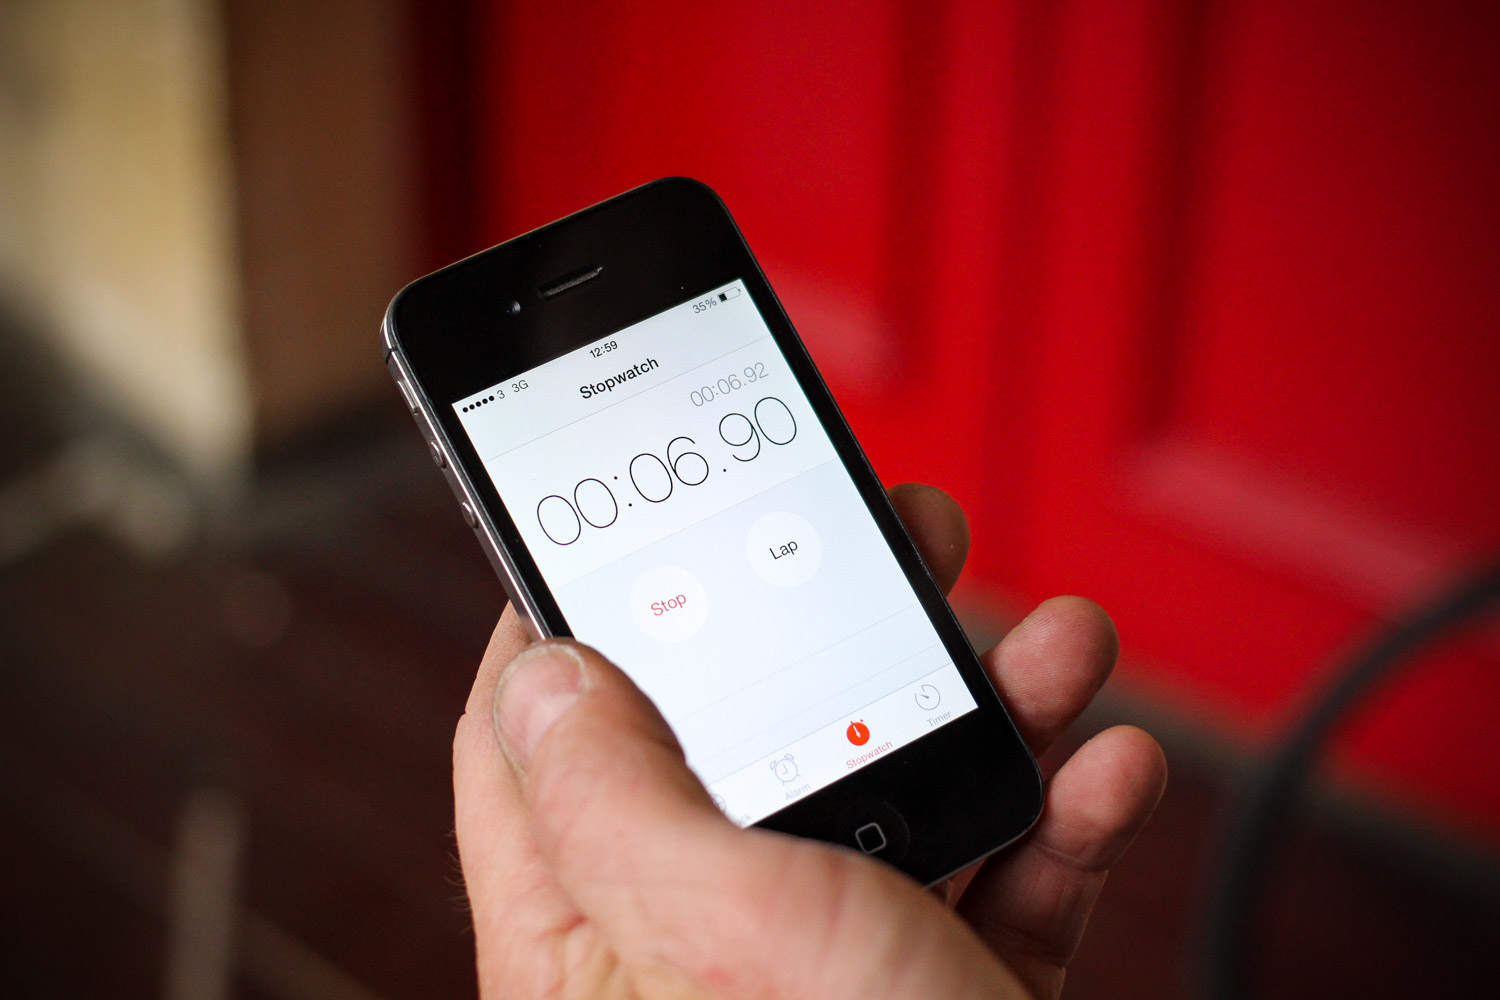
12. Wait
Let the vulcanising solution cure. This takes around five minutes, check your particular patch kit brand for the exact timing. Don’t be tempted to rush it, however far behind the group you might be getting. One fix is quicker than two.
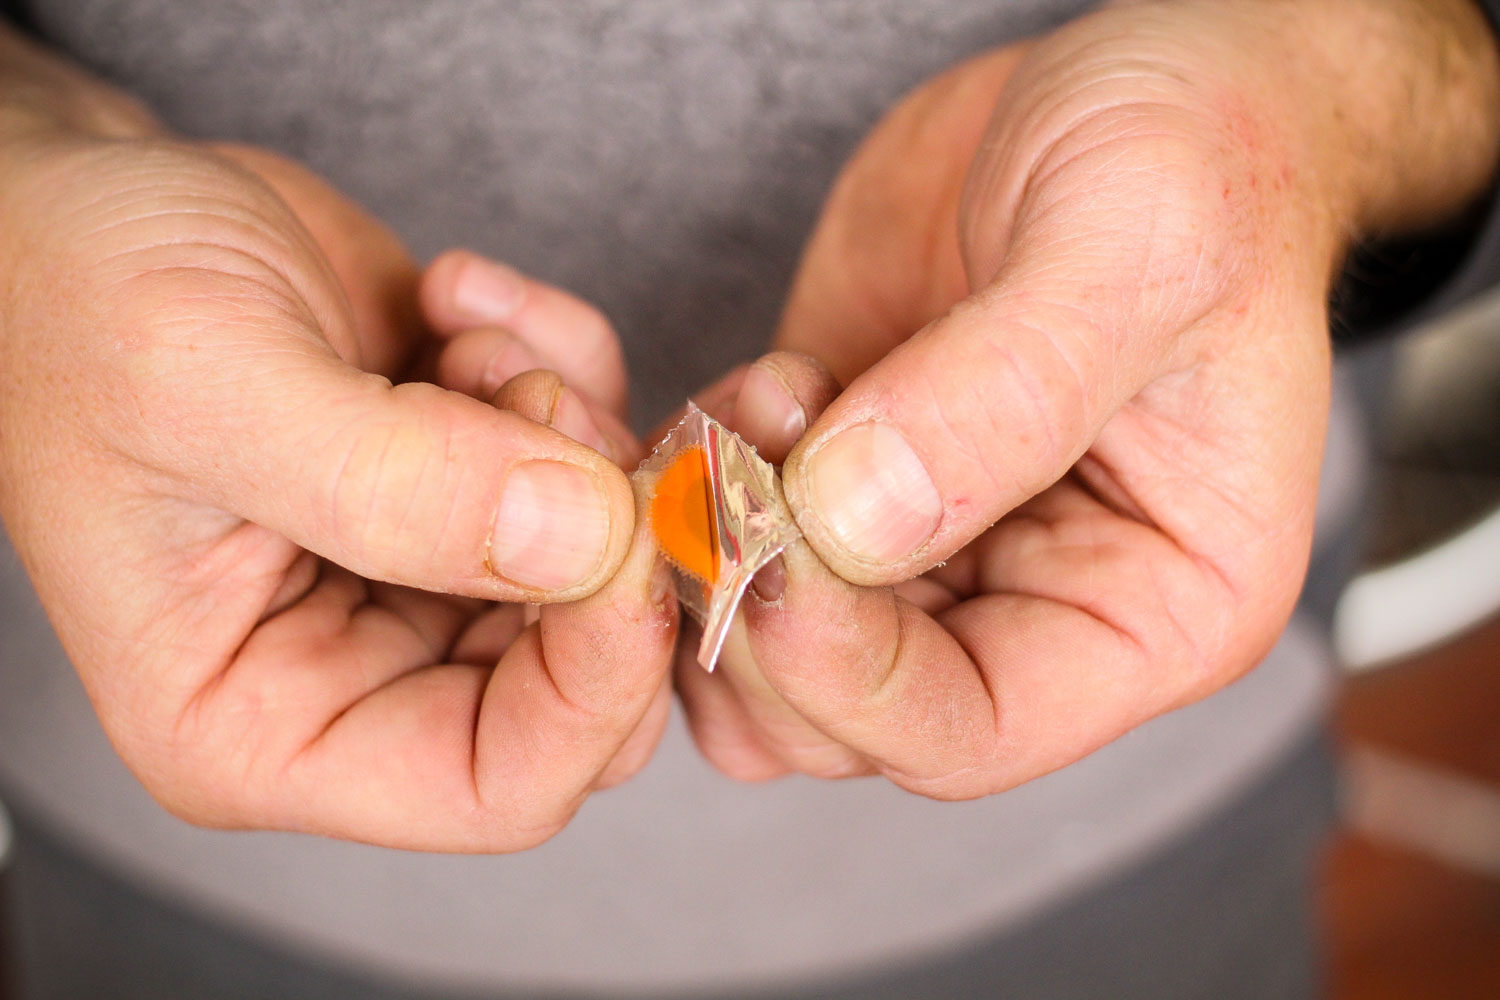
13. Uncover the patch
When the vulcanising solution has cured, peel the foil backing from the patch, making sure you don’t touch the exposed patch surface with your fingers. Leave the plastic layer in place to make positioning the patch on the tube easier.
14. Apply the patch
Look for your cross hair guide lines and when centred, press the patch firmly into position. If you’ve got time, we leave it for a further five minutes to let the chemical bond really take effect.
15. Remove the cover
Carefully peel the plastic backing from the patch. They often have a pre-scored line in the plastic, so you can flex and split it and peel off from the centre of the patch outwards, to reduce the chance of pulling the edges of the patch up.
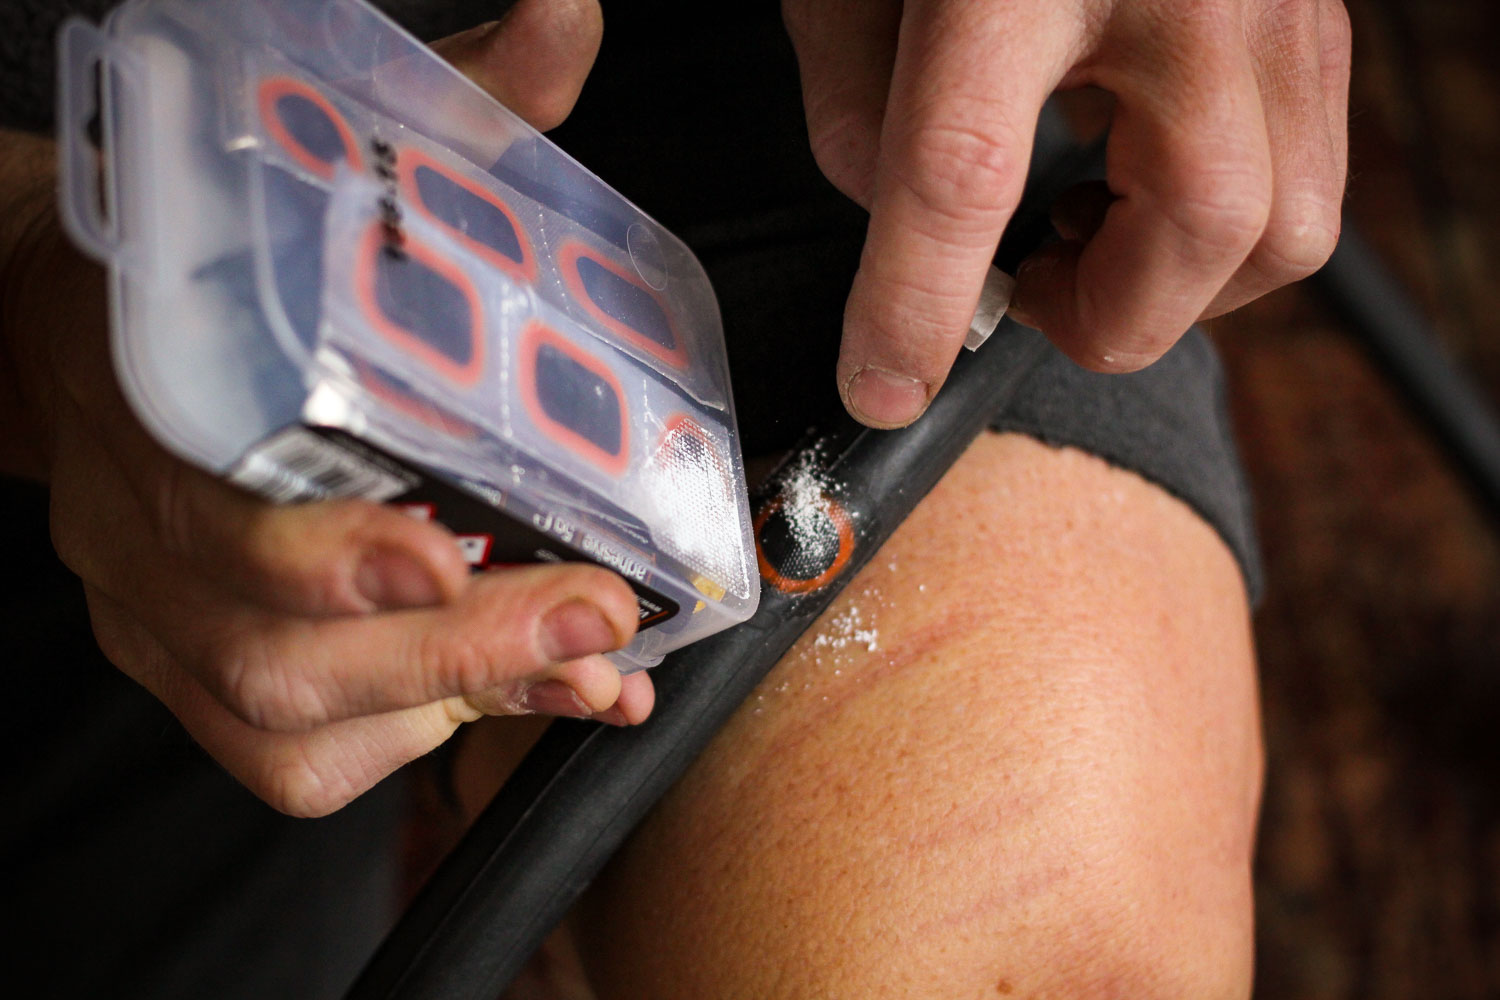
16. Chalk it up
Take the small cube of French chalk from the patch kit and grate a little onto the repaired area. This is to stop the tacky vulcanised rubber and solution from sticking to the inside face of the tyre carcass.
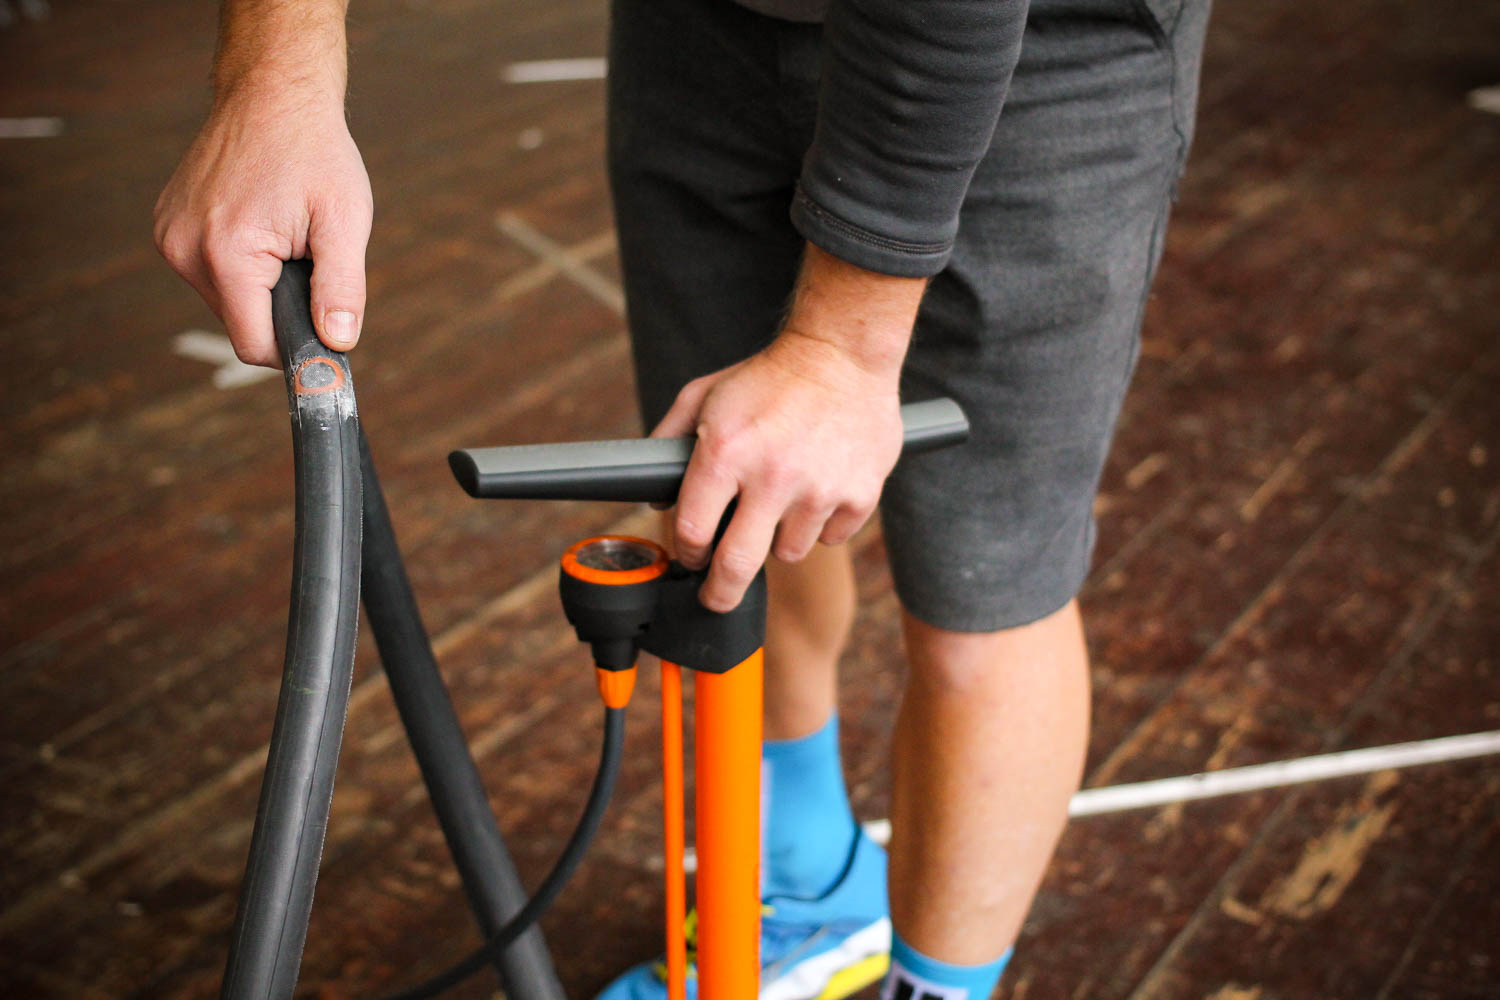
17. Inflate
Give the tube some air. Providing you’ve spotted all the holes, it’ll be going up and staying up. Replace the tyre and tube. Inflate to your favoured pressure and enjoy the rest of your ride.


25 thoughts on “How to change a bike inner tube — learn the basics of cycling puncture repair and get back on the road in no time”
don’t agree with the being
double post
don’t agree with the being
don’t agree with the being generous with the glue, it’s wasteful and you have to use the powder because of it.
rough up both the area to patch AND the patch itself, this gives a better surface for adhesion. Glue the patch with just enough, that way you only glue what is necessary and too much simply will mean longer to set anyways. If you cant apply glue properly to the edge of a patch … LEARN, it’s not rocket science!
Apply the patch, hold in place by thumb/finger for a while then place on flat surface with a weight that also has a flat surface, I use my thick chopping block but a couple of hardbacks will suffice or even a saucepan with some water in it. 5 minutes isn’t enough in my opinion, leave it for 20 mins at the least, I usually do them and leave for an hour or more, I mean, you aren’t needing to use it straight away are you at home and you’d have at least one spare for out and about. No point patching on a ride and because you were too impatient to wait you had to go through the whole process again as soon as you whacked in the pressure up to 80 and the glue hasn’t gone off! air temperature also effects bonding times.
Best patches IMHO are old narrow inner tubes, why, because of the curvature that’s already there, so it will follow the curve of the inflated tube better AND because it’s exactly the same material as the tube (well near as damnit), it’s also a good way to recycle. I always pull the old valve and put it in the scrap metal bin ready to go down to the dump.
You can buy 50g tubes of glue for about £3 or a large tin for £9 on the bay of e.
I try and help out the kids down the street or friends with repairs and any bikes that get donated/found and I can rescue the tubes I simply pass on, give them a repair lesson and some patches plus get them to invest in some decent tyre levers (I usually buy a job lot if I find them cheap and ask them to make a donation to my charity in exchange), this is one of the major problems of non serious cyclists and for their kids as well. A puncture often ends in bike left out the bike/in the shed/garage and never the twin shall meet.
I’ve just had a patching session on Monday as it happens.
what kind of glue do you buy?
what kind of glue do you buy?
I agree that you need to
I agree that you need to rough up and cover both patch and tube with “glue” if you make your own patches*. However I have never failed to get good adhesion with a Tip-Top or Cure-C-Cure feather edged patch straight after ripping off the foil, as long as the “glue” has dried . Of course, it’s not a glue in the normal sense, it’s a vulcanising solution that creates chemical bonding between the two rubber surfaces.
Top Tip: patches adhere tenaciously if you leave the “glue” to dry overnight, then apply the patch in the morning. Patches applied in a hurry, at the roadside often develop a leak later in the ride.
* Nice style, sir
It’s sometimes quicker to
It’s sometimes quicker to whip the tube out, find the hole in that and then you’ll know where in the tyre to look for the cause by measuring round from the valve stem/hole*. If something went in and came out again/snakebite, you’d be looking all day otherwise.
* – assumes the tyre hasn’t moved on the rim, but if you have the label lined up over the valve hole, you’ve got your reference point if it has.
LastBoyScout wrote:
Good tip, but also remember which way round the tube was relative to the tyre when you pulled it out…
Other top tip- remove the valve retaining nut when the new spare tube is rolled up in your pocket… I once found it had worn a hole in the new tube, as I stood by a cold roadside. Luckily I also had good old Park Tools patches!
Use a pair of mole grips and
Use a pair of mole grips and a couple of 2p pieces to clamp the patch. If you’re having a repairing ‘sesh’ you can clamp 2 or 3 tubes simultaneously, if you separate with additional 2p’s.
Use a pair of mole grips and
Double post!
This one could get as
This one could get as contentious as the helmet/disc debates. Don’t know about anyone else, but I learned through some very hard trial and errors into developing my own rituals for this one.
Nice recycled patches there, BTBS.
When I’m out, if I’ve already used the spare then it’s a “fast”patch, but my tyres are wide and lower pressure than most of you. Which I will then properly fix it using slow solution repair, when I get home or to work, where I keep my big kits, with extra tubes of solution, it dries out at the most inconvenient times. I want to be comfortable, warm and dry when I properly fix my tubes.
Clean things, not mentioned above, mostly after the roughening. Filth is the enemy of good adhesion. And I like to talc my tubes and tyres.
I love my latex tubes, so I mark out stuff with a sharpie, for butyl I have used a tipex pen (never seemed to be bad for it). I like to lay on the gunk thick, then let it do it’s thing for a few hours, stick the feather edge patch on. Hard edge ones tended to fail for me. Then press and leave for a while, preferably overnight, often hanging on a handlebar.
I scrape the french chalk with a knife, less mess.
Very interested to hear others secret tips, always happy to enhance my methods.
Going tubeless on 3 inch tyres in a hopefully short bit. Lots of new things to learn.
Who the hell patches tubes?
Who the hell patches tubes? Put a fresh one in and throw the old one away.
Htc wrote:
What a wasteful attitude!
My old technique of patching tubes was a lot quicker than what other people are suggesting. I wouldn’t bother roughing up the tube too much – just a light scrape will do. Then, the next time saving would be to not bother waiting for the glue to set – just slap the patch on as soon as there’s some glue on it.
However, most of the time it wouldn’t work and I’d bin the tube in disgust.
A different technique I used to try was to collect all the inner tubes needing repair into a pile (draped over other bikes for instance) and then attempt to patch them all properly (i.e. follow the instructions), but inevitably the wife would lose patience – “What are you doing with all these? How long are they going to be here?…”. Then I’d bin them.
Hooray for tubeless!
Htc wrote:
What a rubbish attitude.
Last tube I got was a new-ish Continental one found lying in the path not far from my house.
Fixed the pin hole puncture and I’ve got a virtually new tube for about 20p – if it was yours, then thanks very much 🙂
Htc wrote:
I used to do that, but then I found that the new tubes weren’t as good. They’re not a patch on the old ones.
And people complain the
And people complain the tubeless is too complicated.
DoctorFish wrote:
Fixing a puncture is not complicated, a child can do it, I’d like to see an 8 year old sort out a tubeless set up either from scratch or even at the side of the road and finding that the tyre won’t come off and has to deal with all the sealant if they do because the hole in the tyre was too much for the sealant to cope with. Tubeless is significantly more complicated up front, messy and more unreliable in terms of actually being able to fit the tyres at the side of the road compared to standard clinchers (due to countless sizing variantions that are even worse than clinchers). Then there’s the whole issue with putting a tube in if the hole made in the tyre is too big too be sealed, oh and it’s more expensive.
And despite desperate attempts to put all the design and tech into tubeless so they can exceed a standard clincher in rolling resistance, the reality is that compared to latex tubed tyres and tubs there’s still not really any improvement like for like.
The Conti 5k TL was tested at 120psi for the 25mm on biyclerollingresistance, this produced their lowest rolling resistance tyre, except for the fact hardly anyone will put that much into a tubeless and indeed some rims are not able to handle that pressure – or certainly well past the manufacturers spec, Mavic open Pro UST for one which has a max of 87psi for TL.
At that pressure for instance it would be around 9.5watts, the 25mm non tubeless Conti 5k with an 80g latex tube consumes 8.9watts at 100PSI, a more realistic pressure, even the 100g butyl tube run at that size/pressure is 10.7W (I wouldn’t be using 100g tubes in a full on race tyre set up)
I very rarely patch out on a
I very rarely patch out on a ride. Normally take 2 tubes with me. Very very rarely puncture more than twice on a ride.
Some of you do seem to make a fuss of it. Good on you BTBS for re-cycling tubes.
I simply find the hole, put a thin smear of vulcanising solution that is a bit bigger than the patch, wait for it to dry (2-3 mins in warm air) and then place the patch on the spot and squeeze well, giving it a little stretch to make sure there’s no air bubbles. It can then be used straight away (I like to think the force of the air pushing the tube against the tyre helps the bond).
However, I don’t take the plastic cover off the patch. I leave it on because it helps stop the fresh glue sticking to the inside of the tyre. I’ve never talc’d the tube or glue, and never had a problem removing the tube from the tyre later
And why patch tubes? Because it’s a useful skill, and really there is no need to throw a tube because of a hole. The biggest environmental problem this world faces is overconsumption. Whatever you can do to reduce consumption is a bonus for the planet.
Perhaps, instead of tax,
Perhaps, instead of tax, insurance, helmets and reg plates all cyclists should pass a state exam in patching tubes.
I use TipTop patches and glue (okay, vulcanising fluid). Fixing a tube is a doddle. Throwing away a tube instead of repairing a small hole is a ridiculous waste.
You can rapidly dry the
You can rapidly dry the vulcanising solution with the flame from a cigarette lighter. Saves waiting for 5 minutes at the side of the road.
Also, if you can see what caused the puncture, just pull out the inner tube at that location and patch it, no need to remove the wheel from the bike and remove all of the inner tube.
Natrix wrote:
Instructions unclear
Glueless patches work
Glueless patches work brilliantly!
I have found them far faster, more reliable and less faff than using vulcanising solution.
Sparkimp, glueless patches
Sparkimp, glueless patches are marvelous, quick and lack faff, but they are a little more temperamental, when on seams, near the bead or with dust and they don’t last as long. A well done “proper” fix will last as long as the rest of the tube will.
ktache wrote:
Yep, I’ve had mixed results with those glueless patches too. Sometimes they work ok, sometimes they leak, and not just when they’re near the bead either.
Old school patches work best.
I take a spare tube with me on a long ride and keep the punctured one to repair later as a spare.
If I have had to use the
If I have had to use the quick repair, if I have had more than one puncture and the spare tube has already been used, I will remove it when I get home and fix it proper.
The Park kit of quick patches is tiny, smaller than their excellent tyre boots.
I’m back to my tubed bikes as my plus tubeless tyred bike is off the road. My latex tubes do require a lot more pumping up, especially in the hotter weather. I had another one of those latex tubes that needed pumping up every morning, I had to replace it when it needed pumping for the ride home in the evening. Could not for the life of me find any holes, even when holding lots of air and in the full sink.
I find the glue eventually
I find the glue eventually goes off in the tube once you’ve used it and broken the seal, so I just carry spare tubes and wait until I’ve got 2 or 3 tubes with punctures and then fix them all at once.
I try to not get the larger
I try to not get the larger tubes of “glue””, the smaller ones make more sense, and having a few spare, unopened, both at home and at work, is never a bad idea.