

Giving your bike a quick check-over before you head out onto the road will help you stay safe and could save you money by averting expensive mechanical issues. A minor adjustment could avoid a major problem.
Let’s be realistic, if you’re riding most days – maybe twice a day if you’re cycle commuting – you’re not going to check every single part of the bike in detail before each ride, and no one is suggesting that, but here’s what we think is sensible between rides.
You might do some of these checks as soon as you get in from a ride – like making sure your chain is clean and lubed so it doesn’t rust – some you might do before you head out – like checking there’s enough air in your tyres.
This isn’t a comprehensive list of everything you should ever check – not by a long way – and we’ve not included accessories like lights or bike computers that you might have fitted, or spares that you carry, because those can vary massively from one rider to the next.
It might look a lot when written down but if nothing is wrong – and the vast majority of times that’ll be the case – each of these individual checks takes seconds. We did a quick run-through in the office and you’ll get through the lot in a couple of minutes.
Clearly, if you find issues, sorting them out will take time, but perhaps less time than if you don’t identify a small problem and it gradually gets worse.
Before anyone gets the wrong end of the stick, we’re not suggesting you check every bolt on your bike with a torque wrench before you ride, but we have included links where you can find out how to put right any issues you uncover.
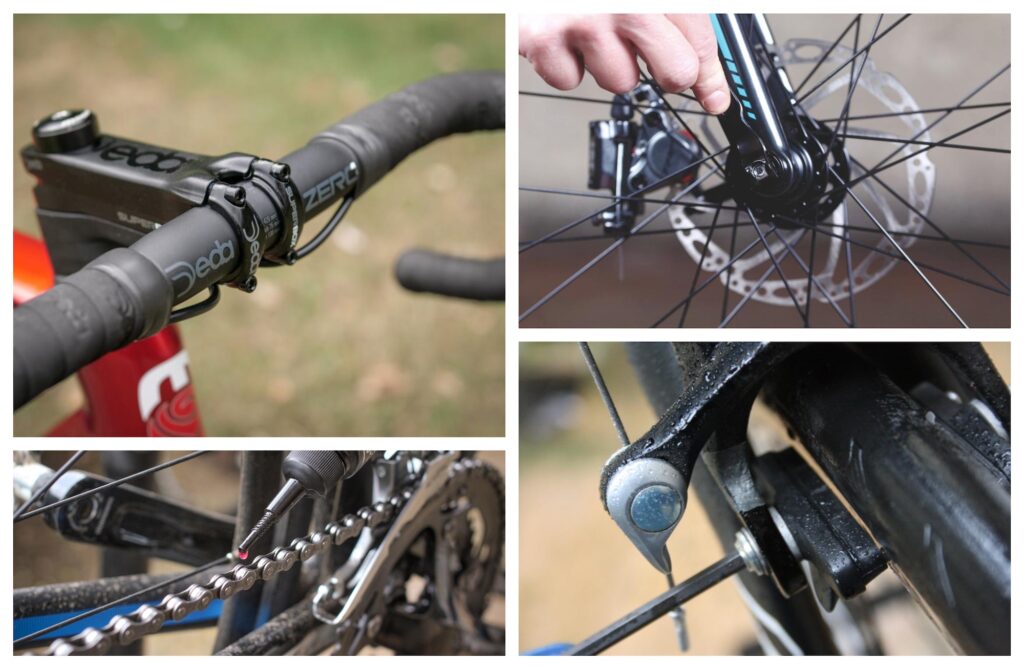
Brakes
Spin the wheels to make sure the brake pads aren’t rubbing on the rims (if you have rim brakes) or rotors (if you have disc brakes).

Make sure that you can apply enough braking pressure to stop in an emergency without the levers contacting the handlebar, and if necessary make adjustments – it might be a two-second job via the barrel adjuster to dial the brake pads in on a rim brake bike, or you might need to take more cable through the calliper.
Check that the cables aren’t sticking (assuming you have cables rather than hydraulics) and that the calliper arms are returning fully after braking.

Whatever type of brakes you have, do a quick visual check every few rides to make sure the pads aren’t worn out.
Find out how to get the most from your bike’s brakes with our video.
Here’s our guide to fitting calliper brake pads.
Find out how to fit disc brake pads.
Here’s how to stop your brakes from squealing.
Chain
If you didn’t clean and lube your chain at the end of your last ride – which you definitely should do if it was wet – check it over before you head out.

While you’re about it, run your eye over the chain to check there’s no damage to the side plates and that the pins are seated correctly. Turn the cranks backwards and make sure there are no stiff links.
This might sound over the top and the chances of any damage to your chain are slim, but a snapped chain can be really dangerous.
Here’s how to clean and lube your chain.
Find out when you should replace your chain.
Wheels
When you spin your wheels (see above), make sure they’re running true.

If you have rim brakes, you’ll sometimes notice a non-true rim rubbing on a brake pad while you’re riding, but a small wobble isn’t always obvious.

If a wheel isn’t true, find out why: it could be a loose or broken spoke.
Here’s our video that shows how to keep your bike’s wheels road, tight and true.
Find out how to replace a spoke here.
Skewers and thru-axles
Quick-release skewers and thru-axles can sometimes loosen in use so check that they’re done up correctly before you ride.

If your bike has quick-release skewers, check that the levers are fully closed.
 There are various thru-axle designs out there. Make sure yours are correctly tightened to the manufacturer’s recommendation.
Tyres
If you’re out on the bike most days you’re unlikely to pump up your tyres or check the pressure before every single ride but it’s a good idea to at least squeeze the sides of the tyres to make sure they’re there or thereabouts. Pinching the tyres like this isn’t a perfect gauge but you’ll probably have an idea of what they should feel like.

Take a quick look at the tyre tread to make sure that it’s not worn out, there are no cuts, and nothing is stuck in there that could lead to a puncture. You can often hook out pieces of flint and other sharp stones before they work their way through.

Also, check for nicks and cuts in the sidewall that could eventually lead to tyre failure. It takes seconds.
Here’s how to fit clincher tyres.
Bolts
No one is suggesting you check every bolt on your bike before each ride but at least make sure the stem bolts are tight – you just need to clamp the front wheel between your knees, grab the handlebar and try to move it side to side and up and down.

You might want to check the bolts that hold your cranks in place too.

If you do notice that anything needs adjusting and you want to get things bang on, component manufacturers suggest a specific tightness for each bolt and a torque wrench will allow you to get everything set accurately.
Gears
If you have time, quickly run through your gears to make sure the shifting is smooth – although if it’s not you’ll probably have noticed on your last ride.

If the chain is struggling to change sprockets and you have mechanical shifting, it might just be a case of twisting the barrel adjuster on the rear derailleur to get things right.
Here’s how to adjust and tune indexed rear derailleurs.

Different electronic shift systems are micro-adjusted in different ways, but they’re all pretty simple. Here’s how to micro-adjust Shimano Ultegra Di2, for example. Rather than going through the lot here, just make sure you know the method for your particular system.
Check out our video that shows you how to adjust your bike’s gears for maximum shifting performance.
Oh and check that your battery or batteries are sufficiently charged.


3 thoughts on “7 things you should check before every bike ride”
Check that your licence plate
Check that your licence plate is straight and legible and your liability insurance hasn’t lapsed. Also, make sure that your citizen papers are stamped and ready for inspection by any official.
Also, if you’ve got Ultegra/Dura-Ace cranks then it’s worth checking for cracks.
If you’re cycling daily, all
If you’re cycling daily, all except the tyre checks can be ticked off in your last 100m riding so you’re ready for the next day. Latex tube users will pump tyres every day…
For me it was every 3, 2 when
For me it was every 3, 2 when very warm weather.