


Making sure your rear gear indexing is properly adjusted means that next time you reach for the shifter to make a gear change you’ll be guaranteed one click, one clean, crisp shift. It’s a relatively simple job. Here’s how to get it right.w
Our guide below shows you what we think is the best way to adjust and tune your rear indexed gears. We’ve included a list of the tools and materials that you will need to complete the job and in some cases where you can buy them. If there are others that you prefer then feel free to let everybody know in the comments below.
Indexed gears require accurate cable tension to deliver crisp, clean gear shifting. An under- or over-tensioned gear cable will throw the shifting out. The difference between perfect shifting and skipping can be as little as a single millimetre of cable so make small adjustments of a quarter turn to screws and barrel adjusters and test the effectiveness of the change before making further changes.
Tools
• Allen keys (some derailleurs use Allen bolts instead of screws)
• Small crosshead screwdriver
• Cable puller
Checking for cable slack
If your bike is relatively new, or even if only the gear cable is, there’s a good chance that the metal inner cable has developed some slack (often referred to as ‘stretch’ although technically it’s bedding in, as the cable ferrules, housings and stops all snug up to their minimum length). This is often enough to throw gear shifting out. If the gear cable has developed slack, you’ll need to remove it by pulling the inner cable through at the derailleur clamp bolt (see below).
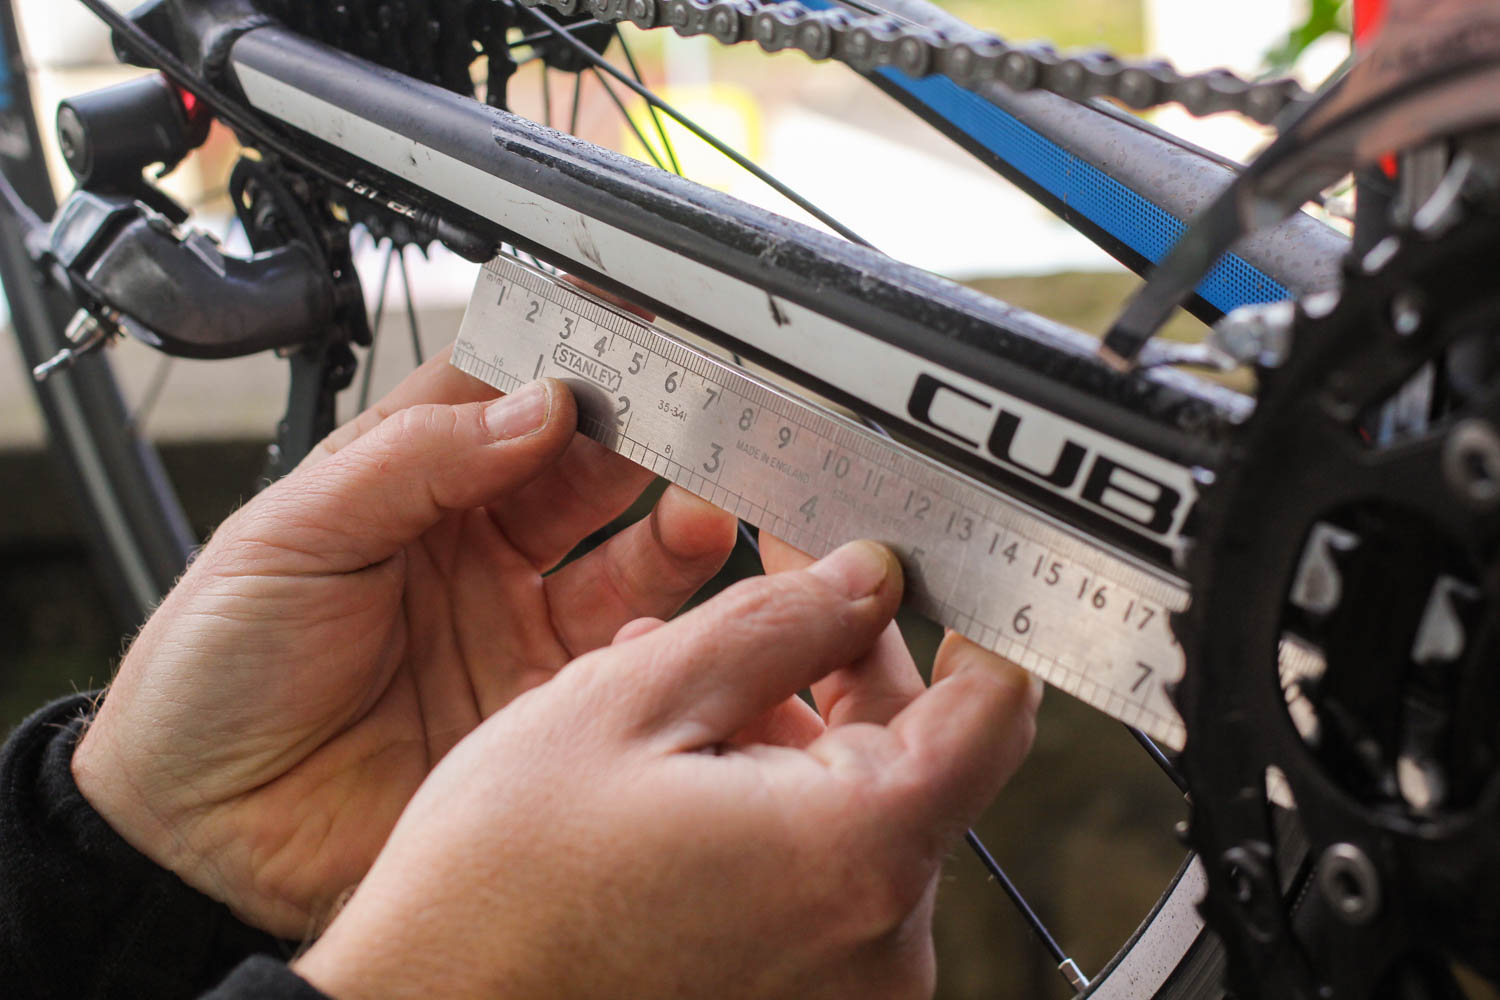
An easy way to check is to put the deraileur in the smallest sprocket and use a steel ruler as a datum as shown. If the cable’s not prallel to the ruler, then it probably needs tightening.
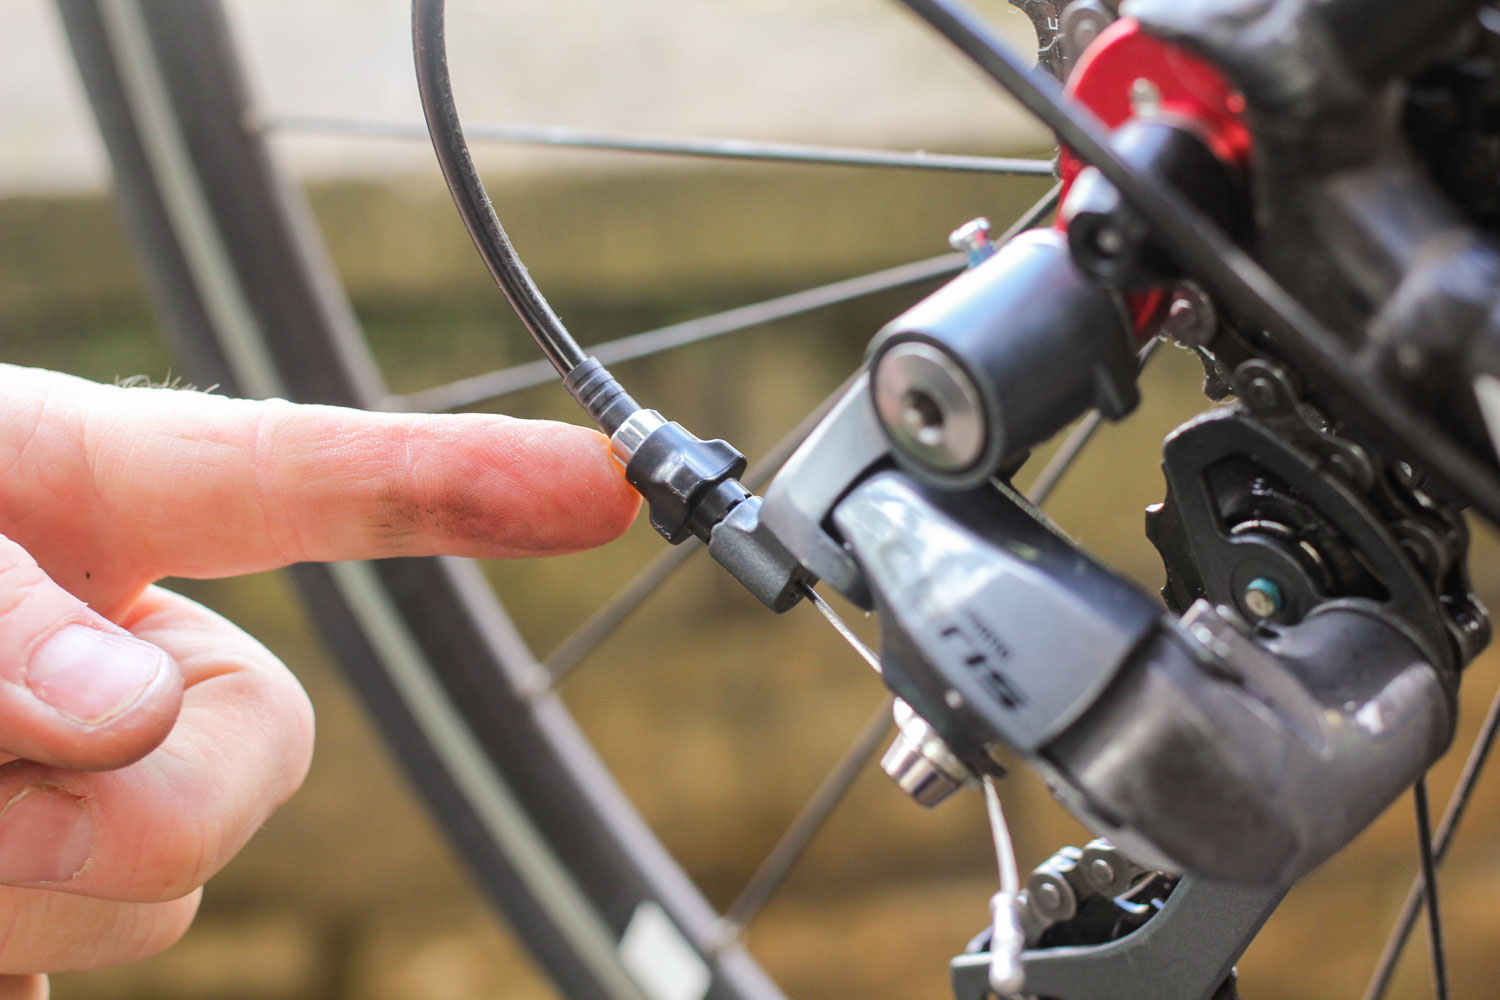
Barrel adjuster tension
You might also find that over time, cable tension adjustments have used up the range of adjustment provided by the barrel adjusters (at the derailleur and/or at the shifter depending on how your bike is equipped). As you can see above, this rear derailleur barrel adjuster is almost all the way out. This needs resetting at the cable clamp bolt (see above).
With the cable tension removed at the cable clamp bolt, re-set the barrel adjusters. Screw them all the way home (clockwise) into the derailleur or shifter body. Then screw them out (anticlockwise) one full turn. This will give you leeway to make fine adjustments in either direction as required.
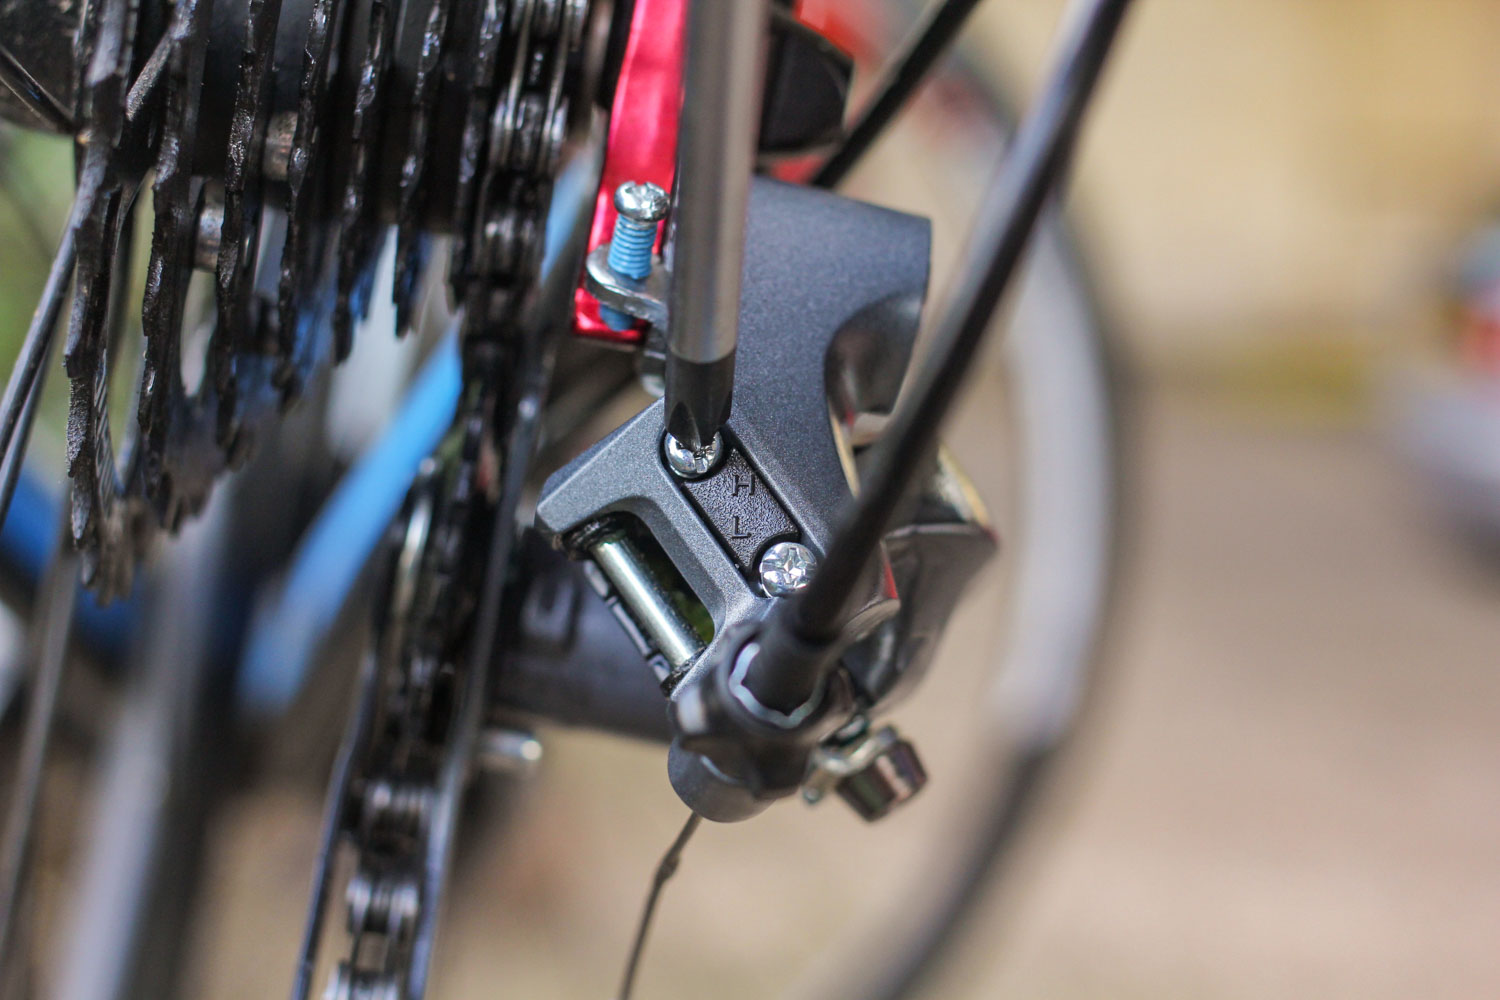
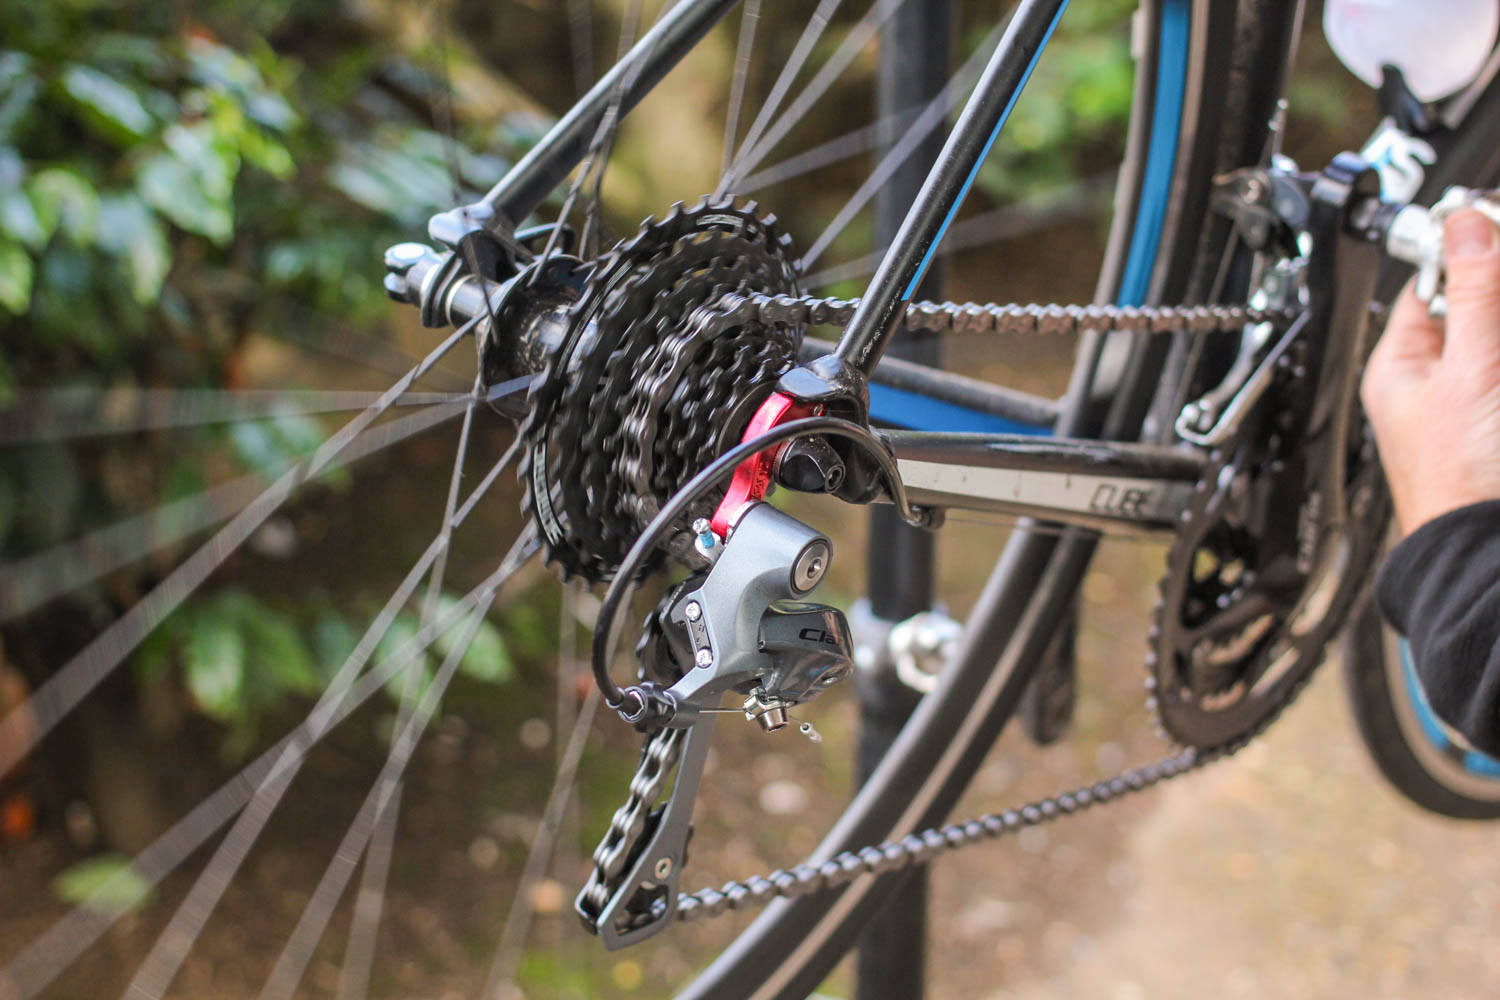
High gear adjustment
With the tension removed from the cable, turn the pedals. The rear derailleur should move the chain to run on the smallest rear sprocket, and the upper jockey wheel of the rear derailleur should be directly underneath the smallest sprocket.
If it’s not, make any adjustments necessary to sort out this alignment with the set screw marked ‘H’ on the derailleur body. Turning the screw limits the extent to which the rear derailleur cage, and therefore the chain, can move outwards. Turn the screw anti-clockwise to let the derailleur move further out.
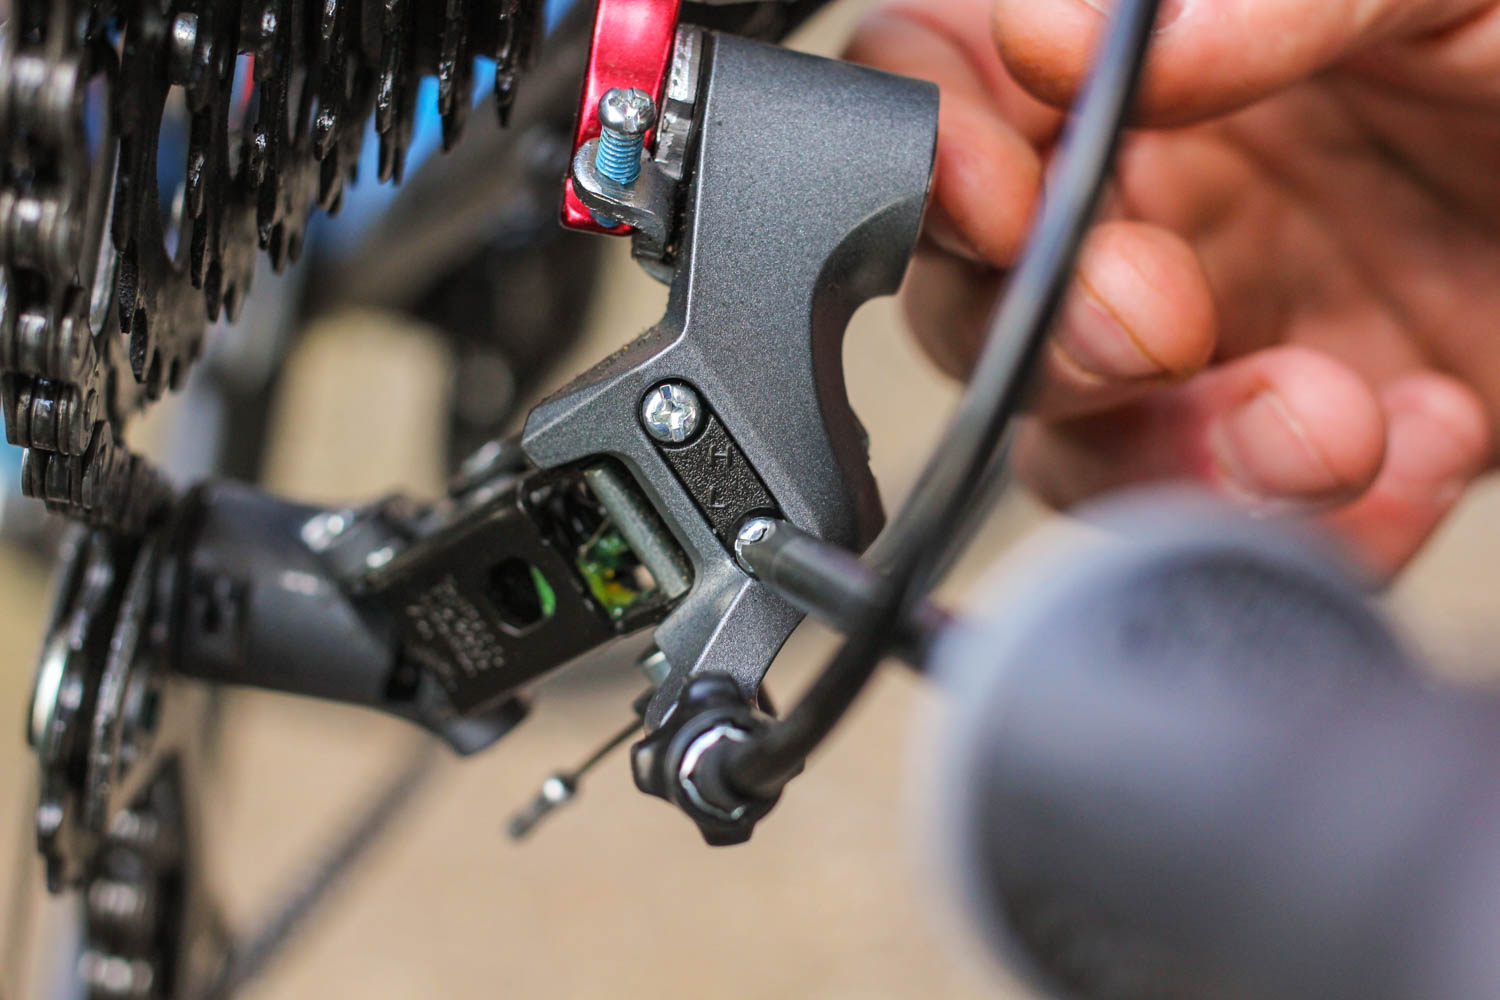
Low gear adjustment
Setting the low gear limit so you can shift cleanly onto the largest rear sprocket is important because failure to do so can allow the chain to over shift off the top of the cassette and into the spokes causing (occasionally terminal) damage to the rear wheel. The furthest inboard the rear derailleur should be able to move is the point where the upper jockey wheel is sitting directly underneath the centre line of the largest sprocket when viewed from the rear. Make any adjustments to achieve this position with the set screw on the rear derailleur body marked ‘L’.
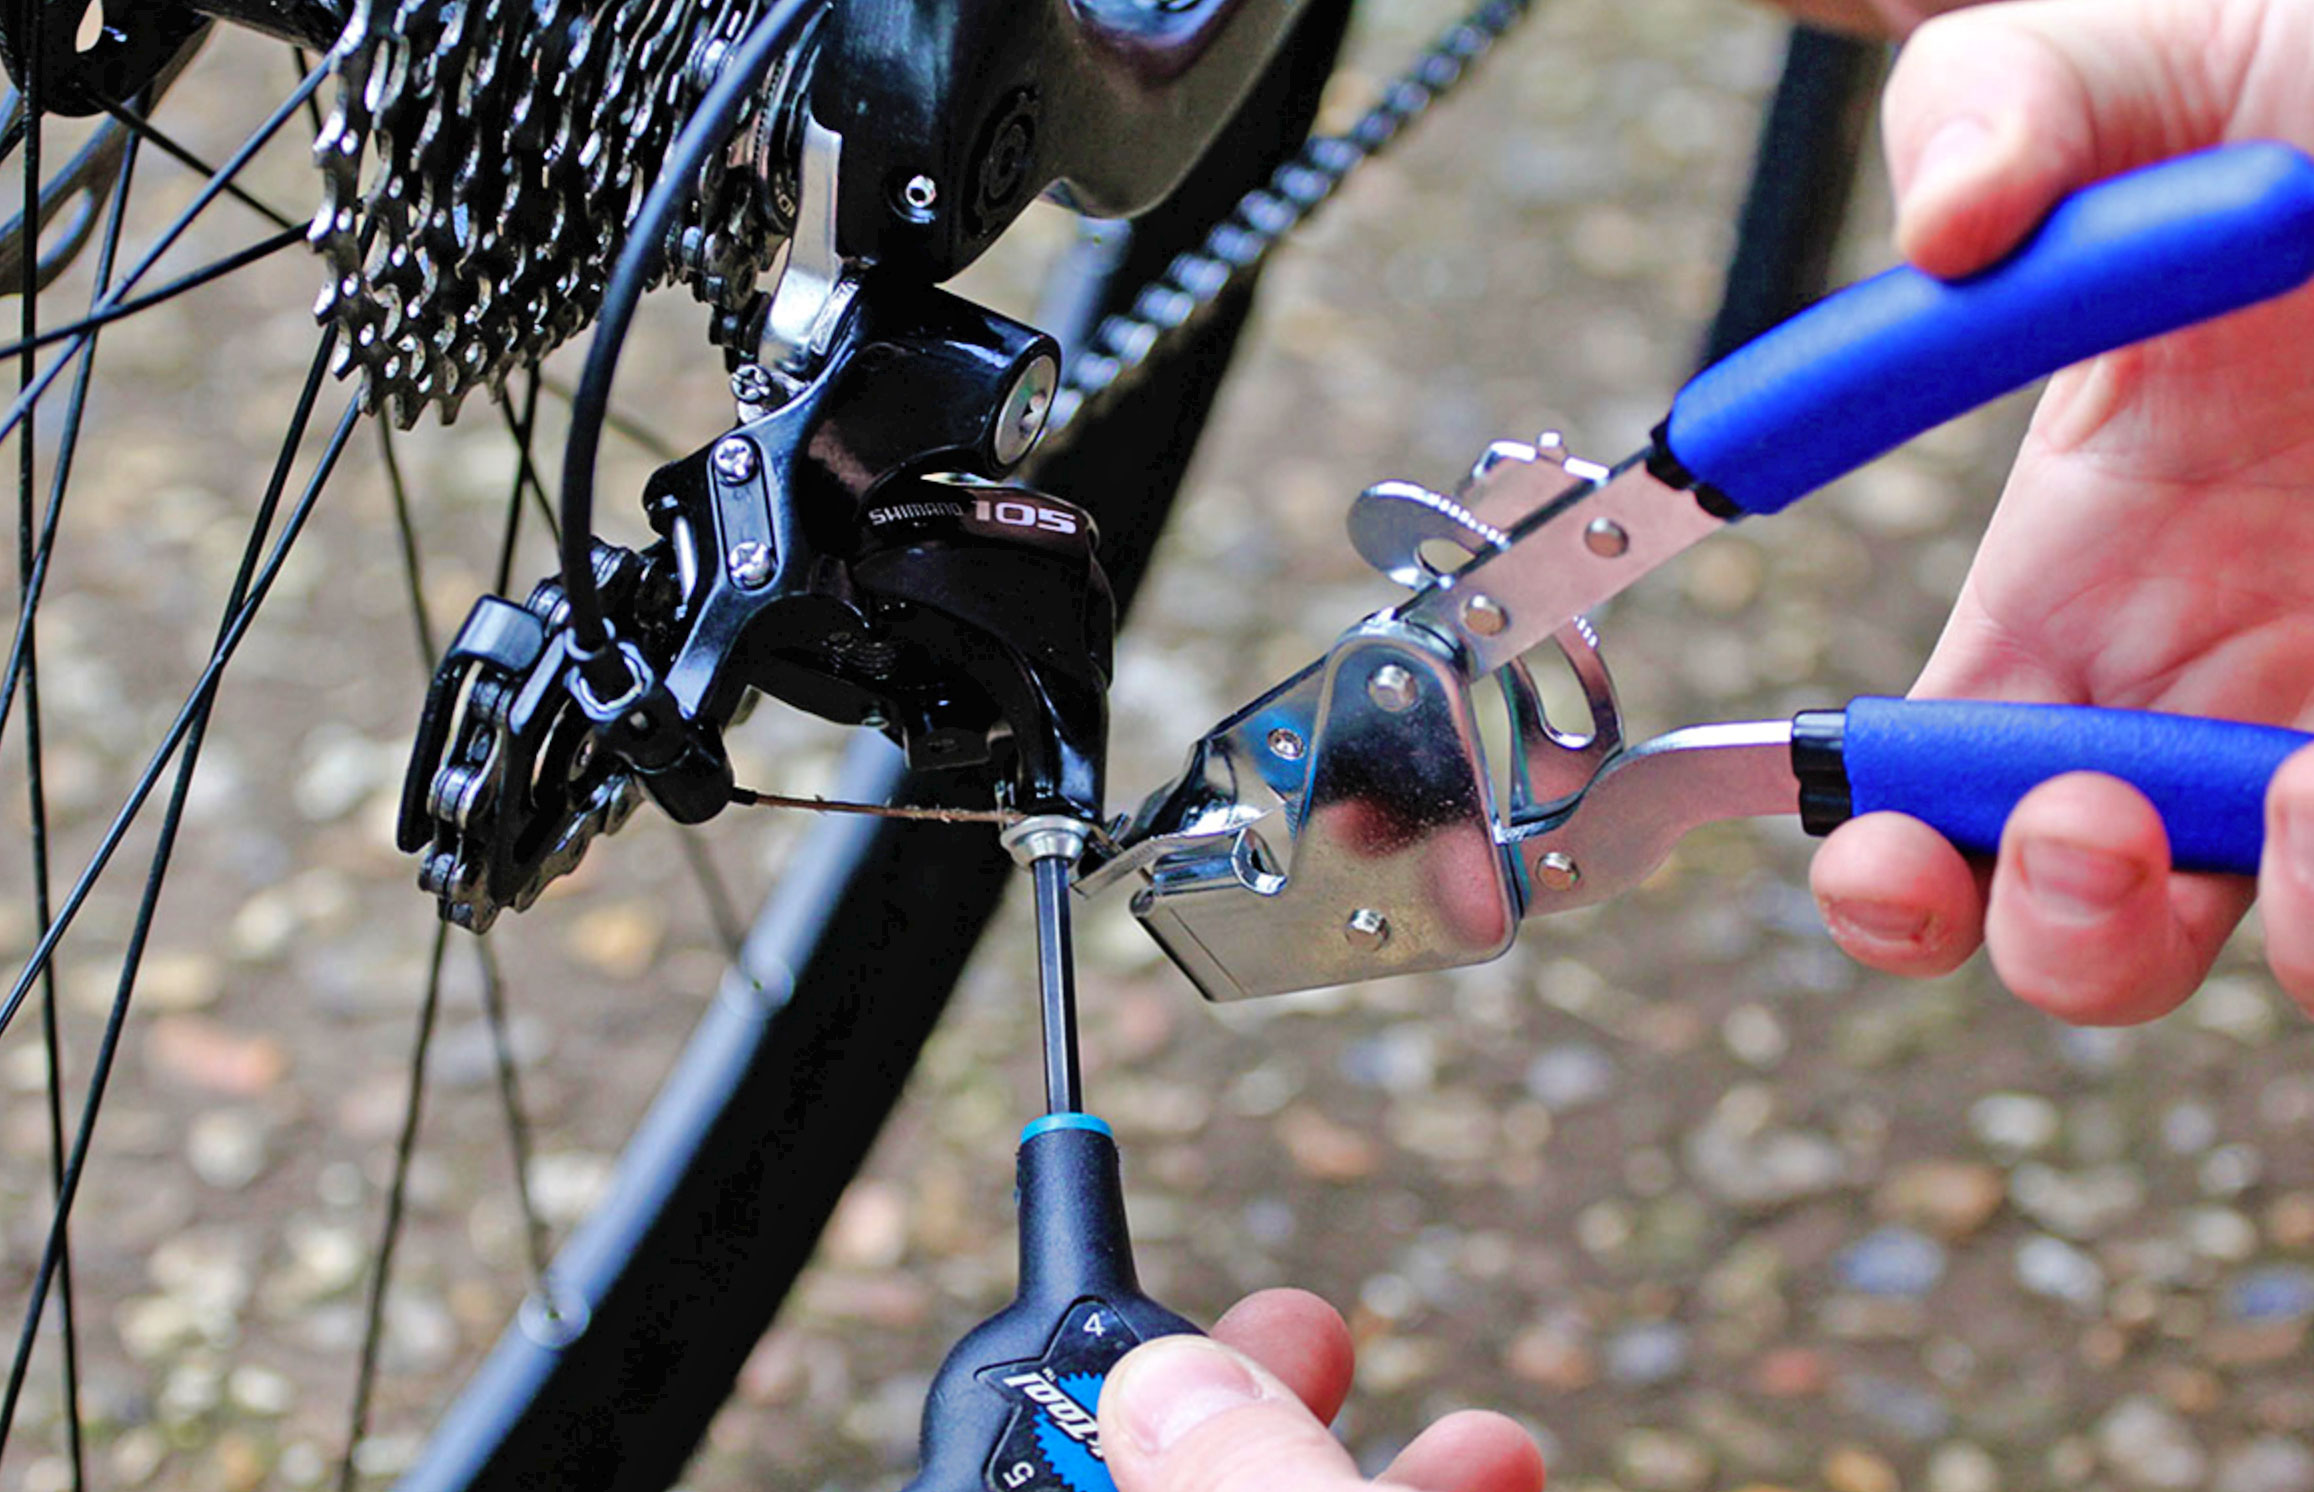
Setting cable tension
Use a cable puller (sometimes called a ‘third hand tool’) to pull the inner gear cable gently through the housing, making sure all sections of cable outer are located in their stops and that any cable guide grooves on the derailleur body are being correctly followed.
It’s the smallest things that can foul up indexing so take a second to be sure. You’re looking for just enough tension to take the slack out. As you make the adjustment, watch to see that the upper jockey wheel isn’t being pulled inwards from under the smallest sprocket. When the cable is free of slack and the derailleur and sprocket are still lined up, tighten the cable clamp bolt to hold the cable in place. Don’t over tighten the bolt – it’s easy to strip threads and tear heads.
Check it
Rotate the cranks. The chain should roll cleanly on the smallest sprocket and through the rear derailleur cage without catching or skipping. Now try the full range of gears one at a time. You can occasionally get the cable tension spot-on first time, but you’ll usually have to make some fine tuning adjustments to the cable tension with the barrel adjuster. You’re looking for one single click of the shifter to deliver one clean gear change. A single index click, which delivers a gear change that is slightly over or under shifting means the cable tension needs fine tuning at the barrel adjuster.
Fine tuning with the barrel adjuster
Shift one gear from the smallest sprocket. The chain should move smoothly onto the adjacent sprocket. If it doesn’t reach the adjacent sprocket, add a quarter turn of tension at the barrel adjuster (turn it anticlockwise). Similarly, if it shifts to the adjacent sprocket, but is making a noise as it tries to reach the third sprocket, you should release a quarter turn of tension at the barrel adjuster to remove the over shift (turn it clockwise). Whichever way you need to make adjustments, make them small; quarter turn adjustments are plenty. Continue until one click at the shifter delivers one clean (quiet, no skipping) shift to the adjacent sprocket.

Test ride your indexing
Ride the bike close to home and test the gears. Occasionally, freshly tuned gears can work faultlessly on the workstand, only to exhibit tuning small tuning niggles when on the road. Bikes with lots of sections of cable outer (including over or under length runs of cable), internal cable routes with funky stops, rear suspension or convoluted cable routing can all suffer in this regard. Make whatever remedial adjustments necessary.


19 thoughts on “Get your gears shifting sweetly: How to tune a rear derailleur”
Good article. More like this
Good article. More like this please. 🙂
Can anyone explain how to
Can anyone explain how to improving shifting via the “B” screw please?
You adjust ‘b’ screw so that
You adjust ‘b’ screw so that it just allows derailleur to shift onto biggest sprocket on the cassette. If you wind on too much b screw tension it moves the derailleur away/back from the cassette, so chain has less wrap around the cassette, making shifting more difficult
Honest feedback, that guide
Honest feedback, that guide is impossible for those new to this to follow. Example: add tension by turning the barrel adjuster – fine I know you mean anticlockwise to make it easeir to get into a bigger cog (easier gear) but someone new to it doesn’t! Your point about not overdoing the cable pull (by using pullers or pliers and pulling really hard before you anchor) is very good advice though.
GCN and Art’s Cyclery on YouTube have a great video each (GCN is good for explaining the concepts, Art’s for the procedure incl b-tension screw). My advice is to go there to see it more clearly step by step.
Just watch several YouTube
Just watch several YouTube videos about adjusting/setting up derailleurs, worth 1000 words
never forget about the b
never forget about the b-tension screw. can make the shifting throughout your gears much smoother and crispier, when adjusted properly. 🙂
Before doing any of this, you
Before doing any of this, you need to ask yourself why the gears are out of adjustment. I see a bike a day that doesn’t have its wheels properly in the dropout – put the bike on its wheels and open and close both skewers and the wheels will often clunk back into the dropouts and gear issues will magically go away.
But a very frequent cause of gear misalignment is a bent hanger. A small knock to the rear mech (eg parking bikes at your cafe stop) is enough to bend the hanger and ruin shifting accuracy.
iane wrote:
Quite right. Also, some hangers appear to be made of a material with all the integrity of warm mozzarella.
One other thing not mentioned is cable drag. The cable routing of some bikes is like the Gordian Knot (mentioning no names, but they speak Canadian French to aero obsessives, another makes very, very big bikes & throws them & worst of all the ‘highly rated’ value bike from Daley Thompson’s business with the err attractive name? They shift like dogs when new & rapidly deteriorate. With old, dirty cables they are hopeless!
The cable stretching tool
The cable stretching tool above is known as a ‘fourth hand tool’, not a third hand as stated. A ‘third hand’ tool is the strong spring on a handle which holds the brakes in the on position while you fiddle with cables.
bikeylikey wrote:
Quite right sir. Although, and this is first-hand knowledge, my third-hand tool happens to be second-hand.
You could go a long way to
You could go a long way to improving this article with some better and more relevant photos: e.g.
Check from behind to see if the upper jockey wheel of the rear derailleur lines up directly underneath the centre line of the smallest sprocket (it should do)
Show a close up photo showing what this looks like. Do the same for the for the limit adjustment for the large sprocket. Likewise for the B-screw.
I think one thing to add is
I think one thing to add is that it is uterly pointless to do this with the bike inverted.
Al__S wrote:
Why? I’ve never had any problems doing this.
It’s fine to buy a forth hand
It’s fine to buy a forth hand tool if you want but don’t feel you need one. I’ve been working on bikes professionally since 1980 and have never used one. Same is true of the third hand tool.
Once gears have been adjusted and settled in the most common cause of bad shifting is sticky cables, particularly in winter when the bike is getting sprayed with salty water. On many bikes you can slip the rear run of cable to the mech off its stop on the chainstay in order to lube it. Use something light and not sticky – GT85 is ideal. This run of cable is particularly vulnerable. Also where the bare the cable runs under the bottom bracket – keep this clean and lubed.
I’ve found this to be a
I’ve found this to be a fairly quick way to get near where you want to be if you’re starting on a bike that’s completely out. GCN’s change a gear and retension hack.
Ah, there can be a world of
Ah, there can be a world of pain wrapped up in that final sentence:
“Make whatever remedial adjustments necessary.”
“Get your gears shifting
“Get your gears shifting sweetly: How to tune a rear derailleur”
Follow the manufacturers instructions. Worked for me for 30plus years.
Stebbo wrote:
I like to open tune mine for a bit of blues cycling.
If you have nicely set up
If you have nicely set up gears that start playing up, especially if you readjust and they go out again, that’s a sign that your cable is fraying. Modern cabling under the bar tape is especially prone to wear in the shifter. Change the inner, because fishing out a cable broken in the shifter can be hard.
Get you home tip. With hidden cable runs, changing a cable at the roadside can be difficult – it can be difficult in a workshop! – so carry a short length of old gear cable, cut to about 10cm or less. If the cable breaks, secure any loose outers, remove the gear inner or secure it out the way, then put the spare inner in through the adjuster barrel, push the derailleur in and clamp the cable. You are aiming to get a midrange gear – considering the elevation you need to tackle. With a bit of tweaking of the barrel adjuster you’ll have a reasonable gear and can shift the front derailleur to have two whole get you home gears.