


How to fit a threaded external cup bottom bracket
If your ears are assaulted by a squeaking and a creaking from down below with every turn of the pedals then it’s probably time to give your bottom bracket some love with a bit of clean and a re-grease. And if those squeaks and creaks are accompanied by any wobbliness or play in the cranks it’s probably time to fit a new bottom bracket. Don’t worry though with the right tools both are relatively easy things to do and your bike will definitely thank you.
The bottom bracket, or ‘BB’ as it often gets shortened to, is the humble bearing which supports the rotation of the cranks. This out of the way components tucked mostly out of sight between the crank arms has morphed to include nearly a dozen different styles and sizes. Even so, the traditional threaded BSA threaded version remains the most popular, and for good reason, it works and is easy to fit so this guide concentrates on this type.
Lots of wet weather riding will encourage the ingress of water into the frame, where gravity will ensure it finds its way to the lowest component in the frame, the bottom bracket. The sitting water will eventually find its way past seals and begin rusting the steel bearing shells. If you’re out in the rain a lot, do your bottom bracket a favour… Periodically whip the cranks off and BB out (literally a five minute process), and wipe out the shell. Look into the backs of the cups, wipe away moisture, grit etc, give a light re-grease to the back of the bearing and put it all back together.
Gone are the days of cup and cone ‘open’ or ‘sealed’ units with separate axles, loose ball bearings and pots of grease, today bottom brackets are largely non user serviceable items which operate on a fit and forget basis. If you hear a squeak or creak, apart from giving the bracket shell a re-grease, and cleaning and reinstalling the cranks, is more or less the only remedy, if it doesn’t work then it’s time for a new BB. Certainly if your bottom bracket develops bearing play, or the bearing dies from contamination, then there is no choice but to buy another and replace it.
Most bike with threaded bottom bracket shells use external screw in cups. These come as specific left and right cups. There is a wide choice of brands, form the big guys like Shimano, SRAM and Campagnolo, to many of the smaller brands like Chris King, Hope Technology, Race Face, Praxis the list is huge. They all work the same way, though as with most components quality and service life is roughly in line with cost.
Bottom brackets are specific to certain types of cranks. Shimano use a straight 24mm axle, as do Full Speed Ahead, SRAM however use a 24mm drive side with a 22mm diameter non drive side, making SRAM bottom brackets specific to SRAM cranks. Know what you need before you buy.
Once you’re armed with the right spec bottom bracket for your cranks, fitting external bottom brackets is easy, do it like this…
Our guide below shows you what we believe is the best method to fit a threaded bottom bracket. We’ve included a list of the tools and materials that you will need to complete the job and in some cases where you can buy them. If there are others that you prefer then feel free to let everybody know in the comments.
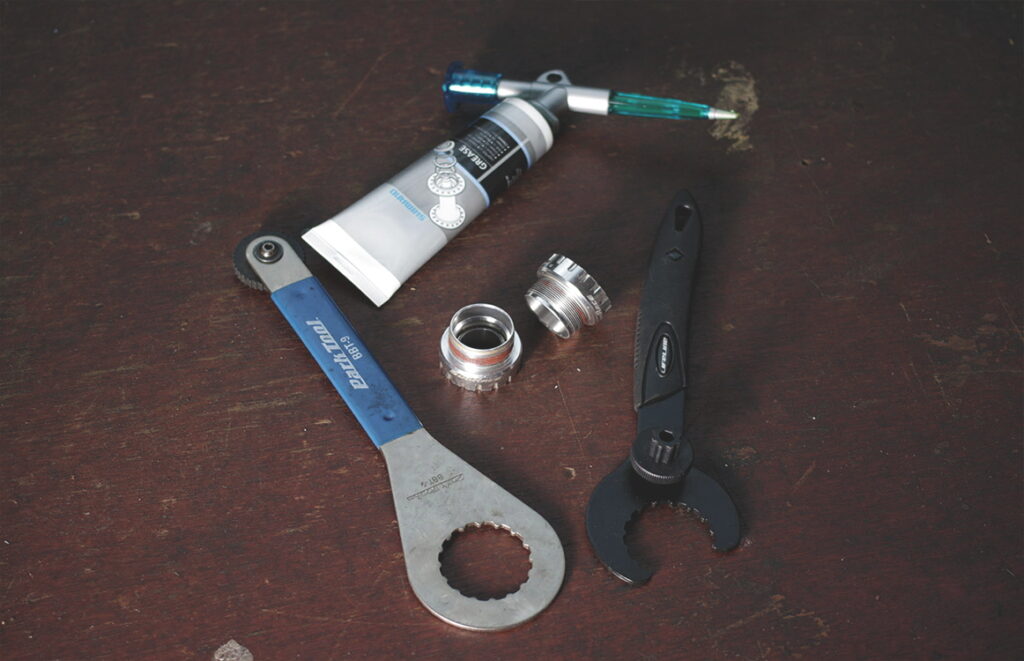
Tools & Materials

•Grease
•Bottom bracket installation tool
1. Frame prep
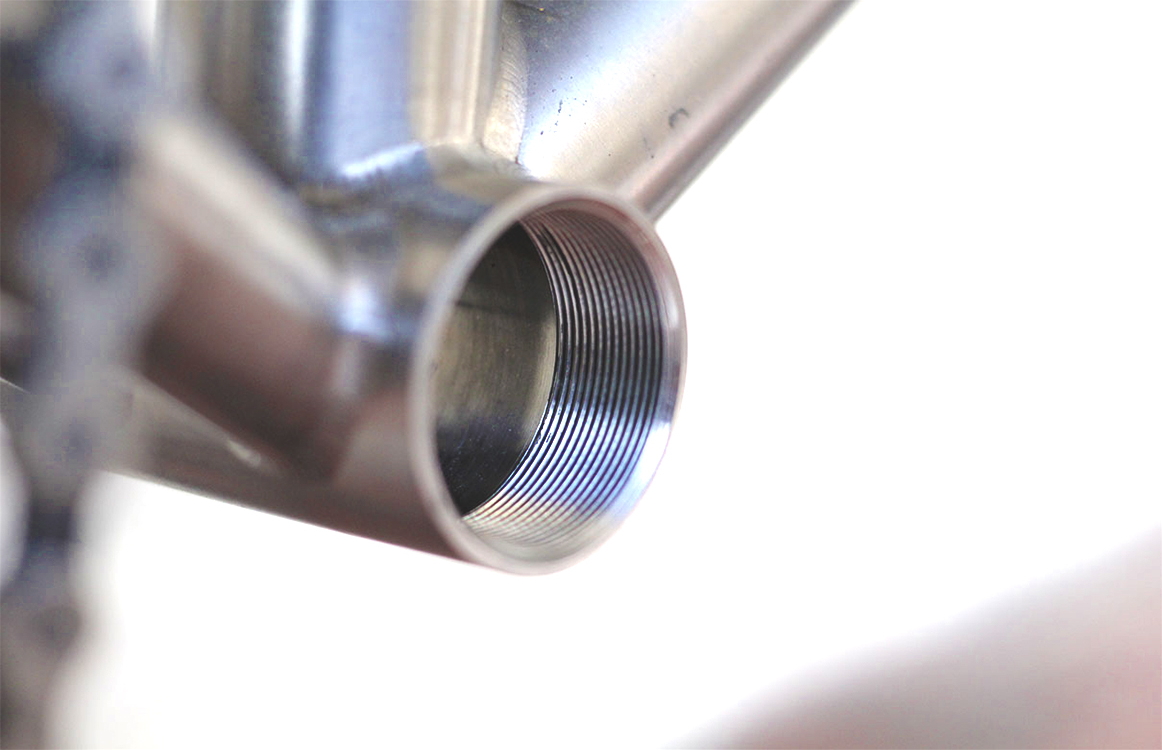
Before you can fit a new threaded external cup bottom bracket, you need to prepare the frame. The threads in the shell need to be clean and sharp. If after cleaning your frame’s bottom bracket threads you notice any damage to the threads or that when you run your fingertip on them, they’re not sharp and well defined, you should consider taking the frame to your local bike shop to have the threads ‘chased’, which cleans and defines them ready for a new bottom bracket.
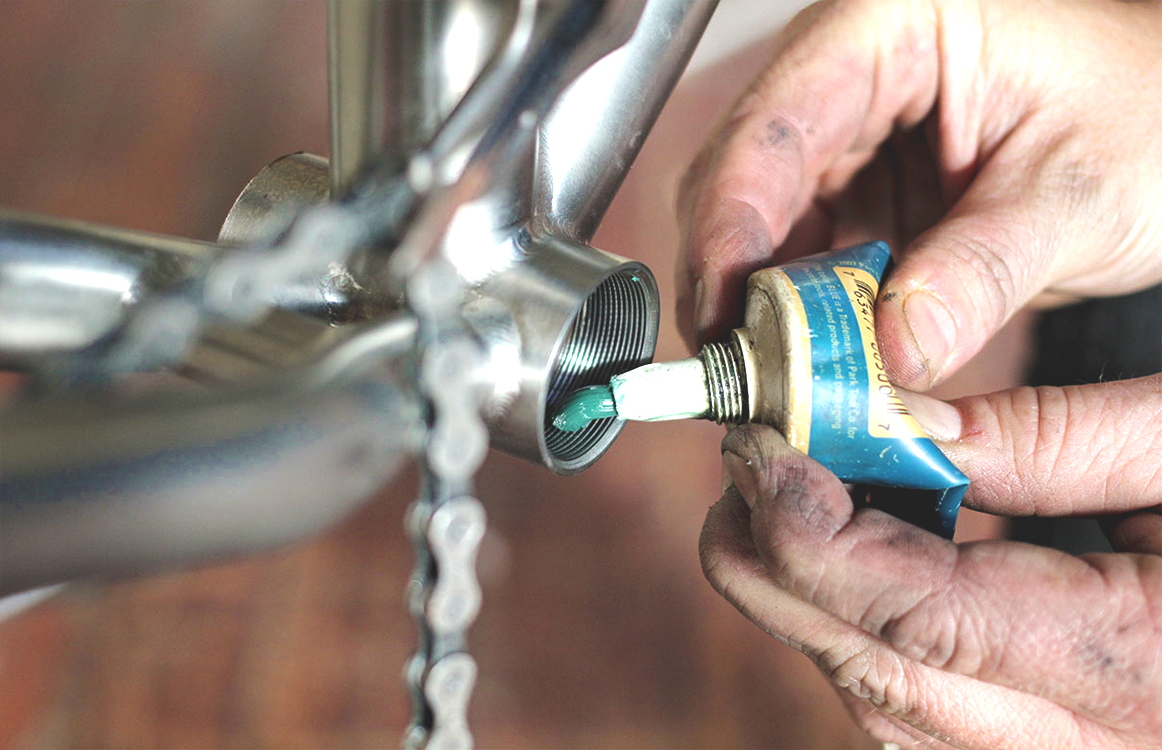
2. Grease
With the threads now clean and sharp the next step is to prepare them with a layer of good quality grease. The grease will enable a smooth fit between the cups and the frame, the grease will also reduce the chance of corrosion developing between the materials in the bottom bracket shell and those in the cups.

3. More grease
The grease you’re applying needs to be in all the threads, some people have a dedicated brush for this, though that can be messy in itself. I’ve always worked it around the inside surface of the bottom bracket shell with my index finger – which does the trick nicely.
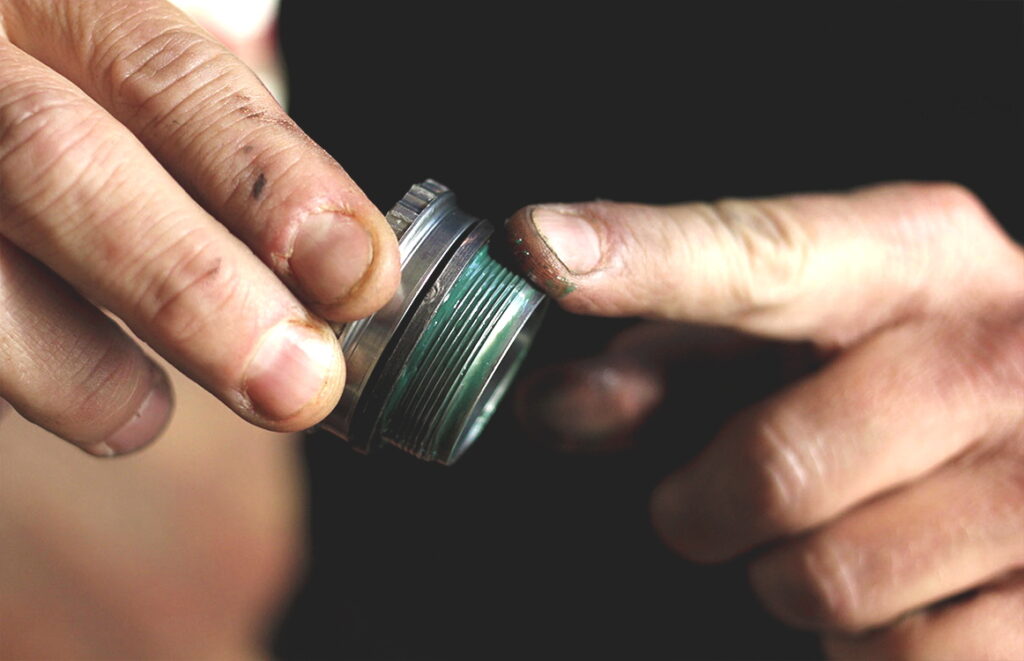
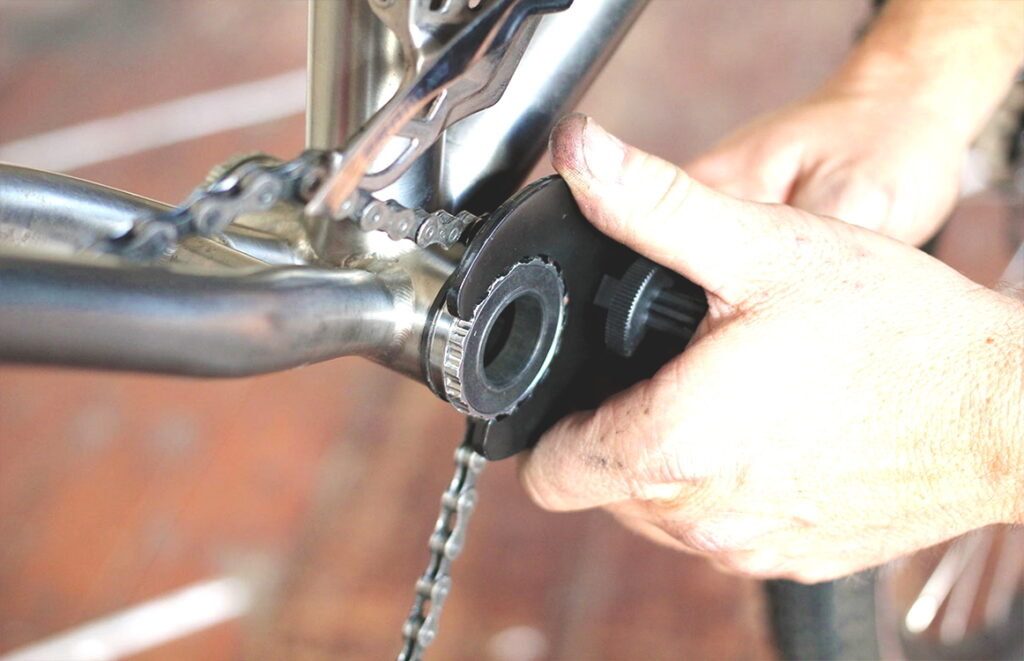
4. Prepare the cups.
The cups are threaded and the threads are different for the left and right sides. The non-drive-side has a left hand thread and the drive-side cup has a right hand thread. It is imperative that you don’t try to screw the wrong cup into the frame, it can in some cases cause damage to the leading threads in the bottom bracket shell and sometimes, though less often, the cup.
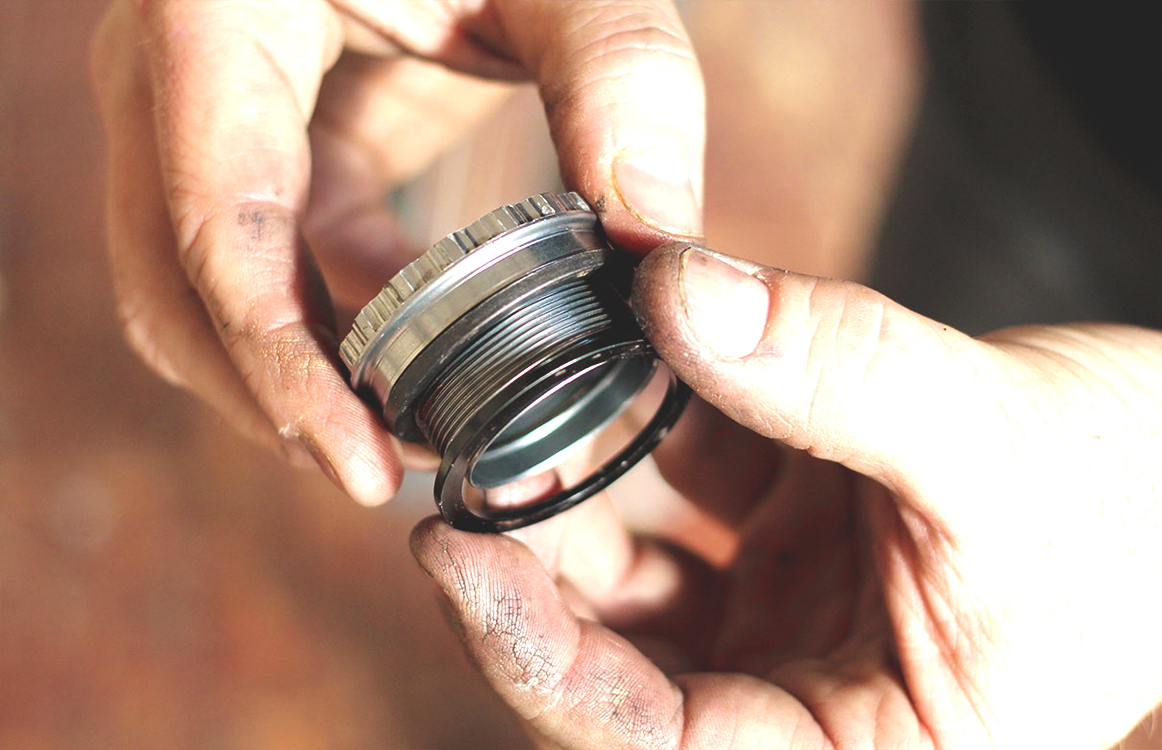
Bottom bracket shells (the bit of the frame we’re screwing the components into) come in 68mm and 73mm widths. Depending on the width of your shell and the specific cranks you’re fitting, you may need zero, one or two 2.5mm spacers. These slide on to the cups prior to fitting (as shown) most bottom brackets have a guide sheet with them telling you how many you need (if any) and which cup to fit them to.
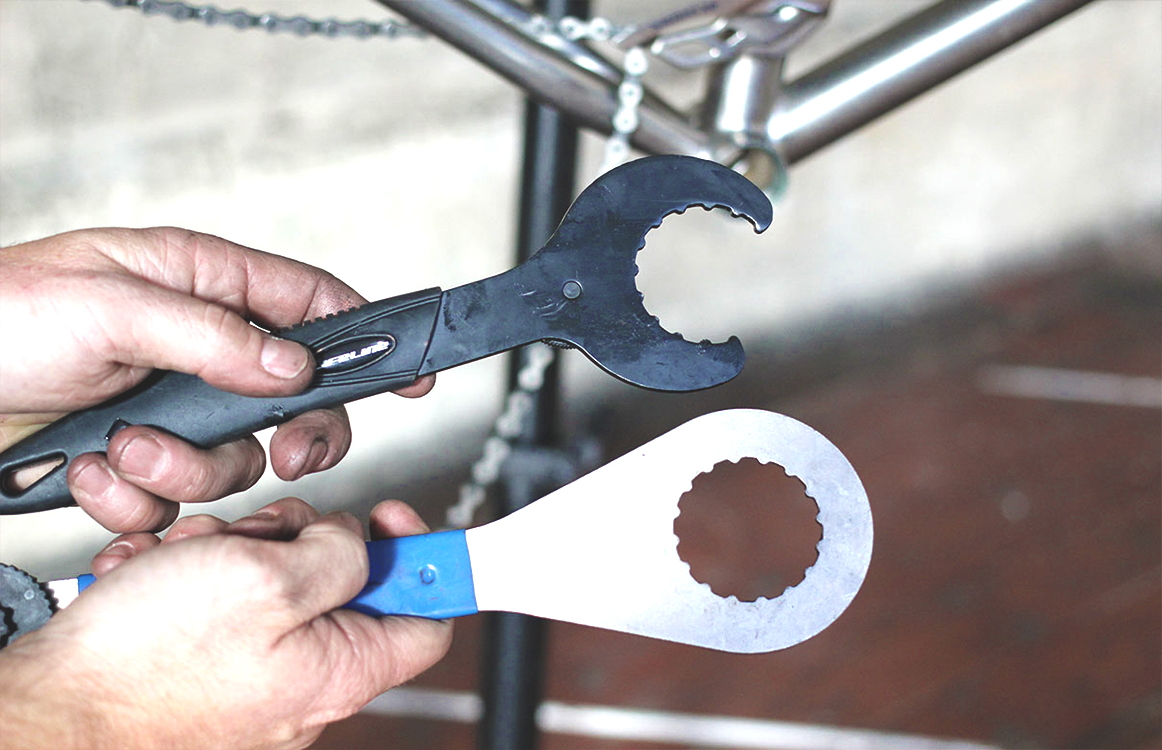
5. Get the right spanner
One of the benefits of the threaded external cup design is that it’s adjustment free, meaning you simply screw it in to the frame until it’s tight. To do this you’ll need a specific external cup bottom bracket fitting tool. They come in a variety of styles, open (top) and ring (lower) for a full 360 degree contact. There are also some socket tools which work well, but wrench styles like these are cheaper and more convenient.

6. Even more grease
Although you’ve greased the bottom bracket shell threads, and if push comes to shove it’s usually enough, it’s still good practice to add some more grease to the threads of each cup prior to installation. Some people choose to fit the plastic spacer which most external threaded bottom brackets come with (it fits between the cups to seal them from moisture). I don’t usually bother, as in wet UK conditions they hold any water which inevitably finds its way in. Better to whip the cups out periodically for a wipe down and re-grease and refit, a process which can be done in five minutes.

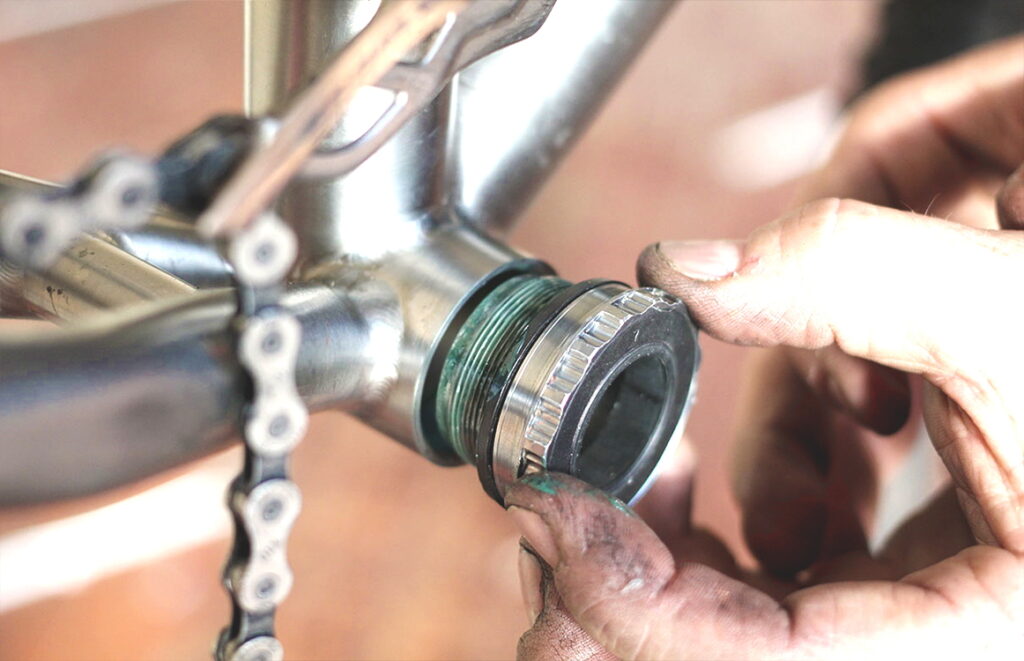
7. Start the thread
The most important moment of the whole process is the offering up of the cup. Having first ensured you’re fitting the correct cup for that side of the frame (it’ll be engraved somewhere on the outside of the cup), you must make sure the cup engages the shell threads exactly square. It is easy to rush and get a cross thread happening. Go slow and get it right, it’s a lot less time consuming than trying to remove a cross threaded cup and repairing the threads.

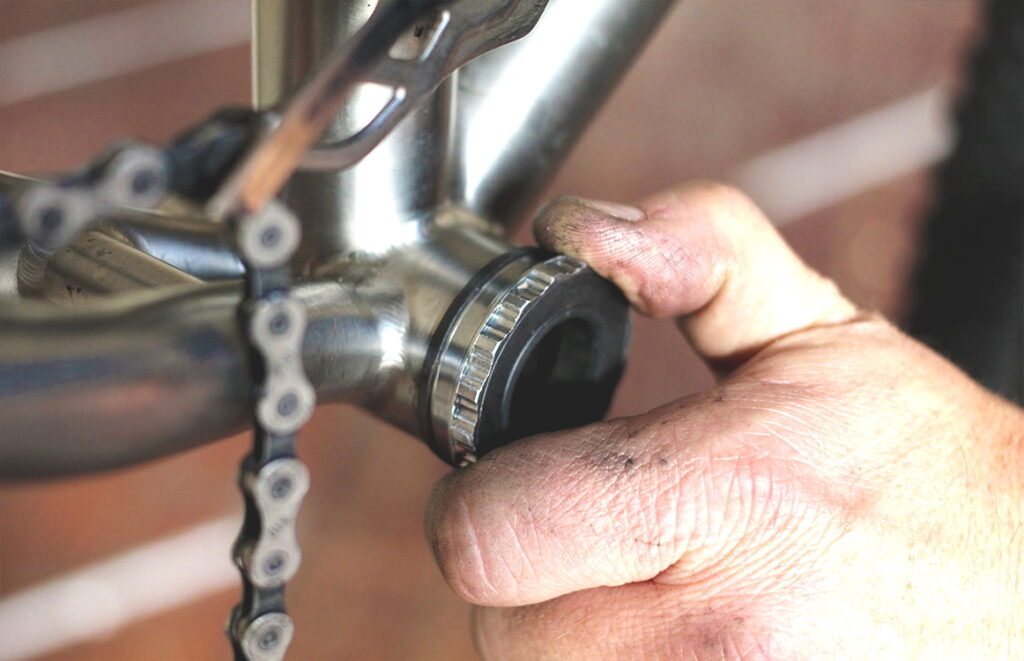
8. Screw the cups in by hand
Once you know you’re square, turn the cup in the direction to screw it in. You should feel the first threads engage (it why we do this by hand and not with a tool). Once you feel it turning keep going. It’s easy enough to do this by hand, the first half of the threads are usually achievable by hand, some, will go a lot further, some less. If your bottom bracket’s threads are particularly tight, you might want to have the them chased to see if they can be freed up. Generally speaking, with bottom bracket thread, you don’t want them ‘baggy’ and loose, or annoyingly tight, somewhere in between.

9. Tighten the cups
The last few turns will require the use of a fitting tool. Keep turning the tool evenly and watch that the jaws don’t slip off, as this can tear the light alloy in the castellations around the edge of the cup. It’s untidy looking and can make future servicing less easy.
Repeat the process for the other side of the bottom bracket shell. You’ll realise the process is extremely simple and convenient to do if and when required. There’s nothing, other than the spacers, in the way of adjustment to worry about. Once you know what you bike needs in terms of spacing that’s it.
Happy home tinkering.


, Portland’s world record ambitions, another e-bike brand goes pop + more")
9 thoughts on “How to fit a threaded bottom bracket in 9 easy steps”
No mention of BB facing? No
No mention of BB facing? No mention of Campy (and their same-way threading)? Confusing that Picture 6 shows one of the width spacers but talks about the internal tube axle shield (“plastic spacer”). I’d suggest its use might depend on the BB shell – many are quite open to the elements – in fact, designed so that trapped water can drain.
I’d suggest getting a “socket” style tool to tighten and loosen, as it’s less likley to mar the finish.
If the external bearing goes on very easily, it would also be a good idea to fit it using low-strength Loctite instead of grease (esp. if Campy)
I look forward to the
I look forward to the pressfit version of this guide, which will be nine stages of swearing.
bikebot wrote:
Followed by pride in a job well done which evaporates immediately you go for a ride and the b&$^@~d thing is still creaking.
Surely, for a BSA bottom
Surely, for a BSA bottom bracket, it’s right-hand cup, left-hand thread / left-hand cup, right-hand thread…? I fitted one last night…
Slowly, slowly catchee monkey
Slowly, slowly catchee monkey applies to this job.
Greased well the cup should go in easily with minimum effort or drag almost all the way to the shell. If there’s resistance after a couple of turns check you’re not cross-threaded and if not as the article states get the threads chased. That’s definitely an LBS job unless you’ve got a bunch of old shells around to practice on.
I’d always go with a full ring spanner for this job, less chance of it slipping and marring either the cups or worse still the frame. It’s a tool you’ll use a lot and not an expensive one so worth the investment. The Park Tool one has the little dial for pre-loading the bearings when you put the cranks back on and also includes the reducer needed for some of the Dura-Ace cups.
When re-installing the cranks make sure the drive side spider is flush with the cup – it is surprisingly easy to install the non-drive side crank with a small gap still present on the drive side. Tap it with the rubber mallet you probably used to tap the crank out before replacing the cups.
(all the above advice is Shimano, I’ve not had the pleasure of working on SRAM or Campy)
Given how easy this job is I don’t really see the point in investing in Hope or Chris King BBs. I usually use Tiagra-level and treat it as a disposable item. Tend to swap it when I winterise the bike – put the mudguards on, swap to winter wheels, swap cassettes, swap to winter chainlube
I use anti-seize rather than
I use anti-seize rather than grease a) if installing a BB in a titanium BB shell, and b) if the BB Shell and BB threads are dissimilar metals (i.e. steel in aluminium, aluminium in steel, etc), as you’re less likely with the anti-sieze to get galvanic corrosion between the two metals. The bottom bracket in a bicycle is the most likely place for this problem to happen, due to the fact that any water ingress into the frame will eventually find its way to that point.
If you’re servicing/replacing your bottom brackets on an annual or bi-annual basis, this probably isn’t an issue, but some bottom brackets (eg Shimano UN5x and UN7x series, SKF, etc) will last the best part of a decade or more before they need servicing.
You find it a struggle to
Four years on and you’ll find it a struggle to source the same BB shown in this piece. In any case from (I *think*) Ultegra 6800 onwards Shimano went over to a different pattern – supposedly to do away with premature creakiness – which is backward compatible with those pictured above.
It typically comes with a rather delicate looking adaptor for use with older-style type BB tools. However, it doesn’t inspire confidence – especially used with an open type wrench rather than the ring type.
Do yourself a favour and buy the proper Shimano tool. It’s steel, 1/2″ drive and cheaper than the aluminium 3/8″ drive Park Tool offering. Fitting a BB with the correct torque might even prolong its lifespan.
Why is this dated 27th
Why is this dated 27th December 2019 but features comments from 4 years ago?!
Rapha Nadal wrote:
It’s surely a conundrum.