

- News
- Reviews
- Bikes
- Accessories
- Accessories - misc
- Computer mounts
- Bags
- Bar ends
- Bike bags & cases
- Bottle cages
- Bottles
- Cameras
- Car racks
- Child seats
- Computers
- Glasses
- GPS units
- Helmets
- Lights - front
- Lights - rear
- Lights - sets
- Locks
- Mirrors
- Mudguards
- Racks
- Pumps & CO2 inflators
- Puncture kits
- Reflectives
- Smart watches
- Stands and racks
- Trailers
- Clothing
- Components
- Bar tape & grips
- Bottom brackets
- Brake & gear cables
- Brake & STI levers
- Brake pads & spares
- Brakes
- Cassettes & freewheels
- Chains
- Chainsets & chainrings
- Derailleurs - front
- Derailleurs - rear
- Forks
- Gear levers & shifters
- Groupsets
- Handlebars & extensions
- Headsets
- Hubs
- Inner tubes
- Pedals
- Quick releases & skewers
- Saddles
- Seatposts
- Stems
- Wheels
- Tyres
- Health, fitness and nutrition
- Tools and workshop
- Miscellaneous
- Buyers Guides
- Features
- Forum
- Recommends
- Podcast
review
£39.99
VERDICT:
Lightweight and compact way to reinflate your tubeless tyres, with caveats around your setup working with it
Lightweight
Compact
Can be used as water bottle
Robust and idiot-proof
Small volume means it won't inflate some combinations of setup
Bottle isn't standard shape for traditional bottle cages
Weight:
167g
Contact:
At road.cc every product is thoroughly tested for as long as it takes to get a proper insight into how well it works. Our reviewers are experienced cyclists that we trust to be objective. While we strive to ensure that opinions expressed are backed up by facts, reviews are by their nature an informed opinion, not a definitive verdict. We don't intentionally try to break anything (except locks) but we do try to look for weak points in any design. The overall score is not just an average of the other scores: it reflects both a product's function and value – with value determined by how a product compares with items of similar spec, quality, and price.
What the road.cc scores meanGood scores are more common than bad, because fortunately good products are more common than bad.
- Exceptional
- Excellent
- Very Good
- Good
- Quite good
- Average
- Not so good
- Poor
- Bad
- Appalling
The milKit Booster is a lightweight, multi-purpose way to reinflate tubeless tyres when travelling or riding. Just be sure to practise beforehand and confirm that it will work with your tyre-rim-valve-pump combo before heading out. And be aware you may need a different bottle cage.
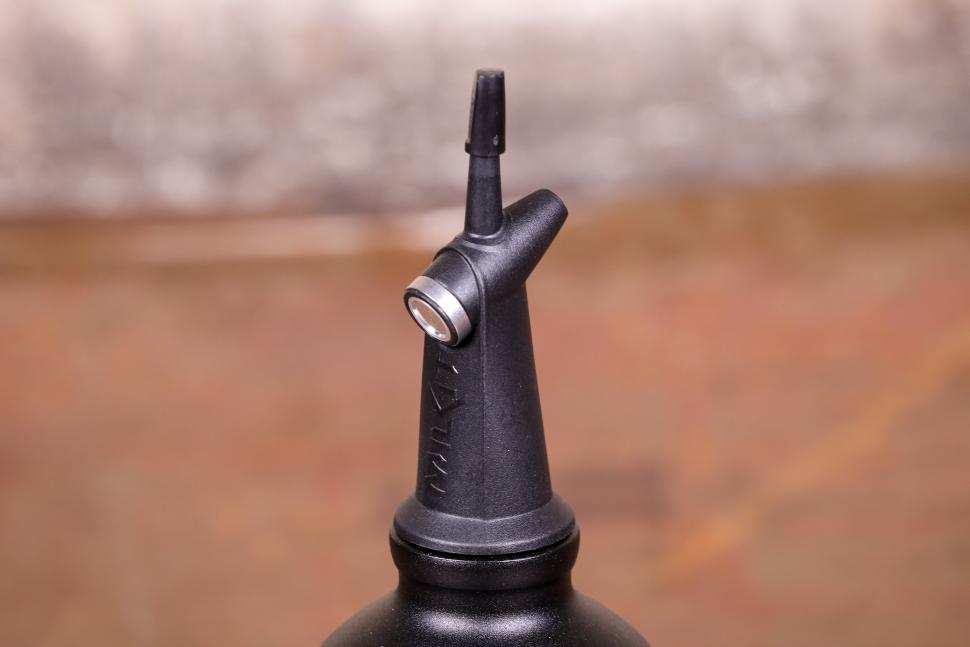
milKit is a Swiss firm best known for its unique tubeless valves, which feature one-way rubber 'flaps' that let you insert and retain air or sealant with the valve core removed, greatly aiding air inrush or ease of checking and topping up sealant without unseating the tyre bead. I've been a fan since testing the Tubeless Valve and Refill Kit back in 2016, and have used milKit valves and sealant injector on countless tubeless setups.
> Find your nearest dealer here
Important note: milKit recalled the first generation of Boosters in 2018, easily-identifiable as they were made from blue plastic. These could fail under high pressure, so if you see a blue Booster in the wild, after throwing your body over it to protect nearby children from plastic shrapnel, let the owner know they can get it replaced for free via milKit's website or reseller.
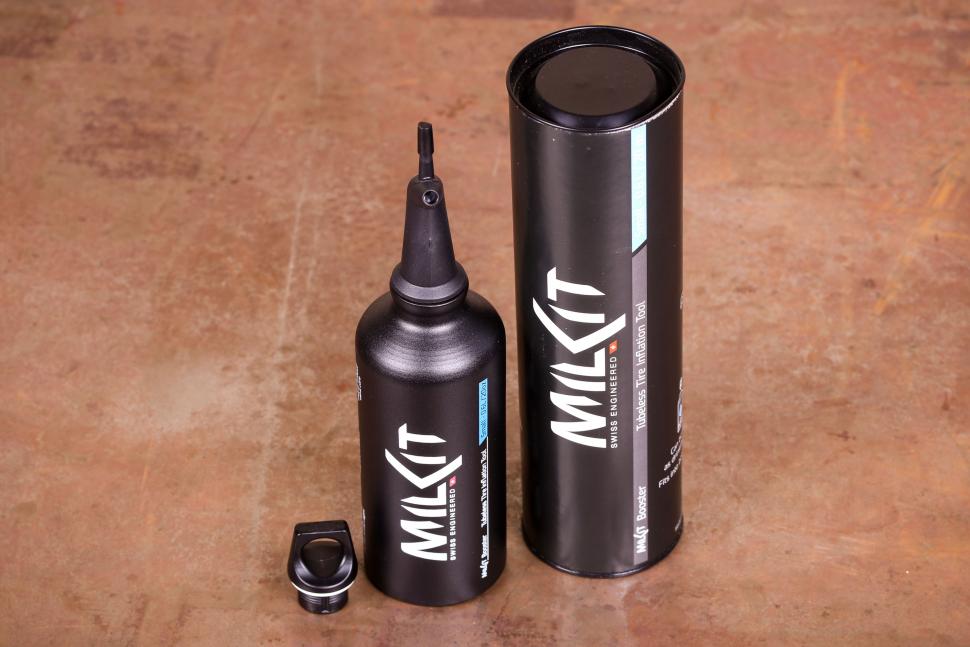
milKit bottle
When not in duty as a tubeless airtank the Booster doubles as a metal water bottle, with the standard 'adventure' threaded plastic cap found on SIGG and other alloy bottles.
The Booster measures 73.4mm in diameter compared to the recognised standard of 73mm – therefore, given it's solid metal with no give, it didn't sit all the way down in any of my metal bottle cages. Also, the curve in the top of the bottle doesn't fit the industry standard bottle cage retaining 'tab' height of 127mm either. The curve starts at 150mm up the Booster bottle, kicking in much higher than that on a normal bottle. So the Booster bottle doesn't sit in the bottom of the cage and is pushed out by the cage bottle tab, only held in place by metal-on-metal friction as opposed to the springiness of the cage holding the bottle down below the tab. This means the bottle is hard to remove for a drink if securely stowed, even passing a finger through the lid and pulling, while pushing up from below. Certainly not doable on the move, should you attempt it.
milKit does a larger bottle size of 1L for £3 more, which also doesn't have an indentation in it at the standard cage tab height. Of course you could opt for a tabless bottle cage like the Zefal Pulse Aluminium, which doesn't have a retaining tab and holds the Booster just fine. This larger bottle size should do a better job of seating difficult tyres requiring more volume of air (see below) and also may be more practical for bikepackers wanting to carry water in it.
Pressure points
The Booster is rated for a maximum of 160psi, but in reality no mini-pump you're likely to have out on a ride is capable of more than 120psi. Indeed, it took 300 strokes of the Birzman Mini Apogee pump to get to 120psi, and you really want to be wearing gloves while doing so. So when you're testing your setup, remember to use what is a realistic achievable pressure for your use case.
When you're seating tubeless tyres two things are your friend: volume and airflow. You need lots of air to flow quickly, and keep flowing until the tyre is in the right shape to pop the beads over the rim ridges and prevent further air loss. Pumped to 160psi, the Booster didn't seat a particular rim/tyre combo with the valve core installed, while the Birzman 2L tank did succeed, charged to the same 160psi pressure. Arguably, the Birzman tank should rate worse, as there's more airhose/valve gubbins in the path. There's a lot to be said for more air that keeps on coming.
milKit suggests removing the valve core to obtain maximum airflow, but the Booster kit doesn't include a valve core removal tool (missed opportunity in the plastic valve cap there) so you'll either need to carry one, or only install them finger-tight. At 120psi the Booster inflated a supple 38mm Compass tyre without valve core no problem – but with the valve core in, no dice – the air pressure just wasn't strong enough. This is where you should be considering running the milKit valves (around £25, or £40 with the whole milKit system), as they have a one-way rubber flange inside that lets air go in, but not come out with the valve core removed.
> How to choose your correct tyre pressure
Going off a realistic trailside maximum pressure of 120psi the Booster did seat a 38mm tyre, but as above, only with the valve core removed. At a workshop-friendly 160psi, it was able to seat the same tyre with the core installed.
I see this difference – 120psi max road/trailside vs 160psi if you're near a floorpump – as the main factor to bear in mind with the Booster. In both cases you'll definitely benefit from using milKit's one-way valves. I certainly could have used the Booster during my ill-fated Dirty Reiver tubeless fiasco where the ability to get a fast shot of air in to reseat the tyre would have meant I could run tubeless instead of resorting to a higher-pressure and more risky inner tube.
Need a Booster
'Burping' tubeless tyres (where all the air falls out as the bead pulls away from the rim under heavy cornering) is becoming a rare occurrence – and even then I've only ever heard of it happening on low-pressure mountain bike tyres. So the most likely cause of need for the Booster in a road or gravel context is when you've suffered a puncture so bad that your sealant couldn't work (or had dried up) and pressure had reduced to the point where the tyre bead slipped back into the centre of the rim – an impossible situation to recover from with just a handpump. In that case the Booster is a near-guaranteed way to get rolling again tubelessly – assuming it works for your combo.
One thing the Booster most likely won't do is give you that 'snap of confidence' as the tyre beads pop over the centre channel ridges and seat fully home all around the rim wall. For that you generally need pressures in excess of 30psi in the tyre, and I never managed more than 20psi even in a super-tight-fitting tyre using the milKit, such was the loss of air during the reseating process.
A 35mm 700C tyre has an inflated volume of around 2 litres – so a 600ml Booster bottle is at best only going to get you to 27.7psi – or quarter of its 120psi starting pressure – and that's before accounting for leakage. So you need to keep your pump handy and be quick about getting more air into what will be a quickly-leaking, yet-to-fully-reseal tyre. As above, if you've had to remove the valve core to get sufficient inrush, you may be unable to get the core reinstalled before all the air falls out again. Hence the recommendation to use milKit valves. Either way, get riding immediately to distribute the sealant and allow the beads to settle.
Conclusion
Overall, the milKit Booster is a lightweight, compact and simple solution to roadside or travel tubeless woes. It's cheaper, smaller and less than half the weight of the nearest competitor, the 1.15L 130psi Airshot, now £49.99 at rrp, and can be used as a water bottle with the right cage so utility and storage isn't an issue on bikepacking trips. However, that small volume does mean you need to thoroughly test your setup, and possibly invest in milKit valves to ensure you can retain what pressure manages to get inside your tyres, out on the road or trail.
Verdict
Lightweight and compact way to reinflate your tubeless tyres, with caveats around your setup working with it
road.cc test report
Make and model: Milkit Booster head with 0.6 litre bottle
Size tested: 0.6 Litre
Tell us what the product is for and who it's aimed at. What do the manufacturers say about it? How does that compare to your own feelings about it?
It's for people wanting to re-inflate their tubeless tyres roadside, in a compact and affordable package.
milKit says: "A LIGHTWEIGHT, SPACE SAVING TUBELESS INFLATOR WITH AWARD WINNING TECHNOLOGY. More efficient inflation, and it even doubles as your water bottle to be taken on rides. Compatible with all Presta tubeless valves, use milKit valves for the best results"
Tell us some more about the technical aspects of the product?
From milKit:
Space-saving: replaces large air compressors
Eco-friendly: replaces single use CO2 cartridges
Economical: no more CO2 cartridges or investing in a costly compressor
Efficient: no additional hoses means the full air pressure goes straight to your valve
Lightweight Booster head (21gr/0.74 oz) with a drawstring bag to take it on rides
Drinking bottle cap included
Rate the product for quality of construction:
10/10
It's made very well indeed. Swiss, actually.
Rate the product for performance:
6/10
Really mixed bag, unfortunately totally reliant on the tyre-rim-valve setup.
Rate the product for durability:
9/10
Early days, but I can't see it ever breaking.
Rate the product for weight (if applicable)
10/10
It's the lightest inflator by far.
Rate the product for value:
7/10
It's the cheapest tubeless inflator on the market, and impressive in terms of getting you rolling again, for this size and weight, for the money.
Tell us how the product performed overall when used for its designed purpose
Assuming your setup was of the right mix, it worked every time.
Tell us what you particularly liked about the product
The simplicity of use.
Tell us what you particularly disliked about the product
The size of the bottle – there's just no reason it couldn't fit cages better.
How does the price compare to that of similar products in the market, including ones recently tested on road.cc?
Pretty good – it's the cheapest tubeless inflator on the market.
Did you enjoy using the product? Yes-ish.
Would you consider buying the product? Yes-ish.
Would you recommend the product to a friend? Yes, but with caveats.
Use this box to explain your overall score
The Booster could be very good, but the need to use different bottle cages and the limits of the small volume to seat tyres whilst retaining pressure mark it down.
About the tester
Age: 46
I usually ride: Merida Ride 5000 Disc My best bike is: Velocite Selene
I've been riding for: Over 20 years I ride: A few times a week I would class myself as: Expert
I regularly do the following types of riding: cyclo cross, club rides, general fitness riding, mtb, Dutch bike pootling.
Living in the Highlands, Mike is constantly finding innovative and usually cold/wet ways to accelerate the degradation of cycling kit. At his happiest in a warm workshop holding an anodised tool of high repute, Mike's been taking bikes apart and (mostly) putting them back together for forty years. With a day job in global IT (he's not completely sure what that means either) and having run a boutique cycle service business on the side for a decade, bikes are his escape into the practical and life-changing for his customers.
Latest Comments
- jaymack 32 min 5 sec ago
Touring never died rather both bicycle manufactures and the cycling media rather lost interest in it.
- Oldfatgit 59 min 19 sec ago
Qidi ... was it just me, or did the guys with the system come over as right cocksockets?...
- Rendel Harris 1 hour 30 min ago
Bit unfair on the chap in the headline photograph to use his image to illustrate an article on this issue, seeing as he is quite clearly safely at...
- Muddy Ford 1 hour 45 min ago
Police prioritising that which risks most harm to the public. Cyclists endangering pedestrians with minor injuries will get £50 fines from police...
- teckert 8 hours 2 min ago
You can see the effect of a 'way too late' opening of this comp, with my dismal results! Wrecked a good start to my season.
- IanMunro 9 hours 27 sec ago
It was off my list of helmets worth buying as soon as I saw someone had named it "Game Changer".
- mark1a 10 hours 28 min ago
Looks valid to me although on a black Mercedes C Class. Last V5 issued 25th April (2 days ago) so maybe plate was being transferred.
- Sam3 13 hours 52 min ago
Asked for comment, a representative of the biker community said: "We are realigning our expenditure better reflect our strategic priorities and...
- Sam3 13 hours 56 min ago
So highly overpriced items such as "premium bike clothing" and overpriced "premium" bikes that no one NEEDS....suffer a disproportionate...
Add new comment
2 comments
Big use case not mentioned is simply using in the home workshop. I have resisted buying a big and expensive compressor by using co2 canisters to seat my tyres. But using co2 canisters also adds up.
One of these would do the job of seating my tyres cheaply without taking up too much room.
About the only scenario in which this system seems to be useful would be a catastrophic failure of a tubeless tyre. I'm a big fan of tubeless (for larger tyres at lowish pressures) and have yet to experience that but if it were to happen it'd seriously affect my trust in tubeless riding. Tubeless is meant to avoid just this type of thing.
I also run 38 mm René Herse Barlow pass extralight tires and seating that bead takes a fully charged airshot + a removed valve core, else there's simply no way. Imagine having to give 300 pushes to charge the system, hoping it would work with the milkit -I'm doubtful, for that specific tyre- then starting all over again after screwing in a valve core (if you don't shell out for the special one-way valve). Oh yes, to make sure you'd better carery some extra sealant too. Then compare in price, time and effort with popping in a replacement tube and inflating normally.