

- News
- Reviews
- Bikes
- Accessories
- Accessories - misc
- Computer mounts
- Bags
- Bar ends
- Bike bags & cases
- Bottle cages
- Bottles
- Cameras
- Car racks
- Child seats
- Computers
- Glasses
- GPS units
- Helmets
- Lights - front
- Lights - rear
- Lights - sets
- Locks
- Mirrors
- Mudguards
- Racks
- Pumps & CO2 inflators
- Puncture kits
- Reflectives
- Smart watches
- Stands and racks
- Trailers
- Clothing
- Components
- Bar tape & grips
- Bottom brackets
- Brake & gear cables
- Brake & STI levers
- Brake pads & spares
- Brakes
- Cassettes & freewheels
- Chains
- Chainsets & chainrings
- Derailleurs - front
- Derailleurs - rear
- Forks
- Gear levers & shifters
- Groupsets
- Handlebars & extensions
- Headsets
- Hubs
- Inner tubes
- Pedals
- Quick releases & skewers
- Saddles
- Seatposts
- Stems
- Wheels
- Tyres
- Health, fitness and nutrition
- Tools and workshop
- Miscellaneous
- Buyers Guides
- Features
- Forum
- Recommends
- Podcast
feature


Clincher bike tyres: find out the easy way to fit them
Fitting and removing tyres is usually considered a dirty and troublesome job. While we can't promise to make it a clean experience, we think we can help you make it one that's easier to master than you think.
Tyres come in two broad designs, clincher and tubular. Most modern road bikes use clinchers - tyres which use a rounded 'bead' shape around the circumference of their inner edges. This bead interlocks with a similar profile on the inner edge of sidewall profile of the rim. Air pressure applied to the inside of the tyre carcass, either directly if tubeless, or from within a separate inner tube for clinchers, forces the tyre bead and rim bead together, effectively 'locking' your tyre into position.
Tubulars use a rim without hooked beads. The concave rim bed requires glue, or adhesive tape to hold tyre and rim together. Traditionally popular with road racers, tubulars are a totally different beast, and we'll cover fitting those elsewhere.
Getting clincher tyres on and off is (usually) relatively easy, depending on the make and model combination you've chosen. It’s worth remembering some tyre/rim combinations can create problems. Too loose or too tight can both be problematic.
Fitting is mostly technique and learning a few tricks. Here’s how we fit a new clincher tyre. Note this is a tyre lever free explanation. Learning to do it without tyre levers is a good skill that will save you, eventually.
Tools and materials:
Fitting a clincher
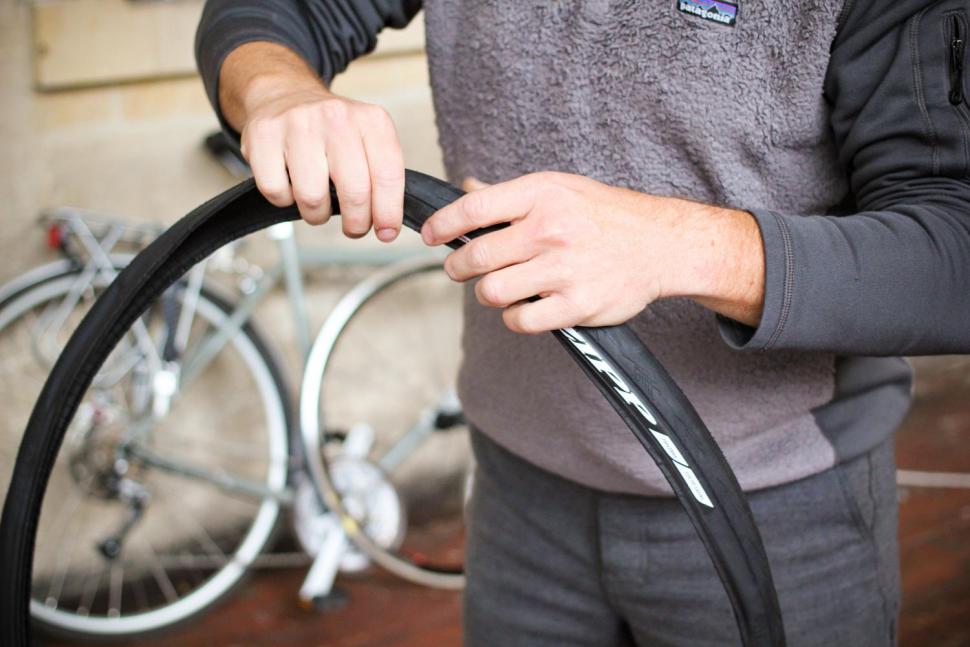
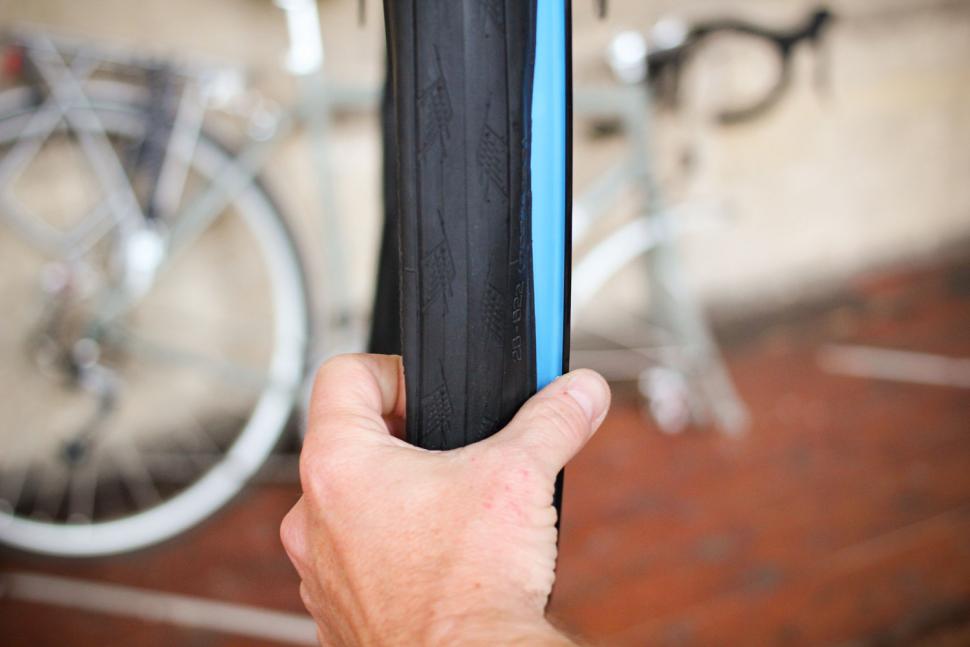
1. Unpack
Remove the new tyre from its packaging and unfold it. Creases in the tyre and any bends in the beads will hamper the fitting process. Use your hands to work out the creases where it has been folded. They can be stubborn, but with warmth and persistence they'll disappear.
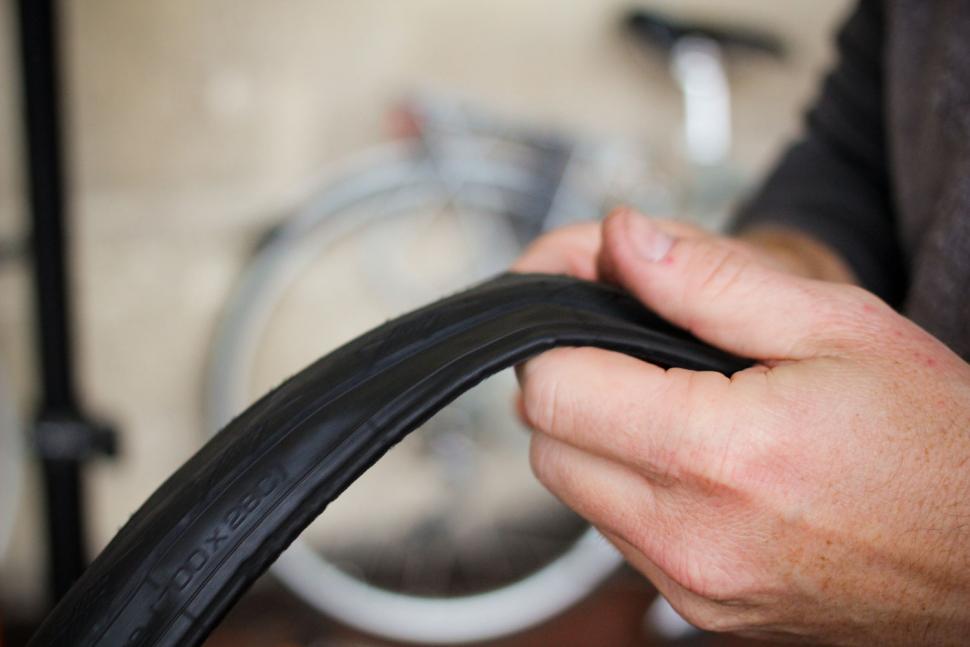
2. Shape the tyre
With the creases eased out, you can work around the tyre pinching the carcass edges together with your fingers. This process encourages the tyre carcass to take its intended tyre shape, instead of a flat band of rubber. Time spent doing this will help when you come to present the tyre to the rim, as it will be more likely to hold its shape, with beads correctly orientated and make their engagement with the rim easier.
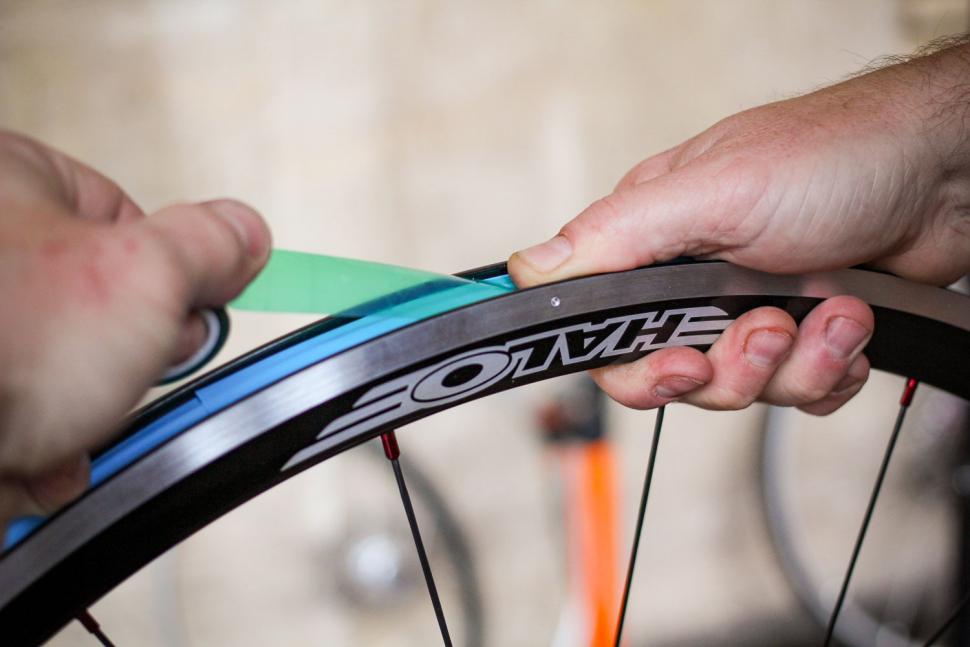
3. Fit rim tape
If you need to fit rim tape do so at this point, ensuring the valve hole lines up with that on the rim. It's a schoolboy error that we've all made. If using a pre-joined, non-adhesive rim tape loop (rather than a roll of adhesive rim tape), we begin at the valve, drop a screwdriver shaft through the two holes when lined up, to lock them together while we fit the remainder of the tape. It stops the tape hole from creeping away from the rim hole as the tape is stretched onto the rim bed.
4. Use more tape for tubeless if necessary
If fitting tubeless ready tyres, with the intention of using them tubeless, then you'll need to ensure you're using an airtight tubeless ready rim, or that your regular rim has been fitted with an airtight tubeless tape. In both cases, sometimes an extra layer of tape can help build up the rim bed depth. This pushes the tyre beads nearer the rim sidewall and makes tyre fit tighter, and encourages a faster creation of an airtight seal, between tyre and rim.
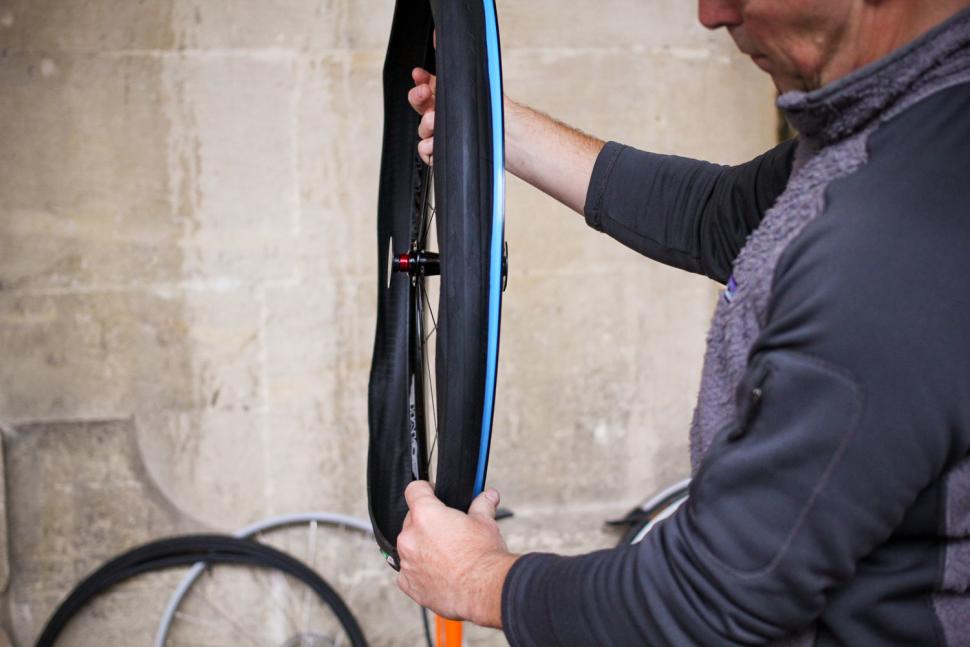
5. Present the uncreased and shaped tyre to the rim.
It looks counter intuitive, but you'll have opposite sides of each item next to each other, this is because you're effectively backing the tyre onto the rim. It can be a tricky few moments as the tyre won't always want to hold its shape as you present it. You'll have to experiment with how you hold it to figure out what works best in each case.
6. Fit the bead
Holding the wheel by the spokes underneath the uppermost section of the rim, allows the opposite edges of the tyre and rim to be presented together. Drop the edge of the bead nearest the rim into the rim bed. You should get a good few inches of the bead easily engaged, enough to stabilise the two items as you reposition your hands for the next bit.
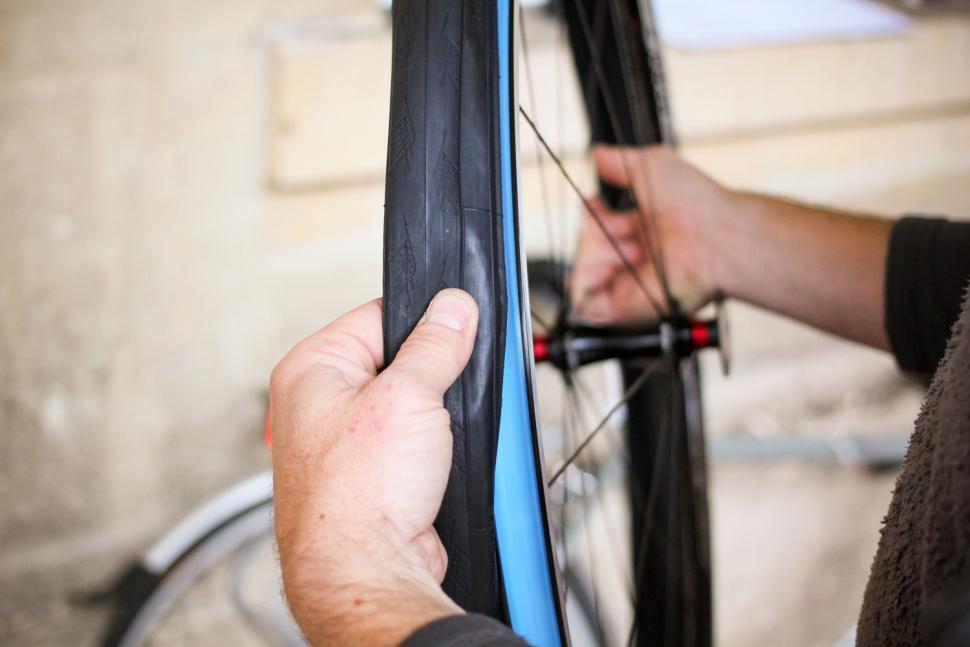
7. Work the bead into the rim
Use your free hand to work around the circumference of the rim, easing the tyre bead edge backwards, over the rim sidewall edge and into the rim bed. The more tyre you engage with the rim, the easier it gets to manage the wheel, as the two items slowly become integrated as a working unit. The last bit will be trickier
8. Fit the final segment
When you get to the last few inches of the first side, it will become harder to push the last inches of tyre bead backwards over the rim wall. Position the bead that is already in the rim bed into the centre of the rim, where it's deepest - to create some slack. With that done, use your thumbs to push the last bit of bead over. It can be very tight and seemingly impossible, but It WILL go.
9. Make room
Now the entire first side of tyre bead is in the rim bed, work around the circumference of the rim and centre the seated tyre bead into the centre of the rim bed. This will help create the most amount of space possible inside the tyre to fit the inner tube.
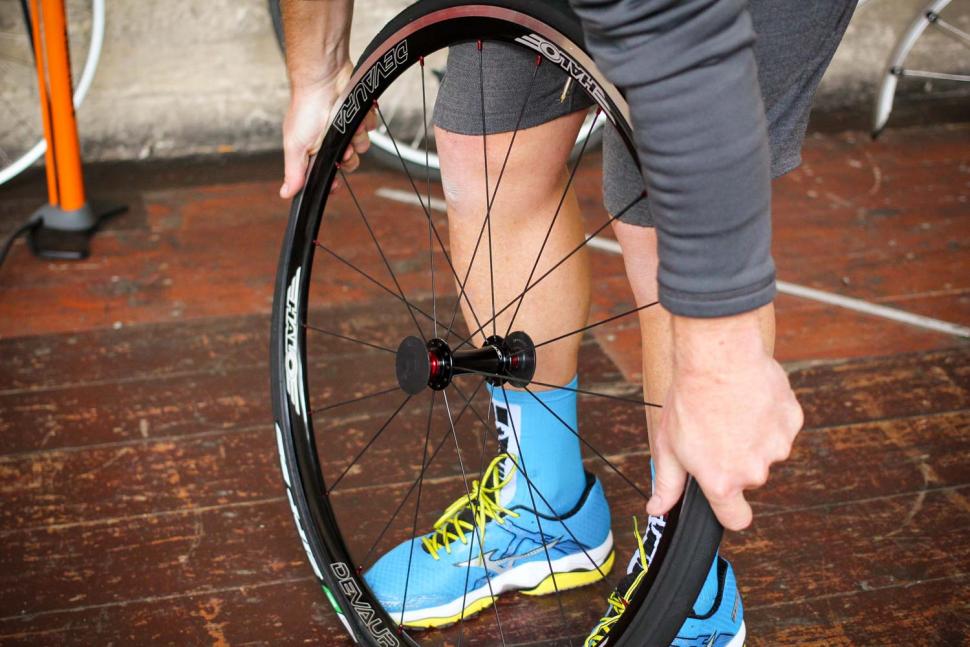
10. Start fitting the tube
Add a little air to your tube, just enough that it takes a circular shape, but not more, otherwise you won't get it inside the tyre and onto the rim. Stand the wheel up at your feet, with the valve hole positioned uppermost. Insert the valve into the rim's valve hole and gently begin tucking the tube inside the tyre carcass. Work around the tyre and seat the inner tube fully into the tyre. If you're fitting a tubeless valve stem, ensure the rubber foot creates a good seal against the rim bed and do the relevent lockring up appropriately tight to make the valve air tight.
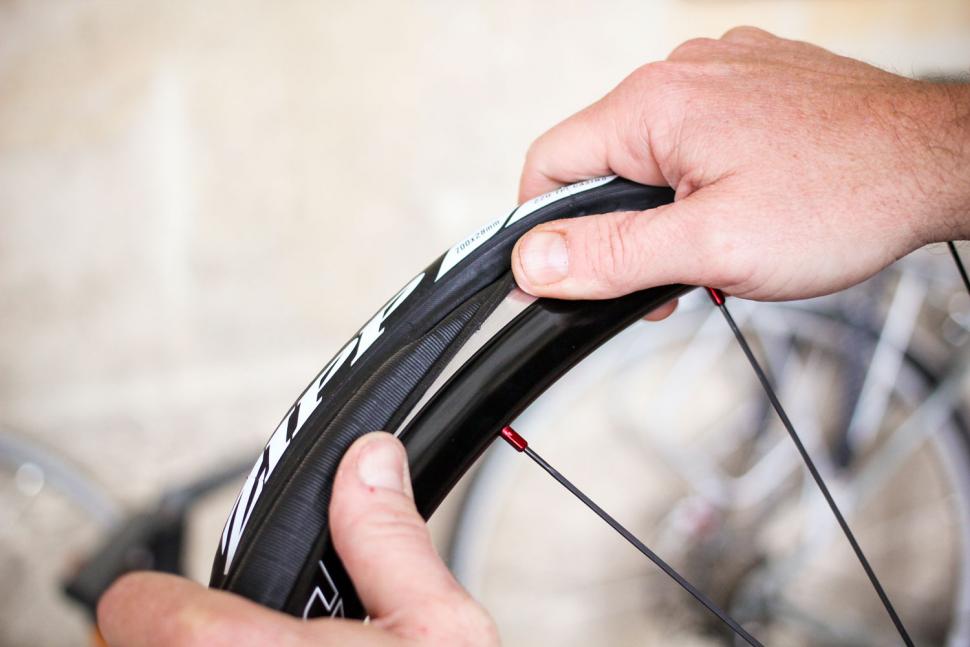
11. Start fitting the second bead
With the tube fully inserted inside the tyre and the wheel stood at your feet - again with the valve uppermost - you'll now need to fit the first section of the unfitted side of tyre bead. We always start with the section that is next to the valve. With the valve section of tyre fully in position, work your hands apart, away from each other, around the rim, seating the majority of the second side of tyre bead as you work around the edge in opposite directions.
12. Push the second bead into place
As with the first side of the bead, the trick is to keep pressure on the tyre with your hands as they move around the edge of the wheel. You're trying to move all the available slack in the tyre bead towards the far edge of the wheel rim, to help give you enough 'spare' bead to pop the final inch or two over the rim edge. It's a skill for sure, and takes a combination of timing and strength to work the bead into the exact position. The more tyres you change, the more intuitive it becomes.
13. Continue fitting the bead
Continue to work your hands around the tyre circumference until you’ve got both your hands at about the 'ten to two' position, then carefully, and without letting the slack you've painstakingly generated go, lift the wheel and place the top edge into your waist.
14. Pop the last bit of bead into place
Use the extra leverage from bracing the wheel with your waist, to ease the slack bead from each side together at the final section - remember we're talking millimetres here, not great flaps of rubber - you will end up with the last bit of tyre just loose enough to be eased over into position. Depending on your choice of tyre, rim and tape, it'll be tight, and you might have to go back to the valve end (where you started) and rework the pressure on the tyre bead to ensure you've got every last bit of slack to the far end. You'll be amazed how 'impossibly' tight tyres can and will fit.
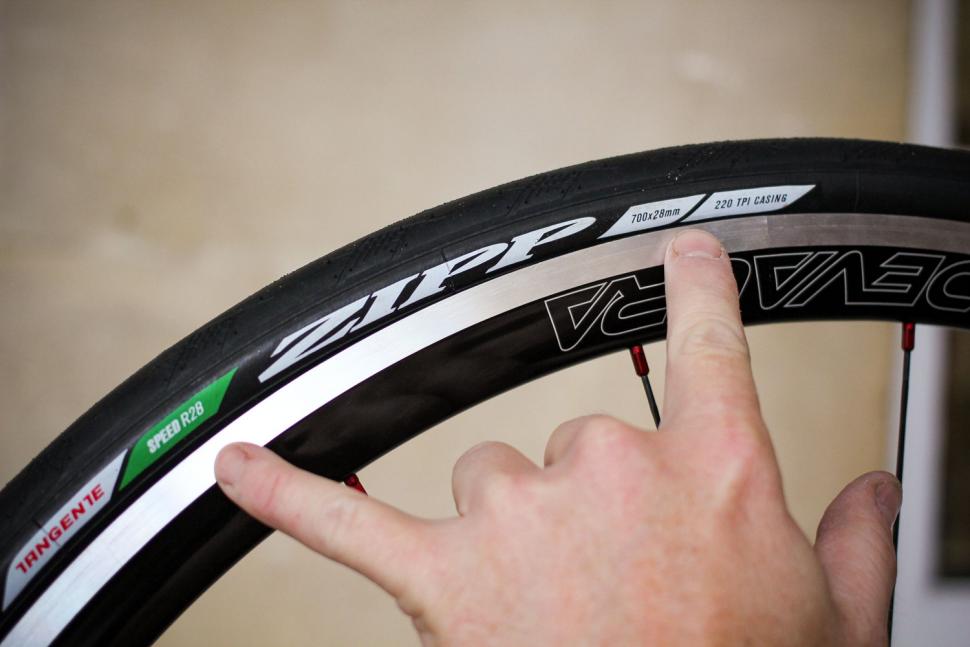
15. Check the seating
With the tyre and tube fully installed, work around the tyre inspecting the seat of the tyre bead. Pull on the shoulders of the carcass to ensure that you haven't trapped any of the inner tube under the bead. Doing so would cause a puncture if you then inflated the tube. It's another easy error to make especially if you're rushing to refit a tyre at the roadside. A few seconds spent checking is well worth it. If you spot a trapped section of inner tube, squeeze and lift the tyre carcass to try and ease it back under.
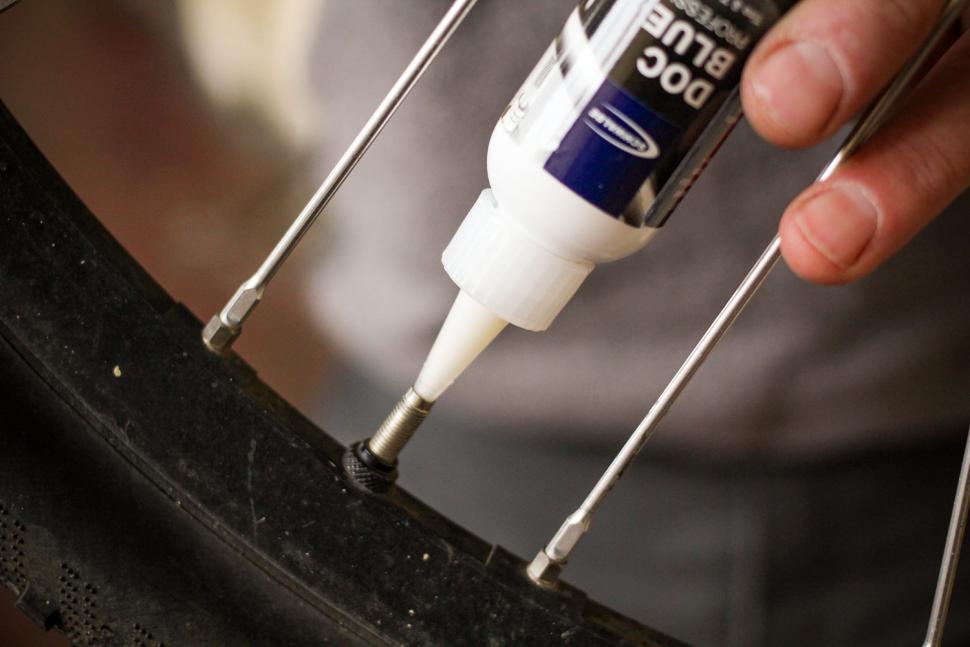
15. Add sealant
If you're going tubeless, you won't have had the worry of the tube fitting to this point. Remove the valve core and add the appropriate volume of sealant fluid though the valve stem. Replace the valve core, tighten it, and replace any lock ring.
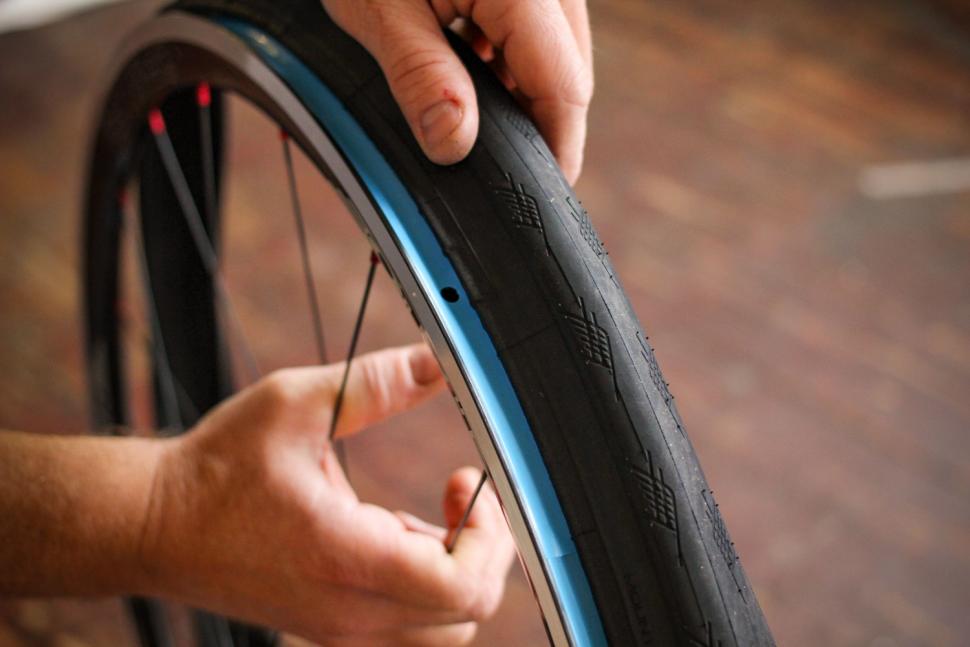
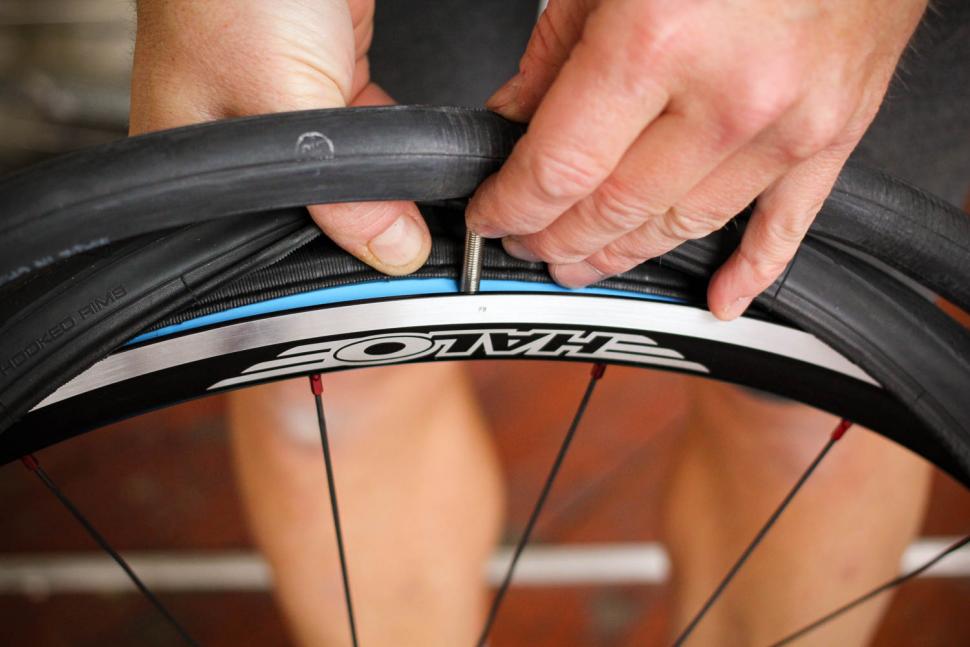
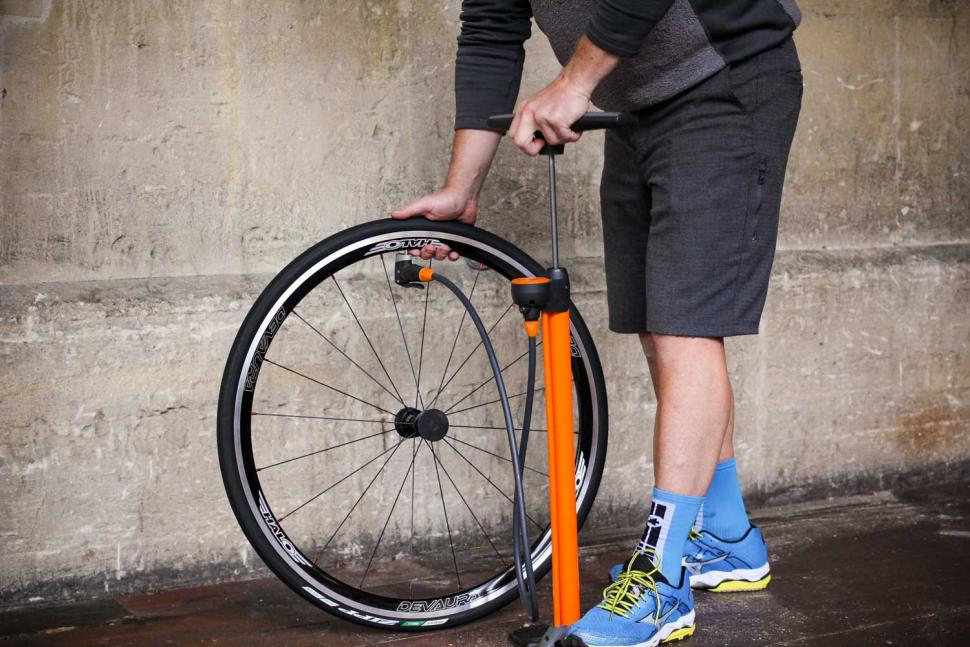
16. Inflate the tyre.
17. Final seating check
The beads of the tyre, esecially when the rubber is new and tacky, can sometimes be a little reluctant to 'pop out' and move into position to the meet the rim bead. Even at your regular tyre pressure, elements of the tyre bead may still be 'tucked'. You can see te difference between seated and tucked portions here. You may have to temporarily overinflate with air to make these bits seat. They will make a distinct 'PING' when they finally snap into position, especially so in the case of tubeless systems. When you've got the tyre beads correctly seated. Check the pressure and adjust to suit you taste and manufacturers recommendation.

Latest Comments
- Hirsute 1 sec ago
You have to add images via a reply to yourself after the topic is created. One at a time too.
- Hirsute 2 min 11 sec ago
“Plus, riders who pair CarBack to their smartphone using the Trek Accessory app can enjoy even more features, including the ability to see the...
- Hirsute 6 min 58 sec ago
Too late for the victim. Whether Ruth Green can take action I don't know.
- Tom_77 18 min 2 sec ago
Had a Kona Blast sometime around the turn of the century, that was a pretty decent mountain bike for not much money....
- OldRidgeback 19 min 26 sec ago
Right whingers moaning about 20mph limits, cyclists and 'woke' are numbskull snowflakes IMHO.
- chrisonabike 53 min 24 sec ago
David9694 - you were right! These new autonomous vehicles really are conspiring to run out of control!...
- HoarseMann 1 hour 24 min ago
Decathlon have the Garmin Varia RTL515 on offer at the moment for £129.99: https://www.decathlon.co.uk/p/rearview-radar-varia-rtl515-65-lumens/_/R-...
- Rendel Harris 2 hours 34 min ago
So when you said "all Jews" you didn't actually mean all Jews, just religious ones. However even that distinction is erroneous, as you must surely...
- Dnnnnnn 3 hours 28 min ago
Almost - but apparently not quite. There are in Northern Ireland.
Add new comment
26 comments
It sounds as if people are saying that the 'pop' I get when an innertube is present would not be achieved if it wasn't, without a very high pressure within the unseated tyre to seat it. This high pressure cannot be attained without a high airflow, because the air is simultaneously leaking past the non-seal. On reflection, I was pretty dim to have failed to work this out for myself! Another reason to avoid tubeless.
Just bent my rim trying to get a new tyre on.
It looked a little worn but I didn't think it was that bad.
That was probably a stroke of luck then. Better you bent the rim trying to change a tyre than having it fail while you're riding
Yeah, there is that ! I did break one in town years ago and the rim cracked completely, luckily I was only 5 mins from a bike shop.
Reminds me years ago when a fellow student had a handlebar bag. They were the old type where you had a bungie holding the metal holder on handlebar in place by clipping on to the fork.
He came back to his bike to find the fork being pulled up and out by the bungie <GULP>.
I will occasionally put a bit of extra air in my tyres on noticably worn rims, getting up to the max on the sides of the tyres, if it's going to go better at home without me on it. Then deflate to comfy levels for the ride.
My rear tends to crack so I notice some brake rub. When the front goes it tends to do it catastophically and half the rim will peel away, like an orange, then the tube will burst. Very exciting really.
Discs!!
I've always seated the tyre bead in the groove of centre of the rim. Silly me, that's what I thought it was for. But even so I've struggled with mostly tubeless tyres where I've assumed a tight tolerance fit is the price for creating a seal.
What would be helpful is to show how to fit tyres that are obviously too
small for the rims. I've had tyres(serveral bikes / builds) so tight to fit (yes, both were 700c) that I've had to use cable ties, detergent and aluminium tyre levers to fit them.
I sold the bikes!!
Genius! Never thought that moving the bead toward the centre of the rim would create a bit of extra slack, and useful comments on starting opposite the valve. I've often wondered why sometimes its easy, sometimes teeth nashingly frustrating.
Last time, I ended up heating the tyre with my wife's hairdryer!
Great article, a video would also be really helpful.
Interesting idea about starting from opposite the valve. I've always started at 90 degrees from the valve, so I neither have to start or finish at it, and so it's not opposite the bit I'm finishing on. I've been doing that since 1966, but happy to try a different technique!
Pedros milk levers have proved themselves to me for so many years.
Haven't had many problems since I had various problems putting tiny Conti GPs on my mountain bike 26 inch rims. Getting them seated right was next to impossible using my dads awful cheap footpump too.
Got better at them though. Wish I knew then some of what I know now.
As someone who has fitted bike tyres professionally for 40 years can I humbly suggest that when fitting the tyre, once the tube has been fitted, you start opposite the valve and finish at the valve. There is a good reason for this. The reason why people often struggle to get the last bit of the tyre over the rim is because the rest of the tyre isn't seated in the well of the rim. So when you get to the point when the last bit is tight go back to where you started and push the tyre into the well of the rim. This is where starting opposite the valve makes a difference as the in the case where you start at the valve this prevents the tyre getting fully into the well. It's only a matter of milimeters but it does make a difference, especially on tight tyre/rim combos.
Also it is not neccessary to use tyre levers to remove a tyre either. When out on club runs I generally take pity on club mates struggling to get tyres off with levers, sometimes breaking them. They look at me as if I'm off another planet when I take the tyre off without levers. It's not a matter of strength but of technique, again getting the tyre into the well of the rim. I use tubeless rims with Conti GP4000s tyre with tubes, which are supposed to be very hard to fit, but have no trouble at all. Of course I have the benefit of experience, but anyone can do it and would recommend practicing at home.
Interesting - I've always started from the valve. I'm going to try your technique next time. I refuse to believe that you can remove tyres with just your fingers - I use tyre levers, lots of effort and swearing.
Thought I'd give you a demonstration
https://photos.app.goo.gl/h6J4HitUtcTnMyzf8
Note that I make sure that the bead of the tyre is in the well of the rim. This is important for both fitting and removing tyres and the reason that the well is there in the first place. Tubeless rims like this one tend to have a shallow well to help get the tyre onto the lip of the rim when inflating making removal and fitting harder, but as you can see it's not difficult even with a tubeless rim. On a normal rim it's easier.
Very impressive, but I'm going to stick my fingers in my ears (eyes?) and go la-la-la not possible. Clearly photoshopped!
Thanks but I'm not trying to impress simply showing how easy it is to do if you use the correct technique.
[/quote]
Very impressive, but I'm going to stick my fingers in my ears (eyes?) and go la-la-la not possible. Clearly photoshopped!
[/quote]
Thanks but I'm not trying to impress simply showing how easy it is to do if you use the correct technique.
[/quote]I can do that too!
Additionally, the part of the tube most likely to be pinched between tyre and rim as at the last bit of the tyre to be pushed over the rim, and you can verify the tube isn't trapped by pushing the valve in and out a couple of times. Saving yourself the shae of having to replace the same tube twice while your clubmates are waiting.
Thanks for the advice. I'll try this next time.
As has been mentioned, warmth is important, you make it harder on yourself fitting tyres in a cold garage. I talkum powder my latex tubes, and put quite a bit onthe inside of the tyres too, this does go sort of everywhere, and so lubricates the bead of the tyre going onto the rim, the bead can be quite sharp and sticky especially on a new tyre. Since doing this I have not had to do the diluted washing up liquid trick to get a difficult bead seated.
I have yet to change a tyre on my newish tubeless set up, lbs set them up, but when I do, and I'm properly thinking about something much more mud appropiate, I'm intending to try and inflate the tyre on the rim without sealent, even using an inner tube to get the tyre to form the correct shape, before I will put any sealent in. And that's 3oz with each of my tyres. I'm hoping that this might reduce the chances of a latex solution explosion.
The little lockring serves two purposes:
Theyre really only necessary for people that don't completely understand what they're doing. Once the tube is inflated, they are entirely superfluous.
A couple of tips to help fitting new tyres, which can sometimes be a challenge to get the last bit of tyre over the rim:
What is the purpose of the little metal ring, on the valve stems of inner tubes (clincher tyres)? Have to admit I've always discarded them...
Where's the bit about matching up the valve hole with the manufacturer label on the tyre to make it look more professional and to make it quicker to find the valve?
I think they're to stop the inner tube from squirming/moving and pulling the valve away from the hole (ie. not vertical) which can lead to damage to the inner tube. You don't tend to get them with long valve tubes, so presumably the longer valves are held in place better by the deeper section rim.
What is the purpose of the little metal ring, on the valve stems of inner tubes (clincher tyres)? Have to admit I've always discarded them...
What?! Obviously much easier getting the pump on. I will continue using levers, which gets both sides off immediately without a lot of sliding round the tyre, pulling off the coating. I'm interested in people saying they need a track pump to make the seal. Admittedly, I haven't actually gone tubeless ever, but I have the appropriate tyres and rims and just my little Aldi pump allows a convincing pop as the beads slip onto the shoulders. Are people saying this pump wouldn't do the job and make a decent seal and hold in the gloop if I was really tubeless (which I'm not contemplating)?
I used a track pump on a Vittoria Corsa. I had to pump like crazy to get enough air in to get it to do the initial seat. Air was escaping around the edge, so a small pump would not have sufficed.
Once you have it seated, an ordinary pump will reinflate, do you can put the sealant in and pump it up.
It depends on how good the seal is initially. As the air in the tyre is leaking out before the beads seal, if it is leaking out faster then you can pump in then you will not get the seal. The gloop just binds any micro leaks once fully done. I find my ones only seal on using a blast of air from an Air shot.